Amazingly Soft Chicken Potato Curry Milk Buns (Tang Zhong Method)
Servings: 12 medium buns
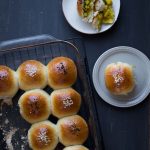
Soft and fluffy milk buns are filled with aromatic and savory chicken and potato curry filling and baked to perfection. You don't want to miss this!
Print Recipe
Ingredients
ROUX STARTER (TANG ZHONG):
- 15 gr bread flour
- 90 ml whole milk
DRY INGREDIENTS:
- 300 gr bread flour
- 5 gr instant yeast
- 5 gr milk powder
WET INGREDIENTS:
- 120 ml whole milk
- 1 large egg about 50 gr without the shell, lightly beaten
INGREDIENT TO ADD LAST TO THE DOUGH:
- 40 gr butter softened
- ½ tsp salt
- 2 Tbsp sugar
EGG WASH:
- 1 egg beaten
- 1 tsp water
TOPPINGS:
- Sesame seeds white and/or black are fine
CHICKEN POTATO CURRY FILLING:
- 1 Tbsp cooking oil
- 1 small onion peeled and diced
- 300 gr boneless skinless breast/thigh cut into small cubes
- 2 large potatoes peeled and cut into small cubes
- ¼ cup chicken broth
- 1 stalk green onion finely chopped
Spices:
- 2 Tbsp curry powder
- 1 tsp coriander powder
- 1 tsp cayenne pepper powder optional if you want it spicy
Herb:
- ¼ cup curry leaves
Seasonings:
- Salt to taste
- ¼ tsp sugar
For brushing:
- 1 Tbsp Butter melted
Instructions
PREPARE THE FILLING (Can be done the day before):
- Preheat a skillet or wok over medium to high heat. Add cooking oil. Add onion and stir fry for about 1 minute or until the onion is aromatic and soft. Add chicken cubes and stir fry until they turn opaque. Some liquid will ooze out too. Add the potatoes, spices, and herbs and stir to mix. Add chicken broth. Bring to a gentle simmer and then cover to cook until the chicken and potato cooks through and liquid is absorbed. Add seasonings to your taste. Sprinkle in the green onion and one last stir to mix everything
- Allow filling to cool down before wrapping
PREPARE TANG ZHONG:
- Place milk and the bread flour in a small saucepan. Whisk until there is no more lumps. Cook this mixture over medium heat until it is thickened, about 5 minutes or less. Remove from the heat and let it cool down completely
MAKE THE DOUGH:
- Mix all the dry ingredients together in a mixing bowl. Make a well in the center and pour in the wet ingredients and the tang zhong you made earlier. Use a dough hook attachment to knead the dough at speed 2 on KA, until all the crumbly dough starts to come together into one mass, it may take about 2-3 minutes for this to happen. Don't be tempted to add any liquid. You may need to stop halfway and scrap the dough off the hook and the sides of the bowl and knead again several times
- Once it comes into a dough, stop the machine. The dough will not be smooth, don't worry.Cover the dough and let it rest for 20 minutes. This is an important rest that bakers refer to as an autolyse (though in our case it's a short one. Read my post above for detail)
- After the rest, turn on and knead the dough again on speed 2 and knead for 1-2 minutes until it is a bit smoother. Then add the salt and sugar into the dough and continue to knead until the dough is relatively smooth. You need to stop and scrape the dough off the hook and the bowl several times during this process. I promise it's worth the effort!
- Once you have a smooth dough, turn the machine back on again and increase the speed to speed 4 and gradually add in the softened butter a bit by a bit. The dough will turn into a REAL sticky mess again because of the butter, just keep kneading and stop halfway and scrape the dough off the hook and bowl again and continue to knead until the butter is absorbed by the dough. IT WILL HAPPEN, don't worry! DO NOT be tempted to add any extra flour. You will get a shiny smooth dough that is very elastic. This may take about 10-15 minutes. The dough must pass a windowpane stage, meaning when you stretch a small portion of the dough slowly into a thin sheet, it won't break
1ST PROOFING:
- Place this dough in a lightly oiled large bowl, cover it with a clean and damp tea cloth or plastic wrap and let it rise at a warm place for about 1 hour. It may not double in size, but it will puff up some for sure.
SHAPING:
- Punch the dough down, divide into 12 balls. Cover these doughs loosely with a plastic wrap and let them rest for 15 minutes. Make sure you don't skip this part of resing the dough before shaping
- Flatten one dough and roll into about 4-5-inch circle. Place about 1-2 Tbsp of the filling in the middle. Gather the edge of the dough to enclose and pinch to seal the bun. Place the seam side down on a baking pan lined with parchment paper and repeat with the rest of the dough. Cover with a plastic wrap or a clean kitchen towel
2ND PROOFING:
- Let the buns proof again for another 40 minutes or until they puff up again to about 50% or more of their original size. Brush the top of the dough with egg wash. Sprinkle with sesame seeds if you choose to
BAKING:
- Preheat oven to 350 F (180 C). My oven is conventional, bottom heat only. If your oven uses top and bottom heat, you may want to lower the temperature by about 20 degrees. Place them in the oven (3rd rack from the top) and let them bake for the next 20-30 minutes depending on the oven, mine took 20 minutes. It will be golden brown on top. Remove from the oven, brush with some melted butter and let them cool down in the pan for about 5 minutes and then let them cool completely on a cooling rack. Enjoy and once it's cooled down completely, wrap it up with plastic wrap and it's good for about 3 days or so (it didn't last that long in our house)
STORING:
- Leftover buns can be kept at room temperature for max 2 days, after that they need to be refrigerated for up to one week
REHEATING:
- Wrap the buns in aluminum foil and reheat in oven or toaster oven or air fryer at 350F for about 10 minutes to warm up, or simply warm it in the microwave oven for about 1 minute or so