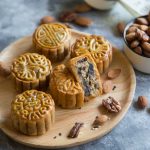
Mixed Nuts and Fruits Mooncake (Wu Ren Yue Bing) - No Golden Syrup
Servings: 9 50-gram mooncakes
Calories: 236kcal
Traditional Chinese baked mooncake filled with mixed nuts and dried fruits or sometimes also known as five nuts mooncakes. The mooncake recipe doesn't use golden syrup and with a great tasty result.
Print Recipe
Ingredients
Please weigh ingredients with kitchen scale
Dough:
- 100 gr cake flour plus more for dusting
- 60 gr honey
- 25 gr cooking oil
- 2 gr alkaline water
- ⅛ tsp salt
Mixed nuts and dried fruits filling (weights of the nuts are without the shells and nuts are unsalted):
- 30 gr walnuts
- 30 gr pistachio nuts
- 30 gr almond
- 30 gr pumpkin seeds
- 25 gr candied winter melon
- 25 gr dried cranberries
- 15 gr white sesame seeds
- 15 gr black sesame seeds
Paste for the filling:
- 20 gr honey
- 15 ml sesame oil or use regular cooking oil
- 5 gr sugar
- 30 gr glutinous rice flour
- 1 Tbsp water or more as needed
- ⅛ tsp salt
Egg wash:
- 1 egg yolk
- 1 Tbsp water
- Pinch of salt
Instructions
Prepare the dough:
- Mix honey, alkaline water, and oil until combined. Sift in flour and salt and mix until combined. Cover and rest the dough for at least 1 hour or up to 3 hours
Stir fry glutinous rice flour to make gao fen:
- Place 30 gr of glutinous rice flour on a dry non-stick pan over medium heat. Stir fry for about 15 minutes or until the flour started to smell slightly nutty/toasted. Let it cool down completely
Roast the nuts and seeds:
- Preheat oven at 350 F (180 C). Arrange the nuts and seeds on a large baking sheet and roast them for 15 minutes. Let them cool down completely
Finely chop nuts and dried fruits:
- Chop all the nuts and dried fruits into fine pieces
Put the nuts, seeds, dried fruit together, and paste together:
- Mix all ingredients for the paste in a large bowl. Add the chopped nuts, dried fruits, and seeds and mix together. If you press the mixture with your palm and it stays in cluster, you are good to go. If it falls apart, you may want to add a bit of water, teaspoon by teaspoon until the mixture can come into a cluster when you press it together without falling apart
- I'm using 4:6 dough to filling ratio. So, I will do 20 gram of dough to 30 grams of filling. Portion into 30 grams of mixed nuts balls. Cover and set aside
Fill and shape:
- Preheat oven to 350 F (180 C). Divide the dough into 20-gram dough ball. Keep them covered
- This is my favorite way of wrapping. I can get thin skin without much difficulty. Take one dough and divide it into two. Flatten them with your palm. Put the filling on top of one and then cover with another flattened dough (refer to the video for visual). Gently close the gap between the two doughs around the filling and roll into a round smooth ball. Continue with the rest of the dough and filling
- Dust the mooncake mould with a thin layer of cake flour and shake off any excess. I also dusted the mooncake dough with thin layer of flour and shake off any excess. Put the dough inside the cavity of the mould and then face it down on a flat surface and gently push down the piston down to imprint the pattern on the dough. Gently push the mooncake out and voila, you have just shaped the dough into a mooncake with imprint on top. Repeat with the rest and dusting with some flour on the mould and the dough each time. Place the shaped dough on a baking sheet lined with a parchment paper
Baking:
- Mist the top of the mooncake with some water from about 4-inch distance. You don't want to make the mooncake super wet, just mist it lightly to prevent it from cracking during baking
- Put the baking sheet, in the middle of the oven, 3rd rack from the top for my oven. Bake for 9 minutes. The mooncakes will still be pale at this point. Let them cool down for 15 minutes. Please don't skip this step no matter how tempted you are
- Beat the egg yolk with a small pinch of salt and water. Use a brush with soft bristles. This is very important as we don't want a thick layer of egg wash that will blur the imprint later after baking
- Very gently and thinly brush this egg wash on top of the mooncake (don't brush the side, only the surface of the mooncake). If you accidentally brush on too much egg wash, very gently blob it with a paper towel or use a brush to get the extra egg wash off
- Place the baking sheet back into the oven, the same position, and bake for another 5-8 minutes or until you have a nice golden brown. Check at 5 minutes to see. Keep in mind that the mooncakes will darken further after baking as you age them for few days
- Please note that if you use honey, the mooncakes will have lighter golden color compared to using golden syrup
Cooling:
- Remove from the oven and let them cool down on the baking sheet for 5 minutes. Don't attempt to move them to cooling rack yet as they are very soft and you will break them trying to lift them up when they are fresh out from the oven like this
- After 5 minutes, very gently transfer them to a cooling rack to let them cool down completely
Age the mooncakes (do not eat them on the same day you bake them):
- They won't taste good if you eat them on the same day. They are dry and not soft. The mooncakes need to be aged to release oil and the oil will moisten the mooncake
- I recommend aging it for 3 days for the best result. Transfer the completely cooled-down mooncakes into an air-tight container. Try not to stack them because they will soften as they age
How to store mooncakes:
- After 3 days, you can consume the mooncakes. This is the best time to consume. Keep the rest in the fridge for up to 2 weeks. Homemade version will not last as long as the commercial one because we do not put any other preservative and additives
- For longer storage, after aging them for 3 days, transfer to a freezer and they can be kept for up to 3 months. Simply thaw them at room temperature before serving
Video
Nutrition
Serving: 150-gram mooncake | Calories: 236kcal | Carbohydrates: 27g | Protein: 5g | Fat: 13g | Saturated Fat: 2g | Polyunsaturated Fat: 5g | Monounsaturated Fat: 6g | Trans Fat: 1g | Sodium: 67mg | Potassium: 134mg | Fiber: 2g | Sugar: 12g | Vitamin A: 16IU | Vitamin C: 1mg | Calcium: 54mg | Iron: 1mg