Mooncake Macaron (French Method, Oven Drying, No Resting)
Servings: 33 macaron sandwiches (2-inch shells)
Calories: 59kcal
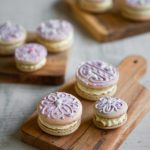
French macaron shells are decorated to mimic the traditional Chinese mooncake design and filled with mung bean paste cream. A fun way to usher in the Mid-autumn festival.
Print Recipe
Ingredients
Please weigh the ingredients (Precision is extremely important):
Macaron shells:
- 64 gr super fine almond flour
- 108 gr icing sugar
- 60 gr egg whites (room temperature)
- 46 gr sugar
- ¼ tsp Small pinch of cream of tartar
- Small pinch of salt
- Gel food coloring of your choice
Mung bean paste cream:
- 150 gr mung bean paste
- 50 gr heavy whipping cream
Royal icing:
- 30 gr liquid pasteurized egg white
- 60 gr icing sugar
- lemon juice as needed to adjust consistency
- Food coloring of your choice
Instructions
- Some people will age the egg whites in the fridge for 2-3 days before making macarons. I've tried aging and without and I don't see much difference. So, I'm sticking with not aging the egg white. I just bring the egg whites to room temperature, by putting it on the counter for an hour or so. This depends on how warm where you are, it may not even need to be that long. If you are short on time, I have put the bowl of egg white on top of a hot water bath to bring it to room temperature quickly
- If you want to be consistent with the size, use a bottle cap that is about 1.5 inch in diameter or print a macaron template out for 1.5-inch macaron
- Prepare a piping bag fitted with 1/4-inch nozzle. Put this piping bag inside a bowl or cup to support it so it's easier for you to pour the batter in later
- Please make sure your oven temperature is accurate. My oven is actually 20 degrees lower than what shows on the display. So I get an oven thermometer to make sure the temperature inside the oven is accurate and I finally get good macarons without overbaking or underbaking
- Don't use dark-colored baking sheet. My macarons cracked whenever I do this. It didn't work for me. I use high-quality anodized aluminum baking sheet
- Invert your baking sheet upside down. This will give you a baking sheet without the rim. This is another game-changer for me. The macarons baked evenly without the rim. Line the baking sheet with parchment paper. I don't have a silpat, so I use parchment paper. DO NOT use wax paper. Put the template you make underneath the parchment paper ready for you to pipe the batter later. If you use silpat that already has the macaron template, then you can skip this step
- Even though I get a super-fine almond flour, it is still necessary to make them finer and smoother. Put almond flour in a food processor and process for about 10-15 seconds until they are fine, but don't overdo it or the almond flour will turn into a paste because the fat will release from the almond
- I don't have a caster sugar (super-fine sugar), so I put granulated sugar in a food processor and pulse it a few times until it's fine, but don't turn it into powder
Prepare the filling:
- Make sure the whipping cream is cold. Use a mixer with a whisk attachment to whip the cream until medium stiff and then fold in the mung bean paste to incorporate. Keep it covered and chill in the fridge until ready to be used
Prepare macaron batter:
- Egg whites should be at room temperature
- Sift the almond flour with icing sugar into a mixing bowl and set aside
- Put the egg white in a mixing bowl or the bowl of the stand mixer fitted with a whisk attachment. Start whipping at speed 4 until it turns foamy with small fine bubbles. Add the small pinch of cream of tartar and whip for another minute. Increase the speed to 6 (don't crank up speed higher than this) and add 1/3 of the sugar and whip for another 1-2 minutes before adding the next. Stop halfway to check the consistency. Continue whipping until you reach a really stiff peak
Check for stiff peak:
- When you lift the whisk up, the meringue has short pointy tips and they shouldn't move at all. When you invert the bowl upside down, it won't drop or move. You will see the meringue ball up slightly inside the whisk. You want to stop beating at this point. Any further will be overwhipping already
Combine almond flour mixture with meringue:
- Sift in the almond flour mixture (yes, I know..again, lots of sifting here) into the meringue. Use a rubber spatula to do the cut several times and fold over motion as you rotate the bowl to mix the almond flour and meringue until they form thick batter
- Divide the batter into two and add gel food coloring to each one and start the macaronage process on each one
Macaronage:
- The purpose of macaronage is to get rid of the large air bubbles and to make the batter smooth and shiny to a flowy pipeable consistency.You want to do macaronage slowly. Do not rush this process. Start by using your spatula to press the batter against the wall of your bowl, spreading it like a flower as you rotate the bowl. This video is a good one to watch on how to do macaronage properly with a spatula.
- Then use your spatula to gather the dough back again and you may need to spread it one more time. How many time you want to press the batter against the wall really depends on the stiffness of your meringue. The stiffer it is, the longer you need to do macaronage and vice versa. So, you really need to observe the batter closely. If you use carton egg white, it’s very easy to overdoing the macaronage.
- After that you don’t want to do anymore spreading, start folding. Use your spatula to scoop down, make sure to touch the bottom of the bowl and fold over. Do that 2-3 times and then check the consistency at the same time. In this photo you can see that the batter is still too thick that it doesn’t even drop down. So mix it around for once or twice and check again
Check on macaronage consistency:
- Lift a good amount of the batter up with your spatula and it should flow down very slowly like thick lava, folding on itself like a staircase. Remember, it needs to flow down SLOWLY. I used to do the figure “8” to test, but I finally figure out that if I’ve reached that stage, it has overmixed for me. Took me one year to figure that out! (again, watch this video, she’s a pro!) Stop mixing. Keep in mind that we will transfer this batter into a piping bag and this will “thin” out the batter a bit more. So don’t overmix the batter
Pipe the batter:
- Scrape one batter down into a piping bag on one side and then the other batter on the other side, kinda side by side in the same piping bag. Push out as much air as possible
- Use your dominant hand to hold the top of the piping bag and the other hand to stabilize the bag near the piping tip. Make sure the piping bag is straight, perpendicular to the baking sheet. Don't pipe at an angle. Gently squeeze the batter out and it will slowly spread. Pipe until just about 1/8-inch before the line. The batter will spread to fill up the space later
- Once you are done with piping. Carefully retrieve and pull the template out from underneath the parchment paper. Dab small amounts of macaron batter to seal the 4 corner of the parchment paper so it stays in place
Pop out the air bubbles:
- Pick up the baking sheet and rap it against the counter top 5-6 times to pop any bubbles. Rap it HARD! Don't be gentle about it! You will see some bubbles come to the surface. Use a toothpick to gently pop those bubbles
Air-dry the macarons:
- Preheat the oven to 350 F (180 C) for a conventional oven. For a convection oven, preheat to 325 F (165 C). I put my oven thermometer in too. I like to preheat it for at least 30 minutes.
- Let the macaron shells dry. This can take from 15 minutes to 1 hour or longer, depending on humidity. I have a ceiling fan and I put the macaron tray and let them air dry. It helps to speed up the drying process. The ceiling fan is perfect because it's quite far from the macaron, so it's not blowing directly on the macaron. It took about 20-25 minutes for the shells to dry
- When you touch the edge, it should be dry. Also check the center. When you gently touch the center, it should be dry too. The shells would look dull and not shiny anymore. This means they are ready to be baked. If you bake them before a skin form, they will crack in the oven
Oven-dry the macarons:
- If humidity is really bad where you are and take your hours just to dry, you can try using your oven "bread proof" function, if there's one. The temperature usually about 90-95 F and if you turn the light on, it may be a bit warmer. Put the tray in there with the door slightly open and let them dry until they form a skin, can take about 15 minutes or longer. Don't go by the time, but observe
- Then take the tray out and preheat the oven to 350 F (180 C) for a conventional oven. For a convection oven, preheat to 325 F (165 C). I put my oven thermometer in too. I like to preheat it for at least 30 minutes.
Baking:
- Place the baking sheet on the 3rd rack from top. Lower the oven temperature to 325 F (165 C) for conventional, 300 F (150 C) for convection. Bake for 12-13 minutes. Don't open the oven door during this baking time.
- Once the timer is up, check on the macarons by touching the shell and see if they are still wiggly when you try to move them or soft on top. If they are, continue baking for 1 more minute and check again. I need 13 minutes for 1.5" inch shell. You want to bake until they no longer move when you touch them
Cool down:
- Remove from the oven and let them cool down on the baking sheet set on a cooling rack for at least 10-15 minutes
- After that you can gently peel the parchment away from the shell. Don't pull the shell from the paper as you may rip the base of the macarons. Some may feel still a tiny bit sticky, you can gently use an offset spatula to help you release or you can put them in the freezer for 10 minutes and they will peel right off. It shouldn't be super sticky, just need a little nudging and it should come off. If it's still very sticky, the shells are apparently, underbaked
- Pair the macaron shells up and get ready to decorate the shells with royal icing
Prepare royal icing:
- Beat the egg white with a fork until foamy. Add icing sugar and a drop or two of food coloring (depending on how intense you want) and few drops of lemon juice. The consistency should be thick but flowy and you can draw a line without breaking or too runny. If it's too thick, add a bit more lemon juice, if it's a bit too runny, add a bit more icing sugar. Try to draw it somewhere before you transfer to plastic bag or piping bag fitted with a fine tip.
Decorate the shells:
- You only need to decorate one shell for each pair with the royal icing. Let the royal icing sets before filling the shells
Fill the shells:
- Transfer the mung bean cream filling into a piping bag fitted with a round (Wilton 2A) or open star tip (Wilton 4B). Pair the shells together, try to find ones with similar size. Start piping the filling on one shell and then top with another shell
Age the macarons:
- Transfer the macaron sandwich into a container with a tight-fitting lid. They taste the best after you age them in the fridge for at least 24 hours
Nutrition
Serving: 1macaron sandwich | Calories: 59kcal | Carbohydrates: 10g | Protein: 1g | Fat: 2g | Saturated Fat: 1g | Polyunsaturated Fat: 1g | Monounsaturated Fat: 1g | Cholesterol: 2mg | Sodium: 6mg | Potassium: 5mg | Fiber: 1g | Sugar: 9g | Vitamin A: 30IU | Vitamin C: 1mg | Calcium: 8mg | Iron: 1mg