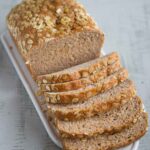
Tangzhong 100% Whole Wheat Bread/Wholemeal Toast
Servings: 12 slices (8 1/2 x 4 1/2 loaf)
Calories: 190kcal
Tangzhong is one of my favorite methods for extending the shelf life of bread and getting that soft and moist crumbs. Here is my take on applying tangzhong to 100% whole wheat milk bread that is made without any butter and refined sugar.
Print Recipe
Ingredients
Tangzhong roux:
- 30 gr whole wheat flour
- 120 gr whole milk
Main dough:
- 2 tsp instant yeast
- 2 Tbsp water
- 360 gr whole wheat flour
- 30 gr milk powder
- 8 gr salt
- 40 gr honey
- 100 gr whole milk or as needed
- 50 gr oil
Topping: (optional)
- ⅓ cup oats or more a needed
Instructions
Prepare tangzhong: (one day before)
- Place milk and the whole wheat flour in a small saucepan (I accidentally wrote "bread flour" in the video). Whisk until there are no more lumps. Cook this mixture over low-medium heat until it reaches 65 C (149 F). Remove from the heat and cover with a plastic wrap, touching the tangzhong so the skin won't form. You can use it once it has cooled down completely but if you have the time and patience, I highly suggest using this the next day instead of using it on the same day. Store this in the fridge
- If you use active dry yeast, dissolve the yeast in 2 Tbsp of water and let it bloom
Prepare the dough:
- Put the flour, milk powder, salt in a mixing bowl of a stand mixer. Roughly stir to combine. Add the milk, honey, tangzhong, oil, and the yeast. Turn the mixer fitted with a dough hook attachment, on to the lowest speed to let it mix until just combined and no dry bits of flour. Cover and let it rest for 20 minutes. This gives the whole wheat flour some chance to hydrate, making it easier to knead later
- After resting, turn the mixer back on and knead on speed 2 for about 6-8 minutes or until the dough is smooth and just slightly tacky, but not sticky. Due to different brands of flour, you may need to adjust by adding a bit more milk if you find the dough is a bit too dry. Add 1 teaspoon at a time if you need to. You won't reach the window pane stage, not with 100% whole wheat flour anyway
Bulk fermentation:
- Oil the bowl and let the dough ferment at a warm place until puffy. It may be close to double, not necessarily double the size. This may take somewhere from 1-2 hours depending on the temperature. Observe the dough, not the time
Shaping:
- Gently deflate the dough and give it a few knead and round it up into a ball. Cover and let it rest for 15 minutes before shaping
- Grease your loaf pan on all sides. Shape it into a log, about the same length as the length of your pan. Mist with some water on the top. Roll and gently press the surface on some oats. Kind of gently press them onto the dough
- Put this inside the prepared pan. Gently press the dough to fit the size of the pan. Cover and let the dough proof for the second time
Final proofing:
- Let the dough proof in the pan until it crowns about 1-inch above the rim of your loaf pan. This may take about 1 hour or longer. 10 minutes before the end of proofing time, preheat the oven to 350 F. Position the oven rack in the middle rack
Baking:
- Put the loaf pan on the middle rack and bake for the next 40 minutes. You may want to tent with a foil, shiny side up, after 20 minutes of baking if the loaf gets browned too quickly
Cooling:
- Remove from the oven and turn the bread out from the pan onto a cooling rack. Brush with some oil while it is warm if you want a softer crust. I also like to wrap the bread in a clean tea towel to preserve moisture for about 30 minutes. This really helps to keep the bread moist and tender. If you prefer a crispier crust, then just transfer it to a cooling rack to let it cool down completely before slicing or storing
Storage:
- The bread needs to be cooled down completely before storing. Once it has cooled down completely, wrap it well and keep in an air-tight container or zipper bag. They can be kept at room temperature for 3-4 days
- For longer storage, I suggest freezing them. You can slice the loaf. I like to wrap 4 slices in one batch and then put inside a freezer bag, push all the air out and seal the bag. It can be kept frozen for one month for the best result and quality
Video
Nutrition
Serving: 1slice | Calories: 190kcal | Carbohydrates: 29g | Protein: 6g | Fat: 6g | Saturated Fat: 1g | Polyunsaturated Fat: 2g | Monounsaturated Fat: 3g | Trans Fat: 1g | Cholesterol: 5mg | Sodium: 277mg | Potassium: 202mg | Fiber: 4g | Sugar: 5g | Vitamin A: 56IU | Vitamin C: 1mg | Calcium: 58mg | Iron: 1mg