Totoro Pizza Buns/ Chigiri Pan
Servings: 10 Totoro buns
Calories: 344kcal
Soft milk bread with savory pizza topping in a form of the popular Japanese Totoro. Not only they are delicious, but they also put a big smile on your face for sure! The recipe can be made with yeast or sourdough starter using a stiff starter
Print Recipe
Ingredients
If using commercial yeast:
- 300 gr bread flour
- 4 gr salt
- 6 gr instant yeast
- 20 gr sugar
- 180 gr whole milk
- 50 gr unsalted butter softened
If using sourdough starter:
Prepare stiff levain:
- 30 gr active starter 100% hydration
- 90 gr bread flour
- 40 gr water
For the dough:
- 210 gr bread flour
- 20 gr sugar
- 4 gr salt
- 165 gr whole milk
- 50 gr unsalted butter softened
Egg wash:
- 1 egg
- 1 tsp milk
Topping: (you can use whatever you want)
- Pizza sauce
- Ham/ pepperoni
- Onion slices
- Mozarella cheese
For decoration:
- Mayonnaise
- green onions
Instructions
For the dough using a commercial yeast:
- Place all ingredients, except for the butter, in a mixing bowl of a stand mixer fitted with a dough hook attachment. Use the hook to stir everything around a bit so when you turn the machine on, the flour won't fly around and wet ingredients won't splash (it happened to me before!). Start with the lowest speed to mix things up and then increase to speed 2 and knead for about 5 minutes or until it forms a dough. If the dough too dry to come together, you can add a bit of milk one teaspoon at a time. Don't add too much as we haven't added butter yet
- Then add softened butter, in 3-4 batches. The dough will turn into a complete mess again because of the butter, but don't worry, it will get absorbed by the dough as it knead. Knead at speed 4 for about 10 minutes or until dough is smooth and elastic. If you slowly stretch a small amount of dough, it will not break and light can pass through, like a window pane. Proceed to first proofing
If using sourdough starter:
No Sour Sourdough Bread
- This recipe will give you sourdough bread that doesn't taste sour. Why? Because we use a Sweet Stiff Levain, which is built from regular 100% hydration sourdough starter. I don't maintain stiff starter. I build it whenever I need it. I love baking enriched bread/buns and steamed buns using sweet stiff starter.
- I recommend using a starter that is at least two month old and consistently doubles or triples in 4-6 hours when you feed it at 1:1:1 ratio. Young starter will not give the best result
- About 8-10 hours before you plan to make the bread, combine all ingredients for the stiff starter in a bowl. Stir a bit to roughly combine and then use your clean hand to knead it. This is a stiff starter, it's like a dough. Make sure no pockets of dry flour is visible. Transfer to a large see-through container (plastic or glass is fine, preferably wide-mouth so you can get it out easier later). Loosely cover with the lid and let it ferment until triple in size
- Place all ingredients (except for butter), including all of the stiff starter, in a mixing bowl of a stand mixer fitted with a dough hook attachment. Use the hook to stir everything around a bit so when you turn the machine on, the flour won't fly around and wet ingredients won't splash (it happened to me before!). Start with the lowest speed to mix things up and then increase to speed 2 and knead for about 5 minutes or until it forms a dough. If the dough is too dry to come together, you can add a bit of milk one teaspoon at a time. Don't add too much as we haven't added butter yet
- Then add softened butter, in 3-4 batches. The dough will turn into a complete mess again because of the butter, but don't worry, it will get absorbed by the dough as it kneads. Knead at speed 4 for about 10 minutes or until the dough is smooth and elastic. If you slowly stretch a small amount of dough, it will not break and light can pass through, like a window pane. Proceed to first proofing
First proofing:
- Transfer to a lightly oiled bowl, cover, and proof at a warm place until double in size. If you use commercial yeast, this may take about 1-2 hours. If you use a sourdough starter, this may take about 2-3 hours at 78-80 F (26-28 C), depending on the strength of your starter and temperature. When you poke the dough with your lightly-floured finger, the indentation stays and the dough has clearly almost doubled or doubled in size
Shaping:
- Punch the dough down and give it a knead a few times to release air bubbles. Divide into 12 equal sizes smaller doughs. Round up each dough to roughly form a ball. Cover and let them rest for 15 minutes
- Then work with one dough at a time, pinch off a small dough from for the ears. I made the ears a bit too small. Roll the ears a bit longer. Flatten the bigger dough with your palm. Roll the dough out into an oval shape, not too thin. Transfer to a baking sheet. Use the back of a small round cup or bowl, about 2 inches in diameter to press down on the dough. Attach the ears on the top of the dough
- Repeat with the rest of the dough. Arrange the buns about 2 inches apart
Second proofing:
- Cover with a damp cloth to let the dough proof again at a warm place for the second time until puffy and about 50% bigger than the original size
- If you use commercial yeast, this may take 45 minutes to 1 hour or longer depending on the temperature. If you use a sourdough starter, this may take about 3 1/2- 4 hours or longer, depending on the temperature and the strength of your starter. Final proofing usually takes much longer for sourdough. Mature starter works faster compared to young starter for example
- When you gently push on the dough, the indentation bounces back very gradually and may leave a bit of indentation. The dough also feels really light and puffy. These are signs that we are done with final proofing
- Use the back of the round cup/bowl to press down on the belly again to create indentation if it gets really puffy and the shape is almost gone after proofing
- 10 minutes before the end of final proofing, preheat oven to 375 F (190 C) for a conventional oven. If you have a convection oven, lower the temperature by 20 F ot 15 C
Add topping:
- Brush the dough with egg wash, except on the belly area. Smear some pizza sauce on the belly, fill with toppings
Baking:
- Place the baking sheet on the middle rack and bake for 15 minutes or until golden brown. Rotate the pan halfway through baking
Cooling and decorating:
- Let the bun cool down to warm before you decorate
- Transfer some mayonnaise to a zipper bag or small piping bag fitted with small-tip nozzle. If you use a zipper bag, just use a scissor to snip off the point to make a small hole
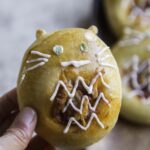
- Use mayonnaise to decorate the eyes, the whiskers, the mouth, and the triangles on the body. Use a small piece of green onion for the eyeballs
Storage:
- I suggest only decorating when you are ready to serve the buns. Wrap them in a plastic wrap and keep in in an air-tight container in the fridge for 2-3 days. The longer you store them in the fridge, the drier the buns get.
- Simply reheat in the toaster oven or oven at 350 F for 5-8 minutes or until warm. Then decorate with mayonnaise right before serving
Nutrition
Serving: 1bun without topping | Calories: 344kcal | Carbohydrates: 52g | Protein: 10g | Fat: 11g | Saturated Fat: 6g | Polyunsaturated Fat: 1g | Monounsaturated Fat: 3g | Trans Fat: 1g | Cholesterol: 42mg | Sodium: 364mg | Potassium: 130mg | Fiber: 2g | Sugar: 6g | Vitamin A: 332IU | Vitamin C: 1mg | Calcium: 58mg | Iron: 1mg