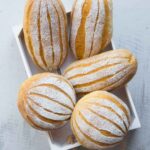
Japanese Milk Hearth Bread/Mirukuhasu (Pumpkin Version)
Servings: 10 servings
Calories: 211kcal
The Japanese version has a rustic look from the outside (like a hearth bread), but the dough is enriched with heavy cream and sugar. It yields a loaf that is crusty on the outisde but with soft and milky crumbs
Print Recipe
Ingredients
- 350 g bread flour (12.7% protein content) plus more for sprinkling
- 5 g instant yeast
- 30 g sugar
- 5 g salt
- 120 g pumpkin puree
- 150 g heavy cream
- 50 g water or more as needed
- 18 g oil
Instructions
Prepare the dough:
- Place all ingredients in a mixing bowl of a stand mixer fitted with a dough hook attachment. Use the hook to stir everything around a bit so when you turn the machine on, the flour won't fly around and wet ingredients won't splash. Start with the lowest speed to mix things up and then increase to speed 2 and knead for about 5 minutes or until it forms a dough. If the dough is too dry to come together, you can add a bit of water one teaspoon at a time
- Knead at speed 4 for about 7 minutes or until dough is smooth and elastic. If you slowly stretch a small amount of dough, it will not break and light can pass through, like a window pane. Proceed to first proofing
First proofing:
- Transfer to a lightly oiled bowl, cover, and proof at a warm place until double in size. If you use commercial yeast, this may take about 1-2 hours. When you poke the dough with your lightly-floured finger, the indentation stays and the dough has clearly almost doubled or doubled in size
Shaping:
- Punch the dough down and give it a knead for a few times. Divide into 4-5 equal -size smaller dough. You can do just one big loaf too. Round up each dough to roughly form a ball. Cover and let them rest for 5 minutes
- Work with one dough at a time. I shape some into round shape and some into oval shape. For the oval shape, roll the dough out into an oval shape, about 8-inch long and then roll on the long side to form an oval, pinch the seam to seal. For the round shape, flatten the dough slightly and then pull the edge towards the center to form a tight round dough ball
- Put them on a baking pan, lined with parchment paper, about 2 inches apart
Final proofing:
- Cover the shaped buns with a clean cloth or plastic cover and let them proof again at a warm place until they are puffy and almost double in size. This may take 45 minutes to 1 hour or longer depending on the temperature.
- When you gently push on the dough, the indentation bounces back very gradually and may leave a bit of indentation.
- 10 minutes before the end of final proofing, preheat oven to 400 F (200 C).
- Sprinkle some bread flour evenly on the surface of the bread. Use a bread lame or a very sharp knife to score the bread in the middle and then two more scores on each sides. These scores are for decorative purposes only. You don't have to score too deep
Baking:
- Place the baking sheet in the middle rack. Lower the temperature to 375 F (190 C). Bake for 20-25 minutes or until golden brown. If you bake one big loaf, you may need 40-45 minutes. Rotate the pan halfway through baking. A digital thermometer inserted into a bread should be at least 190 F (88 C)
Cool down:
- Remove from the oven and let the bread cool on a cooling rack completely
Nutrition
Serving: 12servings | Calories: 211kcal | Carbohydrates: 30g | Protein: 5g | Fat: 8g | Saturated Fat: 4g | Polyunsaturated Fat: 1g | Monounsaturated Fat: 3g | Trans Fat: 0.01g | Cholesterol: 17mg | Sodium: 200mg | Potassium: 79mg | Fiber: 1g | Sugar: 4g | Vitamin A: 2089IU | Vitamin C: 1mg | Calcium: 19mg | Iron: 1mg