Lotus Leaf Steamed Buns (He Ye Bao) / Gua Bao Buns - 3 ways
Servings: 12 medium buns
Calories: 137kcal
Learn how to make soft and fluffy lotus leaf buns (he ye bao) which is also known as gua bao buns (momofuku bao buns). I'm showing how to make them in three different styles.
Print Recipe
Ingredients
Option 1:
- 300 gr all-purpose flour About 2 cups + 2 1/2 Tbsp (spoon and level), plus more for dusting
- 60 gr Wheat starch about 1/2 cup (spoon and level), or use cornstarch or potato starch (not potato flour)
Option 2:
- 180 gr all-purpose flour about 1 cup + 5 Tbsp (spoon and level), plus more for dusting
- 180 gr cake flour about 1 cup + 5 1/2 Tbsp (spoon and level)
For both options:
- 30 gr sugar 2 Tbsp, you can cut down on the sugar or add more to your taste
- 4 gr instant yeast About 1 1/4 tsp
- ¼ tsp salt
- 1 Tbsp cooking oil plus more for brushing
- 180 ml milk to start with ( most likely you will need to add more) (about 6 Tbsp) of milk or water (make sure it's cold or room temperature, NOT warm)
Instructions
Making the dough with a machine:
- Place the flour combination (either option 1 or 2), instant yeast, salt, sugar in a mixing bowl. Add the oil and gradually add the milk. Start on the lowest speed and knead until you get a rough dough, adding water as needed. Continue to knead for 10-12 minutes on speed 2 until the dough is smooth. There's no need to reach a windowpane stage
Making the dough by hands:
- Place the flour combination (either option 1 or 2), instant yeast, sugar in a mixing bowl. Mix until you get a rough dough (it's not going to be smooth yet). Cover and rest it for 15 minutes. Then go back and knead it. You'll be surprised by how easier it is to knead it now. Knead until the dough is smooth and pliable, about 15-20 minutes. At any point during kneading, you can always stop and rest the dough if you find it hard to knead. This is to relax the gluten. Then go back to knead again and you'll be surprised by the difference it makes by just resting the dough before kneading again. It's easier for you too
Resting the dough:
- Cover and rest the dough for 15 minutes. This is not to proof the dough. It shouldn't double in size. This is to relax the gluten for easier shaping and rolling the dough
- Divide the dough into 12 equal portions
- Keep the dough balls covered to prevent drying out. Work with one dough at a time. Pull and tuck the dough from top to bottom so the seams are at the bottom and the surface is relatively smooth
Shape 1 (fold-over with no design):
- Flatten the dough ball with your palm and use a small roller to roll it out into an oval shape, brush with some oil and then fold the buns over to form a half circle. Put on top of parchment paper square. Put on a baking tray and keep them covered with a lightly damp cloth while you work on the rest
Shape 2 (fold-over with lines design):
- Flatten the dough ball with your palm and use a small roller to roll it out into an oval shape, brush with some oil and then fold the buns over to form a half circle. Put on top of parchment paper square. Use a bench scraper and make several line indentations on the surface (refer to photo). Put on a baking tray and keep them covered with a lightly damp cloth while you work on the rest
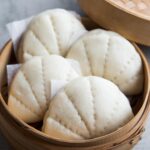
Shape 3 (fold-over with lotus leaf design):
- Flatten the dough ball with your palm and use a small roller to roll it out into an oval shape, brush with some oil and then fold the buns over to form a half circle. Put on top of parchment paper square. Use a bench scraper and make several line indentations on the surface (refer to photo) and then use the tines of a fork to gently poke the buns following the line indentations you make earlier. Use a chopstick to gently push the edge of the dough inside to create a curve along the edge of the dough. Gently pinch the straight side of the bun to create the "stem" . Put on a baking tray and keep them covered with a lightly damp cloth while you work on the rest
Proofing:
- Let the dough rise at room temperature or at a warm place. If it's winter where you are, you can use your oven "bread proof" function to let them proof in there, or simply turn on your oven to the lowest temperature and then turn off and after 15 minutes, place the shaped buns in there to let them proof. They won't necessarily double in size, but at least puff up to about 50% of the original size. This may take about 30 mins to 1 hour at a warm temperature. When you gently push on the dough, it should gradually bounce back. The dough should also feel light and airy. They are done proofing if you have these two signs
Steaming:
- Wrap the lid of your steamer with a kitchen towel to prevent moisture dripping back on the steamed buns as this will create "burn" spots . If you use a bamboo basket, you don't have to do this. The bamboo can "absorb" moisture. Put water inside your steamer. Don't turn on the heat yet. Arrange the proofed buns in the steamer, give them about 1-inch space for expansion during steaming. Turn the heat on to medium, when the water comes to a simmer, start the time and open the lid about 1/4-1/2 inch to allow some steam to escape. Your steamed buns won't wrinkle when you steam this way. Steam for 10 minutes over medium heat
- After 10 minutes, turn off the heat. DO NOT OPEN THE LID of the steamer. Let the buns sit there for 1 minute like this. The buns will not sink or wrinkle due to the sudden change in temperature
- Then transfer to a cooling rack immediately to prevent the bottom of the buns from getting soggy due to condensation trapped at the bottom
- Refill steaming water if needed and let it comes back to a simmer over medium heat and continue steaming leaving 1/4-1/2 inch gap to allow steam to escape
Storing:
- If you make extra and plan to store them, place them on a baking sheet, not touching each other, and then put the entire tray inside the freezer for about 1 hour. They will harden, but not completely frozen yet. Transfer to a freezer bag and they will not stick to each other anymore. Try not to keep for more than 1 month
Serving suggestion:
- Make this gua bao / kong bak bao or use them to sandwich other things you like
Video
Nutrition
Serving: 1medium size bun | Calories: 137kcal | Carbohydrates: 26g | Protein: 4g | Fat: 2g | Saturated Fat: 1g | Polyunsaturated Fat: 1g | Monounsaturated Fat: 1g | Trans Fat: 1g | Sodium: 60mg | Potassium: 101mg | Fiber: 1g | Sugar: 3g | Vitamin A: 59IU | Vitamin C: 1mg | Calcium: 28mg | Iron: 1mg