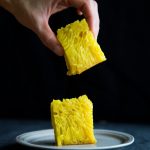
Bika Ambon Panggang (with honeycomb texture)
Servings: 12 servings (depending on size)
Calories: 209kcal
Learn how to make squishy and rich Bika Ambon or Kuih Bingka with this easy, no fuss recipe that gives you amazing honeycomb texture.
Print Recipe
Ingredients
For 6 or 7 inch square cake:
Starter (biang):
- 4 g instant yeast
- 15 g all-purpose flour
- 15 g sugar
- 30 g warm water
Coconut milk mixture:
- 300 g coconut milk
- 150 g sugar
- ½ tsp turmeric powder
- 10 kaffir lime leaves cut into strips
- 2 stalks lemongrass bruise to release flavor
Cake batter:
- 150 g tapioca starch
- 75 g all-purpose flour
- 150 g eggs weight of 3 large eggs without the shells
To add last:
- 30 g melted butter
- ½ tsp salt
Instructions
Prepare starter:
- Place all ingredients for the starter in a bowl. Stir to mix. Cover and let it rests for 15 minutes. The starter will double in size and foamy. If it doesn't, your yeast is no longer good. Do not proceed with the recipe until you get a new yeast
Prepare the coconut milk mixture:
- I use canned coconut milk. Shake the can before opening because the water separates from the milk. Place the coconut milk, salt, sugar, turmeric powder, kaffir lime leaves, lemongrass in a sauce pan. Cook on low heat until sugar melts and the mixture is warm but do not let the coconut milk to boil. Remove from the heat and discard the leaves after that and make sure the mixture is warm and not hot (we don't want to kill the yeast later)
- If you have a thermometer, check to make sure it is between 105-115 F (40-46 C). This is a lukewarm temperature for the yeast. If you don't have a thermometer just dip your clean finger in there and it should be comfortably warm
Prepare the batter:
- Mix tapioca starch with salt, crack in eggs and whisk to combine. Add the coconut milk mixture and stir until combine. Stir in the starter and whisk to combine. Strain this mixture to get rid of lumps
Let the batter ferment:
- Cover with a plastic wrap and let it sit at a warm place (about 30-32 C/86-90 F degrees) for 3 hours. Since it is winter here when I made this, I use my oven "breadproof" function and let the batter sit in there. It helps to speed up the fermentation
- The batter will have lots of bubbles and foamy because of the yeast activity. It should also has a pleasant aroma from the yeast fermentation.
- Give the batter a really good stir as the tapioca flour tends to settle at the bottom. Stir in all the bubbles gently. Make sure everything is mixed in. Stir in the melted butter and salt and make sure it's thoroughly combined
To bake in the oven:
Preheat empty pan in the oven:
- 30 minutes before the end of fermentation, preheat your oven to 330 F (160 C), bottom heat only, which is what most conventional oven is. If you use a convection oven make sure it's only bottom heat. Put your empty baking pan on the lowest rack and preheat it together with the oven. Make sure the pan is preheated for at least 30 minutes. The pan needs to be hot when the batter hits the pan. You can test the pan by sprinkling some water on it. If you hear a sizzling sound, the pan is hot enough. If not, preheat the pan another 5-10 minutes.
- When the oven is done preheating, quickly brush the bottom of the pan with some oil to prevent sticking. Pour the batter into the preheated pan quickly while the pan is still hot. You should hear a "sizzling" sound.
- Bake for 45-50 minutes on the lowest rack with the oven door slightly cracked open. I used a wooden spatula to keep it slightly opened.
- You will see lots of bubbles start to rise 10 minutes into baking. This is a good sign. Let it continue to bake until all the bubbles has "broken" and the surface of the cake is dry to the touch and springs back. If you insert a toothpick it should come out clean with a bit of sticky crumbs is okay, as long as it's not wet. If it's not, continue to bake for another 5 minutes and check again. Remove from the oven for now
- Increase oven temperature to 400 F (200 C). Put the pan on the middle rack and continue baking with the oven door closed for another 5-10 minutes or until the top is lightly golden brown
To bake on the stove:
Preheat the pan on top of a cast-iron pan:
- You need a cast iron pan because it is thick and distributes heat evenly. Place your baking pan on top of the cast iron pan and preheat over medium heat. If you have an infrared thermometer the pan should be around 300-320 F (150-160 C). I highly recommend you to get one. I use infrared thermometer a lot because I bake lots of artisan bread and I check surface temperature of my baking pan/pot, oil, etc quite often. It's an inexpensive investment I think
- Make sure the baking pan sizzles if you splash some water on it
- When the pan is hot enough, brush with some oil on the bottom. Pour the batter into the pan and it should sizzle. Maintain heat between medium and low at this point. 10 minutes into baking, you will see lots of bubbles on the surface. This is a good sign. If you don't see much bubbles, you need to increase the heat a bit.
- Continue to bake for the next 30 minutes or until the surface of the cake is dry to the touch and the cake bounce back when you gently press on it, and all bubbles have broken through and you see lots of poke holes on the surface (that's your honeycomb pattern extending all the way up)
- Cover the pan with aluminum foil and lower the heat a bit and let it continue cooking for the next 10 minutes. Check with a toothpick to see if it comes out clean with a bit of sticky crumbs is okay. If it's wet, bake for another 5 minutes and check again
- Optional step (to brown the surface): The surface won't be golden brown because there's no top heat. You can put it in the oven and broil it with top heat on high until golden brown, about 2-3 minutes. DO NOT walk away as it gets burn quickly when you use a broiler
How to check if the cake is done: (for both methods)
- The cake should be no longer wet on top and springs back when you touch it. Use a toothpick and insert into the middle of the cake and it should come out clean with a bit of sticky crumb is fine, but it shouldn't be wet. If it's still wet after the instructed baking time, bake a bit longer in a 5 -minute increment. Check again
Cooling down:
- Remove from the oven and let it cools down completely inside the pan placed on a cooling rack. This may take 3-4 hours
Unmoulding cake from the pan:
- Run a plastic knife around the edges to loosen the cake and you can gently peel the cake off the pan without much problem. The texture of the cake is very resilient and bouncy
Serve:
- Trim the 4 edges of the cake. The honeycomb texture is most obvious towards the middle of the cake. So don't be disappointed when you don't see much honeycomb texture on the edge of the cake when you trim the edges.
- Slice the cake with an oiled knife to the desired size. Cake can be stored at room temperature for up to 3 days. After that, store in the refrigerator. They may harden because there's coconut oil, which will harden at a cold temperature just like butter. You can reheat it in the microwave for 10 seconds or so or until just warm or use a steamer to heat it up until just warm
Video
Notes
I recommend using really good quality instant yeast instead of active dry yeast. It gives better fermentation and honeycomb texture.
Nutrition
Serving: 1serving | Calories: 209kcal | Carbohydrates: 32g | Protein: 3g | Fat: 8g | Saturated Fat: 6g | Polyunsaturated Fat: 0.4g | Monounsaturated Fat: 1g | Trans Fat: 0.1g | Cholesterol: 52mg | Sodium: 136mg | Potassium: 106mg | Fiber: 0.4g | Sugar: 14g | Vitamin A: 130IU | Vitamin C: 0.3mg | Calcium: 15mg | Iron: 2mg