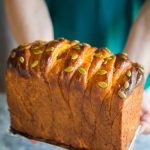
Super Soft Pumpkin Milk Bread Loaf/ Pumpkin Toast (Poolish Method)
Servings: 12 slices (8 1/2 x 4 1/2 loaf)
Calories: 145kcal
I really love how soft this pumpkin milk bread loaf is using poolish. This preferment method is truly one of the keys in baking a great loaf of soft milk bread.
Print Recipe
Ingredients
Poolish:
- 50 gr bread flour
- 50 gr water
- ¼ tsp instant yeast
Dough:
- 210 gr bread flour
- 30 gr sugar
- ½ tsp salt
- 1 tsp instant yeast
- 15 gr milk powder
- 20 gr condensed milk
- 80 gr pumpkin puree
- 30 gr butter unsalted, softened
- 50 gr egg beaten, you may not need all
Pumpkin filling:
- 100 gr pumpkin puree
- 10 gr butter unsalted
- 5 gr sugar
Garnish:
- Pepita seeds/ pumpkin seeds
Instructions
Prepare poolish:
- Mix all ingredients for poolish and let it sit for 8-10 hours. You can even put this in the fridge until the next day when you are ready to use them. They can be kept in the fridge for up to 5 days. Simply let it comes to room temperature for an hour or so before using
Prepare the dough:
- Put all ingredients for the dough and the poolish in a mixing bowl of a stand mixer fitter with dough hook attachment, except for the butter and for the egg, only use 1/3 and reserve the rest to see if you need more or not. This depends on how moist the pumpkin you use
- Start the mixer on low ("stir" on KA) and knead for about 2 minutes. It should come to a rough dough. If it's too dry, you can add a bit more of the egg. Once you get a rough dough that is slightly sticky, increase speed to 2 and knead for 7-8 minutes, the dough should be smoother and a bit stretchy at this point, but the dough will tear if you pull it. Add the softened butter and continue to knead for another 5-6 minutes until you pass the windowpane test. When you stretch the dough thinly, it won't break. You can stop kneading at this point
First proofing:
- Oil the bowl and cover and let the dough rise at temperature about 77-86 F (25-30 C) until they are double in size. This may take 1 hour or longer depending on the temperature. If it's really warm where you are, it may not take that long
Prepare the filling (can be prepared few days before):
- Put pumpkin and sugar in a saucepan and cook until the sugar melts over medium-low heat. Let the liquid evaporates and then add butter and continue to stir until the mixture comes together and dry and leaves side of the pan. Transfer to a bowl and cover, touching the pumpkin so a layer of skin won't form. Chill in the fridge for at least 30 minutes
Filling and shaping:
- Line your baking pan with parchment paper on all sides. Or you can grease the pan well or use cooking spray. When you poke the dough with your lightly oiled finger, the indentation stays. This means the proofing is done and the dough has doubled in size
- Lightly oil your working surface and your palms. I use non-stick cooking spray and deflate the dough, pushing out all the air and round it up into a nice round ball again. Cover and let it rests for 15 minutes
- After that, oil your rolling pin and the working surface again and roll it out into a rectangle. As you roll, you will be able to feel there are some air bubbles being popped at the same time. Fold 1/3 of right into the middle and the 1/3 left into the middle. Rotate 90 degrees and roll it out into rectangle again, the long side near you. The length of the dough should be about the same as the width of your baking pan
- Spread the pumpkin filling on half of the rectangle, leaving about 1/2 inch on the side. Fold the other half over and pinch to seal the three edges
- Cut 8 strips, roughly about the same size. Twist each strip about 3 times. Then roll from the left to right with the seam side down
Second proofing:
- Transfer the shaped dough into the pan. Cover and let the dough proof again at a warm place until it doubles in size, about another hour. At the end of proofing, it will fill up about 90% of the pan. 10 minutes before the end of proofing, preheat your oven at 350 F (180 C) for conventional bottom heat only oven. For convection top and bottom heat, lower the temperature by 15-20 degrees
Baking:
- Use the leftover egg to brush on the surface of the bread. Sprinkle with some pepita seeds
- Place the pan at the middle rack and bake for 10 minutes and then tent the top with a foil and continue baking for another 30 minutes. The bread should sound hollow when you tap the bottom
- Tips: If you use a darker color pan , it absorbs heat and your bread will cook faster. So you may want to start checking for doneness 10 minutes earlier. Unless you pan is really like black in color or very close to black, you may even need to lower the oven temperature by about 20 degrees, otherwise, keep the same temperature and just check a bit earlier for doneness
Cooling:
- Once out of the oven, immediately remove from the pan on a cooling rack. Optional: If you want a softer shinier crust, you can brush with melted butter immediately while the bread is still warm. Let the bread cools down completely on the rack
Storing:
- Once it has cooled down, you can put in an air-tight container and can be kept at room temperature for 2-3 days
Nutrition
Serving: 1slice | Calories: 145kcal | Carbohydrates: 22g | Protein: 5g | Fat: 4g | Saturated Fat: 2g | Polyunsaturated Fat: 1g | Monounsaturated Fat: 1g | Trans Fat: 1g | Cholesterol: 24mg | Sodium: 137mg | Potassium: 101mg | Fiber: 1g | Sugar: 5g | Vitamin A: 2457IU | Vitamin C: 1mg | Calcium: 27mg | Iron: 1mg