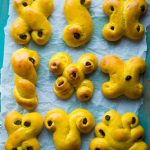
Tangzhong Swedish Saffron Buns (Lussekatter /St Lucia Buns) - 9 shapes
Servings: 9 large buns
Calories: 204kcal
These Swedish saffron buns are simply amazing. The dough is prepared using tangzhong method. The buns are soft, fluffy, buttery, lightly sweetened and yeasted buns with an amazing aroma and beautiful vibrant color from saffron. I'm also sharing how to make the 9 traditional shapes you can make with these saffron buns.
Print Recipe
Ingredients
Tangzhong:
- 15 gr bread flour
- 90 ml whole milk
Dry ingredients:
- 300 gr bread flour
- 5 gr instant yeast
- 5 gr milk powder
Wet ingredients:
- 120 ml whole milk warm
- 2 gr saffron
- 1 large egg 50 gr without the shell, lightly beaten
To add last to the dough:
- 2 Tbsp sugar
- ½ tsp salt
- 40 gr butter unsalted, softened
For decoration:
Egg wash:
- 1 large egg beaten
- 1 tsp water
Instructions
Prepare tangzhong: (one day before)
- Place milk and the bread flour in a small saucepan. Whisk until there is no more lumps. Cook this mixture over low-medium heat until it reaches 65 C (149 F). Remove from the heat and cover with a plastic wrap, touching the tangzhong so the skin won't form. I highly suggest using this the next day instead of using it on the same day. Store this in the fridge15 gr bread flour, 90 ml whole milk
Make the dough:
- Soak the saffron threads in lukewarm milk. Let them sit for 5 minutes2 gr saffron, 120 ml whole milk
- Mix all the dry ingredients together in a mixing bowl. Make a well in the center and pour in the wet ingredients and the saffron milk. Add tangzhong you made earlier. Use a dough hook attachment to knead the dough until all the crumbly dough starts to come together into one mass, it may take about 2-3 minutes for this to happen. Don't be tempted to add any liquid. You may need to stop halfway and scrape the dough off the hook and the sides of the bowl and knead again several times300 gr bread flour, 5 gr instant yeast, 5 gr milk powder, 120 ml whole milk, 2 gr saffron, 1 large egg
- Once it comes into a dough, stop the machine. The dough will not be smooth, don't worry.Cover the dough and let it rest for 20 minutes. This is an important rest that bakers refer to as an autolyse
- After the rest, turn on and knead the dough again and knead for 1-2 minutes until it is a bit smoother. Then add the salt and sugar into the dough. Continue to knead until the dough is relatively smooth½ tsp salt, 2 Tbsp sugar
- Once you have a smooth dough, turn the machine back on again to knead and gradually add in the softened butter a bit by a bit. The dough will turn into a REAL sticky mess again because of the butter, just keep kneading and stop halfway and scrape the dough off the hook and bowl again and continue to knead until the butter is absorbed by the dough. It takes about 10 minutes kneading on speed 4 with my KA40 gr butter
- The dough should be flexible and smooth and pass the window pane test. When you stretch the dough thinly, it will not bread and light can pass through it
1st proofing:
- Place this dough in a lightly oiled large bowl, cover it with a clean and damp tea cloth or plastic wrap and let it rise at a warm place for about 1 hour or until it doubles in size
Shaping:
- Punch the dough down, divide into 9 balls. Cover these doughs with plastic wrap and let them rest for 10 minutes. Make sure you don't skip this part of resting the dough before shaping. Work with one dough at a time and keep the rest covered
- Line two baking sheets with parchment paper
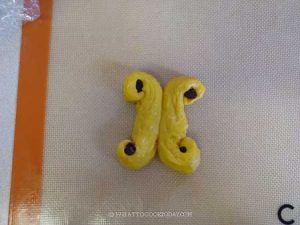
For gullvagn:
- Take one dough and divide it into two. Roll each of the dough into a long log, about 10 inches long, close to 1 inch wide. Curl each end in opposite direction. Place another log on top of this and curl the end in following the direction of the other curl. Place raisin on top of each curl and place on a baking sheetRaisins
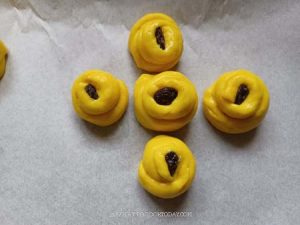
For julvagn:
- Take one dough and divide it into five. Roll each of the dough into a log, about 6 inches long, close to 1 inch wide. Starting from one end, curl into a round spiral. Place them on a baking sheet, close to each other, but not too close to allow room to puff up during second proofing. Place on a baking sheetRaisins
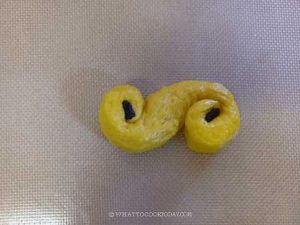
For jugalt:
- This is actually the "S" shape that people have been mistakenly called lussekatt. Roll the dough into a log, about 10 inches long, about 2 inch wide. Curl each end in opposite direction to form an "S" shape. Place raisin on each curl and place on a baking sheetRaisins
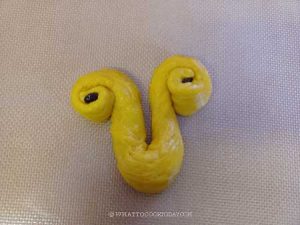
For lilja:
- Roll the dough into a log, about 10 inches long, about 2 inch wide. Shape the log like a "U" with two arms on the side and then coil each arm to make it shape like a "U". Place raisin on each curl and place on a baking sheetRaisins
For lussekatt 1:
- Roll the dough into a log, about 10 inches long, about 2 inch wide. Cut through the middle of the log on each end, but leaving the center uncut. Curl each end and put a raisin in the middle and place on a baking sheetRaisins
For lussekatt 2:
- Divide the dough into 2 and roll each into about 6 inches long. Curl each end and put raisin on each curl and place on a baking sheetRaisins
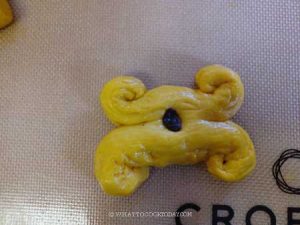
For pojke:
- Roll the dough into a log, about 10 inches long, about 2 inches wide. Shape it into an upside-down U. Put the raisin in the middle (or you can put the raisin later too, it doesn't matter) and start braiding by crossing the two arms. Place on a baking sheetRaisins

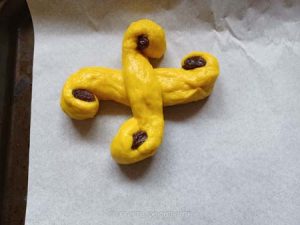
For julkuse:
- Take one dough and divide it into two. Roll each of the dough into a long log, about 10 inches long, Place one dough on top of the other forming a “X”. Curl each end inside to face each other. Place raisin on top of each curl and place on a baking sheetRaisins

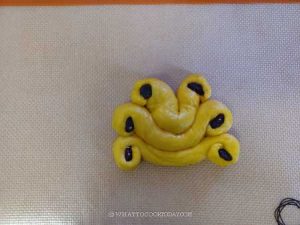
For prastens har:
- Take one dough and divide it into three. Roll each of the dough into a long log, about 6 inches. It's basically like three lilja. Place raisins on each of the curl and place on a baking sheetRaisins
Second proofing:
- Cover them with a cloth and let them proof until puffy again at a warm place. This may take about 30-45 minutes or slightly longer, depending on the temperature where you are
Baking:
- 10 minutes before the end of proofing time, preheat the oven at 350 F (180 C) for conventional oven. For convection oven, lower the temperature by 20 degrees.
- Prepare the egg wash by whisking the whole egg with some water. Brush the buns with egg wash. Bake on the middle rack for 20-25 minutes or until golden brown or internal temperature is 190 F (88 C)1 large egg, 1 tsp water
- Remove from the oven and let it cool down in the pan for about 5 minutes and then lift the bread out and let it cool completely on a cooling rack to prevent the bottom from getting soggy because of the trapped condensation
Storing:
- Enjoy and once it's cooled down completely, wrap it up with plastic wrap and it's good for about 3 days or so at room temperature. If you plan to keep longer, freezing them is better than storing them in the refrigerator
Nutrition
Serving: 1bun | Calories: 204kcal | Carbohydrates: 30g | Protein: 7g | Fat: 6g | Saturated Fat: 3g | Polyunsaturated Fat: 1g | Monounsaturated Fat: 2g | Trans Fat: 1g | Cholesterol: 54mg | Sodium: 192mg | Potassium: 99mg | Fiber: 1g | Sugar: 4g | Vitamin A: 216IU | Vitamin C: 1mg | Calcium: 45mg | Iron: 1mg