Lapis Surabaya Ekonomis (Spikoe/Spiku) - only 5 eggs
Servings: 8 slices (7 x 3 inch cake)
Calories: 490kcal
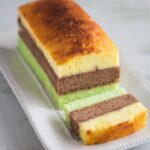
A rich and moist 3-layer cake that tastes like a premium Lapis Surabaya but with only 5 eggs. You will be surprised by how tasty and decadent this Lapis Surabaya ekonomis tastes. The cake is made without any emulsifier or additives.
Print Recipe
Equipment
Ingredients
- 230 gr butter
- 30 gr condensed milk
- 200 gr sugar
- 250 gr eggs beaten
- 50 gr whole milk
Dry ingredients:
- 230 gr cake flour
- ¼ tsp salt
- ½ tsp baking powder
For chocolate layer:
- 1 Tbsp cocoa powder
- 2 Tbsp hot water
For pandan layer (optional):
- ½ tsp pandan essence
To assemble the cake:
- Strawberry jam or any fruit jam of your choice
Instructions
- Preheat oven to 320 F (160 C) for conventional oven and 300 F (150 C) for convection oven
- You will need three 8 x 4-inch (20 x 10) loaf pans. If you choose to use a disposable type loaf pan, get the sturdy ones without too many curves on the sides of the pan (like the ones I used) so you don't have to trim the cakes too much after baking
- Grease the bottom and sides of the pan. You can line the bottom with parchment paper too
Prepare the cake batter:
- Make sure the butter is soft but not melty. Melty butter will not work here. I usually cut it smaller and let them sit at room temperature for 15-30 minutes until softened. If it's warmer where you are, you may not need that long
- Make sure the eggs and milk are at room temperature too. This is very important or the cake batter will separate when you combine the butter and the eggs later
- Weigh the eggs and crack them into a bowl and whisk the eggs to combine and set aside
- Combine all the dry ingredients and sift. Set aside. Combine cocoa powder with hot water. It will be like a paste consistency
- Beat the butter and sugar at a high speed (speed 8 on KA with paddle attachment) for 15 minutes, scrape down the side of the bowl several times during this time so you get all the butter and sugar evenly beaten. Beat until they are pale and thick
- Gradually add in the beaten eggs, in about 8-10 additions. Do not dump all at once or you are risking the butter separating from the eggs. Make sure it is combined before you add the next. Once the eggs are all combined into the batter, add the condensed milk and milk and let it beat for another minute
- Lower the speed to the lowest and gradually add the flour mixture, in 3-4 addition. Mix for another 3 minutes. Stop the machine and scrape the side of the bowl and use a spatula to fold the leftover flour into the batter. make sure you don't see any more pockets of flour. The batter is quite thick, don't panic. You are on the right track
Divide the batter:
- Divide the batter into roughly 3 equal portions into a bowl, about 300 grams each. Leave one batter as original, which is yellowish in color. Add 1/2 teaspoon of pandan essence to the second batter if you choose to, otherwise, leave it as an original layer as well. Add the cocoa paste to the third batter and gently fold to combine
- Pour each batter into each pan. Bang it on the counter a few times to pop any air bubbles. Make sure the cake batter is even or level, so the cake won't be lopsided
Baking:
- Place all three pans side by side in the oven on the middle rack and bake for 25-30 minutes or until a cake tester inserted into the cake comes out clean. If the yellow layer (usually we use as a top layer) is not golden brown enough, turn on the broiler (top heat) on low and let it broil until golden brown, this just takes a minute or two or less. Do not walk away during this time
Cooling:
- Remove from the oven and let the cake cool down in the pan for 5 minutes and then tip the pan upside down gently and the cake should slide right out. Peel the parchment paper at the bottom if you line your pan with it. Let the cake cools down on a cooling rack completely before assembling
Assembling:
- I prefer to assemble the cake first before trimming the four edges. If the bottom (pandan layer) and the middle layer (chocolate layer) have dome tops, use a knife to level them off. You don't need to level the top layer (original yellow) as we want the golden brown crumb on top
- Apply some strawberry jam on top of the pandan layer, don't put too much, just a an even thin layer on the surface. Put the chocolate layer on top of it and then apply some strawberry jam on top of the chocolate layer. Put the yellow layer on top of the chocolate layer. Gently press them down so they really "glue" to each other
- Use a sharp knife to carefully trim off the four sides so they look neat. Scrape off excess jam if any. I wrap the whole cake up with cling wrap somewhat tightly. This helps to "secure" the layers and also to "age" the cake. You can keep it at room temperature. If it's really humid where you are, then you can keep it in the fridge. I do not recommend serving the cake on the same day. The cake doesn't taste as good on the same day (yes, I know, waiting can be a pain, but this is worth the wait!)
To serve:
- If it has been in a fridge, it will harden because butter solidifies at cold temperatures. Let them out at room temperature for 30 minutes or so and the cake will soften and ready to be served
Storage:
- This cake can be wrapped with cling wrap and store at room temperature for 4-5 days. You will notice, the longer it sits, the better the flavor and texture will be. That's because the flavor has fully developed and the fat has evenly distributed throughout the cake. So, your patience will pay off ;)
Nutrition
Serving: 1slice | Calories: 490kcal | Carbohydrates: 54g | Protein: 8g | Fat: 27g | Saturated Fat: 16g | Polyunsaturated Fat: 2g | Monounsaturated Fat: 7g | Trans Fat: 1g | Cholesterol: 180mg | Sodium: 388mg | Potassium: 117mg | Fiber: 1g | Sugar: 31g | Vitamin A: 908IU | Vitamin C: 1mg | Calcium: 79mg | Iron: 1mg