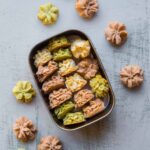
Homemade Hong Kong Jenny Bakery Butter Flower Cookies
Servings: 20 -22 cookies for each flavor
Calories: 101kcal
Learn how to make the popular Hong Kong Jenny Bakery butter cookies at home. The recipe doesn't require using a special golden churn salted butter and the cookies maintain their shapes. All the tips you need to know to make this successfully at home.
Print Recipe
Ingredients
Please measure the ingredients by weight
For original flavor:
- 125 gr European butter (with at least 82% fat) really soft
- 45 gr icing sugar
- ⅛ tsp salt
- 125 gr cake flour
- 45 gr cornstarch
For matcha flavor:
- 125 gr European butter (with at least 82% fat) really soft
- 45 gr icing sugar
- ⅛ tsp salt
- 115 gr cake flour
- 40 gr cornstarch
- 5 gr matcha powder you can add more if you like it more intense
For cocoa flavor:
- 125 gr European butter (with at least 82% fat) really soft
- 45 gr icing sugar
- ⅛ tsp salt omit if your butter is salted
- 115 gr cake flour
- 40 gr cornstarch
- 10 gr cocoa powder Dutch-processed recommended
For adjustment:
- ½ tsp milk (room temperature) or more, for adjustment
Instructions
Things to prepare before start making the cookie dough:
- I take the butter out from the fridge and cut it into small pieces and let them sit at room temperature for about an hour (it's winter here when I made this). The butter really needs to be soft but not melty. You need to able to easily press the butter with your fingers and it leaves an indentation. It is very important that the butter is really soft
- Make sure you have a sturdy and strong piping bag. Double up to two layers if you need to prevent the bag from bursting. The cookie dough is pipeable consistency but has a bit more resistant compared to other piped cookie dough I had worked with before
- Line baking tray with parchment paper. Even if you don't, the cookie actually won't stick to the tray after baking and can be easily removed
- Prepare about 1 Tbsp of milk (room temperature). You may or may not need this to adjust the consistency of the cookie dough
Prepare the cookie dough:
- Use a hand mixer or stand mixer with a paddle attachment and beat the butter until creamy over medium speed. Add the icing sugar and salt and mix it around with the butter so the sugar doesn't fly all over the place. Start with the lowest speed and beat the butter and sugar again and then increase speed to medium and continue to beat until the butter turns pale and creamy. You want to maintain the temperature around room temperature 68-77 F (20-25 C). If it's really hot where you are, you may need a bowl of ice underneath when you beat the butter, unless you are in an air-conditioned room
- Once the butter is pale and creamy, sift in the cake flour and cornstarch (and matcha or cocoa powder if that's the flavor you are making). Use a spatula to combine. It may seem dry at first but just keep mixing until the dough consistency is creamy and paste-like. You should be able to use a spatula to easily smear the dough on the bowl. This is the consistency we want
- Important tips: If your cookie dough looks like a ball of dough, then you need to add a bit of milk, start with 1/2 teaspoon of milk and then mix again with a spatula until you can smear the dough with your spatula. If the dough is too solid, you will have a hell of a hard time trying to pipe that dough (trust me I've been there!)
- After you transfer to a piping bag and when you try to pipe and it's extremely hard to pipe the dough out because it's too stiff, get the dough out from the bag and adjust again by adding a bit more milk usually helps to make it pipe easier. You just want to add a teaspoon at a time. You don't want to add too much
Piping the dough:
- I use an open-star tip (Wilton 6B). You can also drop flower (Wilton 2C) I wish I have a large nozzle to make piping a bit easier, but it's still doable. Transfer the cookie dough to the piping bag. I suggest not filling it up too much, maybe just 1/3 or 1/2 of the dough to make piping easier
- With one hand holding the bag and your pointer finger holding the tip steady, make sure you are holding the bag upright. Squeeze and move upward to create the first layer and continue to move upward steadily until you get 4 layers and then press the tip down a bit on the cookie dough and twist to "cut off" the dough. Pipe about 2-inch apart. The cookie won't spread too much, but will spread some and this is normal
- Important tips: The piping part is also very important. If you do not pipe straight, and the flower design doesn't "align" the cookie dough will skew and fall to either left or right during baking. For beginners, I recommend piping a maximum of 3-4 layers only until you get better at piping really straight with the flowers aligned (I still need lots of practice myself). The more layers you pipe, the more likely the dough will fall down or skew to one side after baked
Chill the piped dough:
- I highly recommend chilling the dough in the freezer (not refrigerator) for a minimum of 1 hour (2 hours if possible). This also helps to maintain the flower design much better
- 10 minutes before you plan to bake, preheat the oven to 320 F (160 C) for a conventional oven. For a convection oven, lower the temperature by 20 degrees. I recommend baking one tray at a time and keeping the rest in the freezer while waiting
Baking:
- Bake at the middle rack for 20-25 minutes or until just lightly golden brown. You don't want to overbake the cookies. Rotate the pan from front to back halfway through baking so they bake evenly
- The cookies will spread a bit to the side or "fall down" a bit in height and shorter than the dough you piped before baking and that is expected, but the flower design should not be blurred and disappeared altogether.
Cooling down:
- Let the cookies cool down on the tray for 10 minutes then transfer to a cooling rack to let them cool down completely and then store in an air-tight container at room temperature for weeks
Video
Nutrition
Serving: 1cookie (original flavor) | Calories: 101kcal | Carbohydrates: 10g | Protein: 1g | Fat: 6g | Saturated Fat: 4g | Polyunsaturated Fat: 1g | Monounsaturated Fat: 2g | Trans Fat: 1g | Cholesterol: 16mg | Sodium: 113mg | Potassium: 10mg | Fiber: 1g | Sugar: 2g | Vitamin A: 188IU | Calcium: 3mg | Iron: 1mg