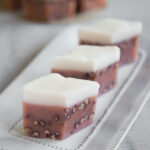
Red Bean Kue/Kuih Talam (Talam Kacang Merah)
Servings: 12 servings
Calories: 177kcal
Soft and bouncy two-layered steamed cake studded with red beans and top with rich coconut milk on top. You only need 6 ingredients and the cake is naturally gluten-free, dairy-free, and vegan.
Print Recipe
Equipment
Ingredients
Red bean layer:
- 100 gr red beans
- 60 gr rice flour
- 50 gr tapioca flour
- ¼ tsp salt
- 110 gr sugar
- 125 ml coconut milk
- 125 ml liquid from boiling the beans see notes 1
Coconut milk layer:
- 250 ml coconut milk
- 50 gr rice flour
- 10 gr tapioca flour
- 15 gr sugar
- ¼ tsp salt
Instructions
Cook the red beans:
- Give the beans a few rinses and pick out the ones that don't look good anymore.
- If you are cooking the beans on the stove, soak the beans for at least 4 hours or overnight. Drain off the soaking water. Put this inside a pot, and cover with water, about 1 inch above the beans. Bring water to a boil and then lower the heat to simmer, cover with a lid, but leave a bit of crack so the beans won't boil over. Boil for about 45 minutes or until the beans can be easily mashed with your fingers when you squeeze it. Drain off the cooking liquid but save it. We will use this in the batter to give it a natural reddish hue
- If you cook with a pressure cooker like Instant Pot, you do not need to soak the bean. Put the beans in the inner pot of Instant Pot. Cover with water, about 1 inch above the beans. Close the lid and turn the steam release valve to "sealing". Press "Pressure Cooker" and make sure it's on high pressure. Set timer to 40 minutes. I found that 40 minutes is perfect for the beans not to be mushy but soft enough that you can mash it with your finger if you squeeze it
- When the timer is up, do a natural release, meaning wait until the valve collapses on its own before opening the lid. Drain off the cooking liquid but save it. We will use this in the batter to give it a natural reddish hue
Prepare the red bean layer:
- Bring the water in a steamer to a boil and then lower the heat to medium to let it simmer. Wrap the lid of the steamed with a cloth to prevent condensation from dripping onto the cake surface, making it wet
- You can use 6 x 6 inch square pan or 7 inch round pan. Oil the pan on all sides and set aside
- Combine rice flour, tapioca flour, sugar, and salt in a mixing bowl. Add coconut milk and liquid from boiling the beans (if using) and whisk until combined. I strain the mixture into a pot to make sure there are no lumps. Fold in the cooked red beans
- Put the pot on the stove over low-medium heat and keep stirring. Make sure you stir all the way to the bottom and scraping the side of the pot. Nothing seems to be happening at first, then you will start feeling some lumps at the bottom. Just keep stirring until you feel a bit more lumps then turn off the heat. You don't want to cook until the entire batter is thickened. These lumps will even out during steaming, don't worry! So the overall batter consistency is still pourable with some lumps.
- Pour this into the prepared pan and steam over medium heat for 20 minutes. The top should be set and no longer watery before you pour the coconut milk layer on top. If it is, steam a bit longer
Prepare the coconut milk layer:
- While the red bean layer is steaming, prepare the coconut milk layer Combine all the ingredients in a saucepan and whisk to combine
Steam the coconut milk layer:
- After 20 minutes of steaming the red bean layer, uncover the lid and give the coconut milk layer a stir and gently pour or spoon this batter over the top of the red bean layer. Cover with a lid again and steam for another 25 minutes over medium-low heat. Don't steam over high heat as this may "wrinkle" the coconut milk layer
- There might be a bit of water pooling on top after steaming, they will dry up as they cool down at room temperature. But the coconut milk layer should be set and no longer jiggly
Cool down the cake:
- Remove from the steamer and cool down completely for at least 2-3 hours
Serving:
- As the cake cools down, it will pull from the side of the pan. Simply loosen the edge and then gently flip the cake out. You shouldn't have a problem doing so if you oil the pan earlier. Rub some oil on the knife to prevent sticking when you cut the cake. Cut the cake into desired sizes
Notes
If you prefer a richer taste, you can substitute this 125 ml liquid from cooking the beans with using all coconut milk instead and add a bit of red food coloring if you want the color to be more prominent. If you don't care about adding color, you can definitely skip adding food coloring
Nutrition
Serving: 1serving | Calories: 177kcal | Carbohydrates: 28g | Protein: 3g | Fat: 7g | Saturated Fat: 6g | Polyunsaturated Fat: 1g | Monounsaturated Fat: 1g | Sodium: 103mg | Potassium: 187mg | Fiber: 1g | Sugar: 11g | Vitamin C: 1mg | Calcium: 13mg | Iron: 2mg