Chocolate Yule Log Tree Stump Cake (with Vertical Layers)
Servings: 6 servings (5-inch cake)
Calories: 680kcal
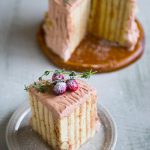
Soft and fluffy chocolate chiffon cake layers are filled and frosted with chocolate mascarpone ganache and vertically layered to mimic the tree stump
Print Recipe
Ingredients
Cake batter:
- 4 egg yolks room temperature
- 30 gr granulated sugar
- 50 gr oil
- 40 ml milk room temperature
- 1 tsp vanilla extract
- 75 gr cake flour
- ¼ tsp salt
Meringue for the cake:
- 4 egg whites room temperature
- 50 gr granulated sugar
- ½ tsp vinegar
Simple syrup to brush the cake:
- 2 Tbsp granulated sugar
- 2 Tbsp hot water
Chocolate ganache:
- 75 gr semi-sweet chocolate or you can also use dark chocolate
- 75 gr heavy cream
Mascarpone cream:
- 250 gr mascarpone
- 2 Tbsp powdered sugar or more if you prefer sweeter
- 200 gr heavy cream
To decorate:
- slivered almond or known as almond flakes
- powdered sugar
Instructions
- Preheat the oven to 350 F (180 C) for a conventional oven. Lower the temperature by 20 degrees if you use a convection oven. Grease and Line a 12 x 17-inch pan (half-sheet pan) with parchment paper on all sides
Prepare simple syrup:
- Simply mix the sugar with hot water until sugar dissolves. This helps to keep the cake moist
Prepare the cake:
- Combine yolks, sugar, oil, vanilla extract, and milk in a mixing bowl with a whisk. Sift in the cake flour and salt and whisk to combine. Set aside
Prepare the meringue:
- Beat the egg whites on medium speed until frothy, add the vinegar and whip until it turns whitish and air bubbles are fine. Gradually add the sugar as you beat, in 3 batches. I beat them at medium speed (speed 6 on Kitchen Aid). This will take a bit longer compared to beating at high speed. I used to do higher speed (speed 8), but the meringue is smoother and nicer when I maintain the speed on 6. I highly recommend stopping several times to check on the consistency and scraping the sides of the bowl to make sure no sugar is left on the side of the bowl. Whip until you reach a stiff peak but still have a slight bent on the tip. Then lower the speed to 4 and whip for 1 minute to even out large bubbles and stop beating
Fold meringue into cake batter:
- Gently fold 1/3 of the meringue into the thick batter. Using a whisk, using a cutting motion and fold over to mix. Repeat this motion several rounds. Continue on with the second 1/3 of the meringue again to mix. For the last 1/3 of the meringue, use a rubber spatula instead to ensure you get all the batter at the bottom of the bowl mixed in as well. Use a cut down in the middle and fold over motion to fold gently but quickly. Make sure you don't see any more white meringue. The mixture should be fluffy and voluminous
- Pour the batter into the pan and use a rubber spatula to help to spread evenly. You can use a dough scraper to help you even out the surface too if necessary
Bake the cake:
- Gently tap the baking sheet on your working surface several times to pop any air bubbles
- Place the pan on the middle rack. Bake for 30 minutes and then switch to convection mode (fan mode) and bake for another 3-4 minutes or until the top is golden brown and dry to touch. If you don't have convection mode, bake another 5 minutes and check to make sure the top is golden brown and dry to touch
Prepare the chocolate mascarpone cream:
- While the cake is baking, we can prepare the chocolate mascarpone cream. Heat the heavy cream until it comes to just gentle simmer and turn off the heat. Pour this over the chocolate and let it sits for about 10 seconds and then stir. The chocolate will melt as you stir
- Very slowly add the heavy cream to the chocolate mixture and another hand continue to whisk as you add the chocolate in. Put this into a freezer (not fridge) for about 30 minutes to get it really cold
Back to the cake:
- Remove the cake from the oven and then lift it out from the pan immediately to a cooling rack and peel off the parchment paper from 4 sides. Let it cools down like this for 5-6 minutes
- After 5-6 minutes. Place a new piece of parchment paper, larger than the cake, on top of the cake and flip over to the other side. Peel off the parchment paper
- Use a serrated knife to trim about 1/4-inch of the 4 edges. This makes rolling the cake easier
- Cut the cake into 3 equal pieces length-wise. So you have 3 sheets of cake now
Back to the chocolate mascarpone cream:
- Whisk the heavy cream and icing sugar over medium speed until it just started to thicken. It is important not to overbeat. Add the mascarpone cream and continue beating until the cream is medium-firm. It can hold its shape but not stiff. If you overbeat, the cream will turn grainy and worse, it may separate
Assemble (refer to photos above for visual help if necessary):
- Brush the simple syrup all over the cake with a pastry brush. Apply the cream to the surface of the cake. Starting from the first roll, roll up and then "connect" it to the second sheet and continue to roll and then "connect" to the 3rd one. It may get a bit difficult as the roll will get bigger. If the rolls break, don't worry, just do your best to continue rolling. The broken piece will not show on your final design
- Gently place this on a cake stand or cake turner if you have one. I place an acetate sheet around it to "tighten" the roll and put it in the fridge for about 15 minutes. You can use parchment paper to "tighten" the roll and secure it with a stapler. Keep the cream chilled in the fridge while waiting
- Then remove the acetate sheet or parchment paper and frost the side of the cake with the remaining cream. You can frost the top too if you prefer not to expose the cake to prevent it from drying out. Some people like to leave it unfrosted on top so the "circular" growth rings just like in a real tree
- Use a toothpick, a skewer, a pointy chopstick, or tines of a fork to create those grains that you see on a tree
- Finish off designing by putting some almond flakes on the side of the cake to mimic the fungi that grow on the tree
Chill the cake before serving:
- Chill the cake for at least 2-3 hours before serving. On the day you are going to serve this, decoreate with some leaves or fresh/frozen fruit if you like. I happened to have fresh thyme leaves and fresh cranberries and so I put those on top of the tree as part of the decorations and dust with a bit of powdered sugar
Notes
This recipe makes a small, about 5-inch size cake in diameter, 4 inches in height, which is perfect for a family of 4 like us to consume in 2-3 days. If you want to make a larger cake, simply double the recipe, divide the batter equally into two baking sheets and bake as directed. You will have larger rolls in diameter
Nutrition
Serving: 1serving | Calories: 680kcal | Carbohydrates: 42g | Protein: 10g | Fat: 52g | Saturated Fat: 27g | Polyunsaturated Fat: 4g | Monounsaturated Fat: 13g | Trans Fat: 1g | Cholesterol: 236mg | Sodium: 182mg | Potassium: 173mg | Fiber: 1g | Sugar: 28g | Vitamin A: 1447IU | Vitamin C: 1mg | Calcium: 122mg | Iron: 1mg