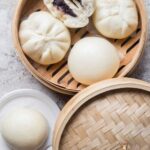
Soft Fluffy Steamed Buns / Baozi with Tangzhong/Yudane
Servings: 8 large buns
Calories: 227kcal
Elevate your steamed buns game by adding tangzhong or yudane to the recipe. The steamed buns stay soft for days.
Print Recipe
Equipment
- kitchen aid
Ingredients
If using tangzhong:
- 30 gr all-purpose flour
- 150 gr milk
Dough with tangzhong:
- 150 gr all-purpose flour plus more for dusting
- 180 gr cake flour
- ½ tsp salt
- 4 gr instant yeast
- 50 gr sugar
- 20 g oil
- 60 g whole milk start with this amount
If using yudane:
- 75 g all-purpose flour
- 75 g hot boiling water
Dough with yudane:
- 105 g all-purpose flour
- 180 g cake flour
- 4 g instant yeast
- ½ tsp salt
- 100 g whole milk
- 50 g sugar
- 20 g oil
Instructions
If using tangzhong:
- Place milk and the flour in a small saucepan. Whisk until there is no more lumps. Cook this mixture over low-medium heat until it reaches 65 C (149 F). Remove from the heat and cover with a plastic wrap, touching the tangzhong so the skin won't form. I highly suggest using this the next day instead of using it on the same day. Store this in the fridge
If using yudane:
- Measure out 75 gr all-purpose flour in a heat-proof bowl. Place this on top of a kitchen scale. Bring water to a boil. I usually boil 15-20 grams extra than what I need to account for evaporation during boiling. When water comes to a boil, don’t turn it off yet, let it boil for another minute or two to make sure it reaches boiling temperature. Use a thermometer if you have one. I make sure it’s at least 212 F/100 C
- Carefully but quickly pour the amount of boiling water you need into the flour and stir with a sturdy spatula until all the flour is hydrated by the hot boiling water. You will get a sticky dough
- Let it cool down to about 122F/50 C. Wrap it with a cling wrap that I lightly sprayed with non-stick spray and let it sit on the counter if you will be using it in 4 hours later or in the fridge for the next day. They can be kept in the fridge for up to 3 days. The longer you rest the yudane, the better the quality of your bread
Prepare the dough:
- Place the flour, instant yeast, sugar, salt, oil in a mixing bowl of a stand mixer and stir to combine. Add tangzhong paste or yudane to the dough
- Attach the dough hook to the stand mixer. Turn on the mixer at the lowest speed to prevent the flour from flying all over the place. Knead at low speed (speed 2 on KA) for 3-4 minutes or until the dough roughly come together. If the dough feels dry, add milk, one teaspoon at a time. The dough needs to feel soft. You can increase the speed to speed 4 and knead until the dough clears the side of the bowl, feel smooth and soft, about 3-4 minutes (depending on your machine too).
- If the dough feels stiff, don't be afraid to add more milk. Soft dough is one of the keys to getting soft and fluffy steamed buns. You don't need to develop a window pane here but the dough needs to be soft and smooth
Shaping:
- Divide the dough into 8-10 equal portions. To make plain buns without filling, flatten and gather the edge to round them up into dough balls. Roll the dough into a smooth round ball in between the palm of your hand or as I did in the video. REALLY make sure the dough is smooth.
- If you want to add a filling, flatten the dough with your palm and then use a rolling pin to roll it out to form a circle about 4-5 inches, with a slightly thicker middle part. This is to support the weight of the filling. Don't roll the dough too thin. If you roll the dough too thin, the filling might make the steamed buns "wrinkle" later when you steam. Place the filling at the center and then gather the sides to enclose the bun and pinch to seal. Flip the bun so the seam side is down now
- Cup the dough with both palms and move the dough in a circular motion to shape it taller. This part is important so your steamed buns come out tall instead of spreading to the side after steaming
- Place on a piece of parchment paper. Lightly dab the surface of the bun with some milk using your finger to smooth the surface. You can also mist with some water using a spray bottle. Loosely cover with clean kitchen towel to prevent drying. Work with another dough and do the same. Proceed to proofing after that
Proofing:
- Let the dough rise at room temperature or at a warm place. If it's winter where you are, you can use your oven "bread proof" function to let them proof in there, or simply turn on your oven to the lowest temperature and then turn off and after 15 minutes, place the shaped buns in there to let them proof. They won't necessarily double in size, but at least puff up to about 50% of the original size. This may take about 1 hour or longer at a warm temperature. Don't go by the time however. Observe the dough instead!
- How do you know if your buns have proofed ? They will be about 50% bigger than their original size AND when you lift them up, they should feel significantly lighter. If not, let them proof a bit longer. They may not visually look bigger. Use a finger test too. When you gently push on the dough, it will leave an indentation but it will spring back slowly. This dough is perfectly proofed. If it springs back right away, it needs to be proofed a bit longer. If it never springs back, then you have over-proofed the dough. Loosely cover them with plastic wrap and put the over-proofed buns in the fridge to slow down the proofing while waiting for the steamer
- An under proofed buns will be very dense and have bumpy surface after steaming. An over proofed buns may widen to the side and much flatter, but they shouldn't be dense and heavy. So, overproof may still be a bit "safer" compared to the buns not sufficiently proofed. Ideally, we want it to be perfectly proofed of course
Steaming:
- Most likely your steamer won't be able to accommodate steaming all buns at one go. You may need to steam in 2-3 batches, which means, the rest of the batches will sit longer and continue to proof while waiting for the steamer. Here's what you can do: Make sure to cover them with plastic wrap and then place them in the refrigerator to slow down the yeast activity until they are ready to be steamed
Steaming:
- Fill up the steamer with water but do not turn on the stove yet. Carefully arrange the proofed buns in the steamer, giving about 2 inches of space in between as they will expand quite a bit. Cover with a lid wrapped with a cloth to prevent condensation from dropping on the surface of the buns. If you use a bamboo steamer, you don't need to wrap the lid as bamboo steamer absorbs liquid
- Please note that I use the largest burner on my stove. Different sizes of burners will produce different amount of heat, so use your largest burner. TURN THE HEAT TO MEDIUM (6/10)
- When the water comes to a simmer, crack the lid open about 1/2 inch gap and start the timer. Steam with the lid cracked open like that for 15 minutes for large buns, about 10 minutes for medium buns
- After steaming, turn off the heat. DO NOT OPEN THE LID of the steamer. Let the buns sit there for 3 minutes. The buns will not sink or wrinkle due to the sudden change in temperature
- Proceed with the next batch and steam with the same method and setting as I mentioned above. You don't have to wait for the water in the steamer to cool down to start. Just turn on the stove to medium heat, crack the lid open immediately and the time starts when water is back to a simmer again
Serving:
- Serve them warm or immediately remove the buns to wire rack to let them cool down. This is to ensure the bottom of the steamed buns will not be wet and soggy
- If you make extra and plan to store them, let the already steamed buns cool down completely and then place them on a baking sheet, not touching each other, and then put the entire tray inside the freezer for about 1 hour. They will harden, but not completely frozen yet. Transfer to a freezer bag and they will not stick to each other anymore. Try not to keep for more than 1 month
- Simply reheat in the steamer before serving. If frozen, steam over medium heat for 12-15 minutes or until heated through. The timing depends on the size of the buns and whether or not you have a filling inside. You can also partially thaw them by letting them sit at room temperature for about 30 minutes and then steam them on medium heat for about 10 minutes or until heated through
Video
Nutrition
Serving: 1plain bun | Calories: 227kcal | Carbohydrates: 41g | Protein: 6g | Fat: 4g | Saturated Fat: 1g | Polyunsaturated Fat: 1g | Monounsaturated Fat: 2g | Trans Fat: 0.01g | Cholesterol: 3mg | Sodium: 159mg | Potassium: 91mg | Fiber: 1g | Sugar: 8g | Vitamin A: 43IU | Vitamin C: 0.001mg | Calcium: 39mg | Iron: 1mg