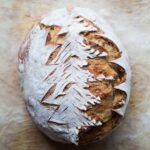
No-Knead Pistachio Caraway Seeds Sourdough Bread (Christmas Tree Scoring)
Servings: 10 servings
Calories: 189kcal
Incredibly tasty, soft crumb with an amazing nutty aroma from the nuts and caraway seeds is fast becoming our family favorite sourdough loaf.
Print Recipe
Ingredients
- 220 g bread flour (12.7% protein content) 70%
- 95 g spelt flour 30%
- 235 g water 75%
- 24 g honey 7%
- 75 g active starter (100% hydration) 24%
- 7 g salt 2%
- 60 g pistachio (finely chopped) 19%
- 6 g caraway seeds 2%
For scoring:
- Rice flour for dusting
Instructions
Fermentolyse:
- Weigh 75 grams of your active starter into a mixing bowl. Feed the starter as per your normal routine. Combine starter, water, honey, and salt and stir to combine. Add bread flour, spelt flour, nuts, and caraway seeds to a mixing bowl. If you have a dough whisk, you can use that, otherwise, a sturdy spatula or your hand would work too. Stir to combine into a rough wet dough. The whole process probably take about 3-5 minutes. It is important that there shouldn't be any visible dry bits. All flour needs to be fully hydrated. Cover and let it sit for 1 hour. Maintain dough temperature at 70-72 F (21-22 C) at this stage if possible
- Bulk fermentation begins when you innoculate starter (adding starter) into the dough. In this case, it starts at this fermentolyse step
4 sets of stretches and folds:
- We will do 4 sets of stretches and folds every 30 minutes. From this point on, I maintain the temperature a bit warmer, at 75-78 F (24-26C). Wet your fingers lightly. Pick up the dough from one of the edges, kinda wiggle it and stretch it up and fold it over. Repeat this throughout the edge of the dough. You may end up with 4 stretches
- Only stretch as far as the dough allows you too, don't force it. Flip it to the smooth side. Cover and rest for 30 minutes. Repeat with stretch and fold #2, #3 every 30 minutes. After the 3rd stretch and fold, transfer the dough to a baking dish or pan, about 9 x 9 inch and spray the container with non-stick spray. You can also use a straight-sided 2-quart container so I can see how much the dough has grown during bulk fermentation
- After about 2 hours since the last fold, check and see how much the dough has grown. You can also just visually observe how much the dough has grown in size. It should look about 50% puffier than before. Total bulking time from the time the starter is added to this end of bulk fermentation is about 3.5-4 hours at 75-78 F (24-26 C). Again, you need to observe the dough, not the clock. It may take longer or faster depending on the temperature
Shaping:
- My banneton is lined with a cloth. Dust your banneton with some flour
- I don't do pre-shaping since I only bake one small loaf and the dough usually seems pretty strong after all those stretch and folds. I also try not to handle the dough too much near the end of bulk fermentation, to avoid degasing the dough too much
- Lightly flour the surface of the dough in the container. Tip the container upside down to let the dough gently slide down upside down. Dust the surrounding of the dough with flour. If you use a square container, the dough will be sort of "squarish". If you use a round container, the dough will be "roundish"
- Just use a bench knife to help you stretch the dough out a bit to make it more "squarish". It doesn't have to be a picture-perfect square. Use a bench knife to tuck in the flour underneath the four edges of the dough
- Gently fold half of the dough over towards you to the center. Repeat with the opposite half, overlapping the first half. Then roll the dough over from one end to the other. You can feel that the dough is jiggly and full of air
- Tuck a bench knife under one side of the dough and push gently to tighten the dough a bit. Seal both ends. Then use a bench knife to help you transfer this to the prepared banneton.
- Let it sit at room temperature for about another 1 hour and then proceed to a cold retard
Cold retard the dough:
- Place the dough inside a produce plastic bag and twist the bag and secure with a clip. Any large ziploc bag would work too. Put this inside the coldest part of your fridge. Make sure the fridge is cold enough at 37-38 F (3-4 C). This is important so the dough won't continue to ferment and you end up with an over-proofed dough. Let the dough cold retard for 15-18 hours
Preheating the oven:
- I bake using a cast-iron dutch oven. 45 minutes before you plan to bake, position one oven rack at the lowest level and then another one rack above it. Place the dutch oven and its lid at the 2nd rack. I keep the pot and the lid separated during preheating. Preheat the oven together with the dutch oven to 485 F (250 C) for 30 minutes
- Cut a parchment paper about 2 inches bigger than the size of your banneton. I have a combo cooker Dutch oven, which is nice because I can load the dough with less risk of getting burnt on my arms. If you have a regular Dutch oven pot, you want to cut parchment paper so that it has a "handle" so you can lift the handle and lower the dough into the pot without getting burnt.
Christmas tree scoring:
- When the oven has preheated for 45 minutes, get the dough out from the refrigerator. There is no need to let it come to room temperature. It's easier to score when it's firm and cold
- Place the parchment paper covering the top of the banneton and turn it over so the dough is now sitting on top of the parchment paper
- Dust the surface of the dough with rice flour. Dust off the excess rice flour. This dusting will make your decorative scoring more prominent
- Use a toothpick to outline your design. I should have done this in the video instead of using my blade to do the outline. Then use your blade or bread lame to do the decorative scoring, which is not very deep on one side of the tree. Then an expansion score on the other side of the tree. The expansion score is usually about 1/2-inch deep and at about 45-degree angle. Please refer to the short video if I confuse you
Baking:
- Wear a mitten and carefully get the Dutch oven pot and its lid out from the oven and place one baking sheet on the lowest rack and quickly but carefully close the oven's door back to prevent too much heat loss. This helps to prevent the bottom crust of your bread from being too thick and tough
- Carefully load the dough by lifting the parchment paper and lower it into the pot or the combo cooker. Close the lid. Open the oven door again and carefully transfer the pot into the oven again and close the oven door. Lower the temperature to 450 F (230 C) and bake for 30 minutes
- After 30 minutes remove the Dutch oven from the oven. Transfer the half-baked bread to a regular baking sheet and put this back inside the oven. Again, this is to help create a nice thin crust all around
- Lower the oven temperature to 425 F (220 C) and bake for 15 minutes. Rotate the bread halfway during this second portion of baking
- Turn off the oven and open the oven door slightly to let the hot air out and let the bread sit in the oven for 10 minutes. This helps to "cure" the bread without overcooking it, so the inside won't be wet and gummy
Cooling down:
- After that, get the bread out of the oven and transfer it to a cooling rack immediately and now comes the hardest part! You need to wait for at least 3-4 hours or longer before you slice it. If you slice into warm bread, you will end up with gummy crumbs
Store:
- Once the bread has cooled down completely, you can store it in a bread box if you plan to consume it in the next few days. You can also put it inside a paper bag
- For longer storage, you can wrap the whole loaf or sliced bread in plastic wrap and then put inside a freezer bag. Push all the air out and seal. It can be kept frozen for 1-2 months. Simply thaw at room temperature before serving and then reheat them in toaster or air-fryer. Most toasters these days can toast frozen sliced bread. So you may not even need to thaw it completely
Video
Nutrition
Serving: 1serving | Calories: 189kcal | Carbohydrates: 32g | Protein: 6g | Fat: 4g | Saturated Fat: 0.3g | Polyunsaturated Fat: 1g | Monounsaturated Fat: 2g | Trans Fat: 0.001g | Sodium: 274mg | Potassium: 83mg | Fiber: 3g | Sugar: 2g | Vitamin A: 3IU | Vitamin C: 0.1mg | Calcium: 26mg | Iron: 1mg