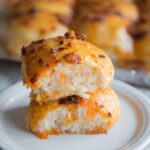
Chili Crisp Garlic Butter Dinner Rolls
Servings: 16 rolls
Calories: 182kcal
Soft, fluffy dinner rolls brushed with savory chili crisp garlic butter. These buns are flavorful, not spicy, and perfect for weeknight dinners or gatherings.
Print Recipe
Ingredients
For the dough:
- 360 g all-purpose flour I use King Arthur's unbleached all purpose flour
- 8 g fine sea salt
- 40 g sugar
- 80 g oil
- 28 g milk powder
- 2 ½ tsp instant yeast
- 39 g instant potato flakes unseasoned. see notes 1
- 220 g whole milk plus more as needed
Chili crisp garlic butter:
- 2 Tbsp unsalted butter
- 1 Tbsp Lao Gan Ma spicy chili crisp or more to your taste. Get the chili flakes with some of the oil
- 5 cloves garlic finely minced/grated
- ¼ tsp salt plus more to taste
Instructions
Prepare the dough:
- If you are using active dry yeast, bloom it with about 1 -2 Tbsp of the milk called for in the recipe and let it sit for 5 minutes until foamy before using
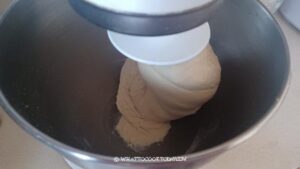
- Place all ingredients for the dough in a mixing bowl of a stand mixer fitted with a dough hook attachment. I use the hook to stir everything to roughly combine the dry ingredients with the wet.
- Start with the lowest speed to combine everything, about 3 minutes. Then increase the speed to medium and let the dough knead until it is soft and smooth. It is a sticky dough, so it will clear the sides of the bowl, but still somewhat sticky. The dough still sticks to the bottom of the bowl. It takes about 5-7 minutes of kneading for me to get to this point
- If your dough feels dry, you can add a bit more milk, 1 Tbsp at a time. You want the dough to be soft and slightly tacky to the touch.
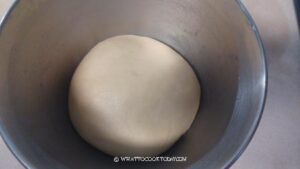
First proofing:
- You can transfer the dough to another oiled large bowl for first proofing or you can proof right in the same bowl, but I usually scoop it out and oil the bowl, oil my hands and round up the dough and put it back into the bowl. Cover and let it proof at a warm place for about 1 1/2 – 2 hours until it doubles in volume (the time depends on the temperature)
Shaping:
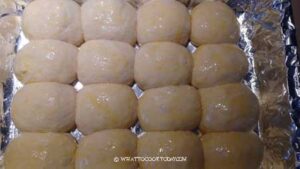
- Divide the filling into 16 portions. You can use two 8 x 8 inch or 9 x 9 inch round or square baking pan or 9 x 13 inches baking pan. I like to line it with parchment paper sling, overhanging on the side for easier removal later
- Deflate the dough and divide it into 16 equal pieces. I usually weigh the dough and then divide it by 16, so I know how many grams of dough are needed for each bun. You can eyeball it, but I like to have the same size for each bun
- Round each dough into a dough ball by pulling the edge towards the center, pinch it the seams together to seal and then flip it over and place the seam side down on the prepared baking pan
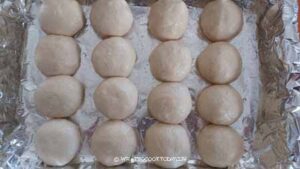
- Repeat with the rest of the dough and filling. I would arrange about 8 buns per pan, if you use two pans. If you use one large baking pan, you can arrange into 4 x 4
Second proofing:
- Cover the pan with lightly oiled cling wrap and let it proof until the buns filled up the pan and really puffy, about 45 minutes to 1 hour, depending on the temperature
- Brush the top of the dough with egg wash.
Baking:
- 15 minutes before the end of the proofing time, start preheating the oven to 350 F (180 C) for conventional oven. For convection oven, please lower the temperature by 20 F (15 C). Position the oven rack in the middle of the oven
- Place two pans side by side in the oven if you are using two pans and bake for 25-30 minutes or until golden brown
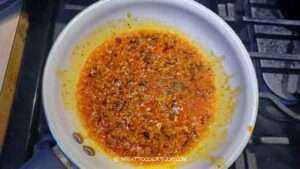
Prepare the chili crisp butter garlic topping:
- 5 minutes before the end of baking time, melt butter in a pan, then add the garlic and cook over medium-low heat until the garlic is aromatic, about 2-3 minutes. Watch the heat as we don't want to burn the garlic. Add the chili crisp and salt and stir to combine. Turn off the heat. Have a taste and add a bit more salt if you think it needs it
Brush with topping:
- Set the baking pan on top of a cooling rack and use a pastry brush to brush the chili crisp butter garlic topping on top of the buns. You may need to use a spoon to scoop the chili crisp and garlic bits to help spread them as evenly as possible on top of the buns
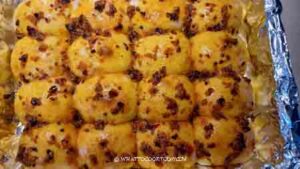
- Grab the parchment paper and lift the buns out from the pan and set on top of cooling rack. Serve them warm
Nutrition
Serving: 1dinner roll | Calories: 182kcal | Carbohydrates: 24g | Protein: 4g | Fat: 8g | Saturated Fat: 2g | Polyunsaturated Fat: 2g | Monounsaturated Fat: 4g | Trans Fat: 0.1g | Cholesterol: 7mg | Sodium: 259mg | Potassium: 121mg | Fiber: 1g | Sugar: 4g | Vitamin A: 90IU | Vitamin C: 3mg | Calcium: 40mg | Iron: 1mg
