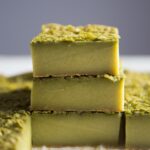
Matcha White Chocolate Mochi Brownies
Servings: 9 pieces ( 8 x 8 square pan)
Calories: 214kcal
If you love the texture of soft and chewy mochi, you will enjoy these matcha mochi brownies. It has a unique texture of dense, soft but springy and chewy all in one bite! It is naturally gluten-free!
Print Recipe
Equipment
Ingredients
- 70 g unsalted butter
- 75 g white chocolate with cocoa butter
- 100 g eggs from 2 large eggs
- 150 g sugar
- 425 g whole milk
- 220 g glutinous rice flour/Mochiko flour
- 15 g matcha powder
- 1 tsp baking powder
- ⅛ tsp salt
Instructions
- Preheat the oven to 350 F (180 C) for conventional oven, 330 F (165 C) for convection oven
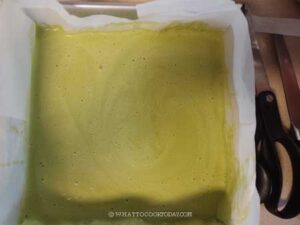
- Oil the 8 x 8 inch square pan and line with one piece of parchment. You can follow this tutorial. The cake batter is very watery so it's good to line the pan with one piece of parchment paper to prevent the batter from leaking to the pan, though it may still leak a bit, but cleaning up is a bit easier
Melt the butter and chocolate:
- Chop the chocolate into small pieces.
- Put the butter and white chocolate in a heatproof bowl and set it on top of a saucepan with some simmering water, not touching the bottom of the bowl. This is a double-boiler set up to melt the chocolate. Let the butter melt and when the white chocolate almost all melt, remove from the heat. Continue to stir until the white chocolate melts
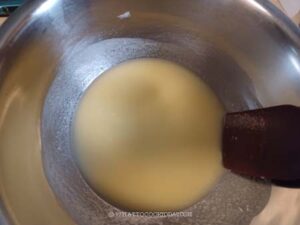
- You can also melt the butter and chocolate in a microwave using a low power , about 50% with 30 seconds interval. If only a bit of chocolate left not melted yet, you can stop microwaving and stir until the chocolate melts. You don't want to overheat the chocolate
Prepare the brownie batter:
- Let the chocolate and butter mixture cool down to lukewarm before mixing with the eggs
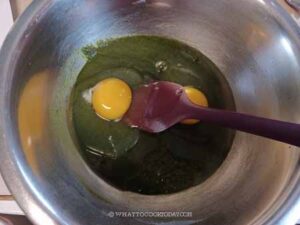
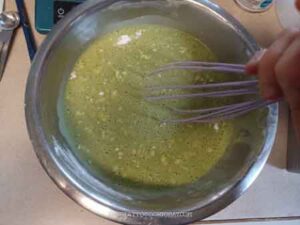
- While waiting, crack 2 egg in a large mixing bowl, add matcha powder, sugar, and whisk until combined. Make sure the eggs are well-combined.
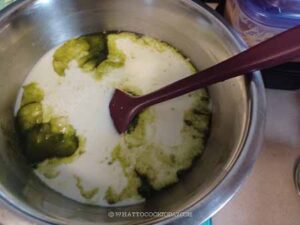
- Then gradually add the milk while whisking. Then add the butter and chocolate mixture and continue to whisk
- In another large mixing bowl, sift mochiko flour, matcha powder, baking powder, and salt and whisk to combine. Pour the wet into the dry and continue to whisk until all are well-combined. The batter is very watery. Don't be alarmed.
- Strain the batter into the prepared baking pan to make sure there is no lumps
Baking:
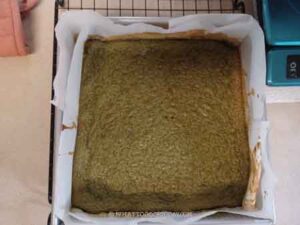
- Place the pan on the middle rack and bake for 60-70 minutes. This is a very watery batter so it takes longer to bake. It took my oven about 70 minutes, but check at 60-minute mark. A toothpick inserted into the center of the cake will come out with a bit of sticky crumbs but it shouldn't be wet
- The cake shouldn't be jiggly anymore when you shake the pan. When you gently press on the surface, it should bounce and dry to the touch
- Place the pan on top of a cooling rack to let it cool down completely. Do not try to cut it when it's still warm. I let it cool down completely at room temperature and then cover it with cling wrap and cut it the next day (if you can wait that long). It tastes better the next day
Serving:
- Oil your knife and cut into 9 or 12 slices, it's up to you how big or small you want each serving
How to store leftover:
- Leftovers can be kept in an air-tight container for 2-3 days. They can also be kept frozen. Wrap each piece well with a cling wrap and put them in a freezer bag. Thaw at room temperature or overnight in the fridge. They can be reheated in a microwave for 20-30 seconds or until just warm and soft and chewy again
Nutrition
Serving: 1serving | Calories: 214kcal | Carbohydrates: 24g | Protein: 4g | Fat: 12g | Saturated Fat: 7g | Polyunsaturated Fat: 1g | Monounsaturated Fat: 3g | Trans Fat: 0.3g | Cholesterol: 65mg | Sodium: 123mg | Potassium: 112mg | Fiber: 0.02g | Sugar: 24g | Vitamin A: 417IU | Vitamin C: 0.04mg | Calcium: 109mg | Iron: 1mg
