Braided Matcha Red Beans Milk Bread
Servings: 14 slices (8 1/2 x 4 1/2 loaf)
Calories: 163kcal
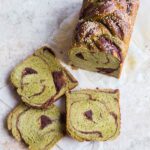
3-Strand braided soft and fluffy matcha bread filled with sweet red bean paste is simply irresistible.
Print Recipe
Ingredients
Dough:
- 300 gr bread flour
- 10 gr matcha powder
- 4 gr instant yeast
- 28 gr sugar
- 4 gr salt
- 25 gr condensed milk
- 100 gr whole milk
- 90 gr water
- 35 gr softened butter plus extra to brush on the loaf after baking
Filling:
- 200 gr red bean paste
Egg wash:
- 1 egg
- 1 Tbsp water
Topping:
- 1 Tbsp White sesame seeds
Instructions
Prepare the dough:
- Combine bread flour, matcha powder, sugar, salt, and yeast in a mixing bowl of a stand mixer fitted with a dough hook attachment. Add condensed milk, milk, and water. Turn the mixer to the lowest speed to let it stir a bit so it won't fly all over the place. Increase the speed to 2 and knead for about 8 minutes until a dough is formed, but not smooth and flexible yet at this point
- At the softened butter and continue to knead again on speed 2 for another 10 minutes or until the dough reaches window pane stage. If you pull a small piece of the dough and gently and slowly pull it, it will stretch thin without breaking. You can stop kneading if you've reached that point. The dough should be smooth and stretchy. Round the dough up into a ball and put in an oiled bowl to prevent sticking
First fermentation:
- Cover the bowl with a plastic wrap or shower cap. Let the dough ferment at a warm place until it doubles in size. If you poke your floured finger into the dough, the indentations stays, the dough is done proofing. This can take somewhere from 1-2 hours or longer depending on the temperature
Shaping:
- Oil the bread pan for easier release later. Transfer the dough to a work surface and punch the air out and round it up into a dough ball. Cover and let it rest for 15 minutes to relax the gluten
- Roll the dough out into about 8 x 14 inches rectangle. Gently spread the sweet red bean paste on the surface of the dough, leaving about a 1/2-inch border on the edge. Try not to smear too hard as we don't want to tear the dough
- Fold the bottom into half and then the top. Use a bench scraper or a pizza cutter to cut the dough into three strands for braiding. Take care not to cut all the way on the top
- Separate the three strands as shown in the photos. Move the right strand to the middle, then the left strand to the middle. Expose the cut side up so you can see the beautiful pattern and the color from red bean paste. Repeat this motion, right to the middle, left to the middle. Refer to the photos for better understanding (hopefully!)
- When you reach the end, simply tuck both ends so it fits the length of your bread pan. Gently lift the shaped dough and put inside the prepared bread pan
2nd proofing:
- Let the dough proof at a warm place until it reaches the top rim. Start preheating oven at 375 F (190 C) for conventional oven, 15 minutes before the end of 2nd proofing. If you use a convection oven, you may want to lower the temperature to 350 F (180 C)
- Prepare the egg wash by mixing the egg with water. Use pastry brush to apply the egg wash on the surface. Sprinkle with some white sesame seeds
Baking:
- Bake in the preheated oven on the middle rack for 30-35 minutes or until nicely golden brown. If the top gets brown too quickly, tent it loosely with aluminum foil, shiny side facing up
Cool down:
- When it's out of the oven, remove it from the pan immediately onto the cooling rack. Brush with some melted butter or coconut oil for a soft crust (optional). Let it cool down completely before slicing. You don't want to slice into hot bread as it is still "cooking" inside
How to store:
- Once the bread has cooled down completely, you can store it in a bread box for 3-4 days. If you don't have a bread box, you can put in an air-tight container and keep at a cool dry place for about 3 days or so
- For longer storage, portion out the slices and wrap in a plastic wrap and put inside a freezer-friendly bag, push out all the air and freeze for one month. Simply thaw at room temperature before serving
Nutrition
Serving: 1slice | Calories: 163kcal | Carbohydrates: 28g | Protein: 5g | Fat: 3g | Saturated Fat: 2g | Polyunsaturated Fat: 1g | Monounsaturated Fat: 1g | Trans Fat: 1g | Cholesterol: 19mg | Sodium: 137mg | Potassium: 49mg | Fiber: 1g | Sugar: 10g | Vitamin A: 132IU | Vitamin C: 1mg | Calcium: 28mg | Iron: 1mg