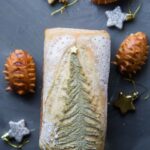
Shokupan with Easy Christmas Tree Scoring and Chocolate Pine Cone
Servings: 12 servings
Calories: 164kcal
Feathery soft and fluffy Japanese milk bread/shokupan decorated with easy Christmas tree scoring on top and I'm also showing how to use the same bread dough to shape into chocolate pine cone buns. The recipe can also be made using sourdough sweet stiff starter.
Print Recipe
Ingredients
If using commercial yeast:
- 350 gr bread flour (12.7% protein content)
- 5 gr salt
- 110 gr heavy cream
- 45 gr sugar
- 6 gr instant yeast
- 20 gr softened butter plus more to brush on the pine cone buns later
If using sourdough:
Prepare sweet stiff levain:
- 40 gr active starter (100% hydration)
- 120 gr all-purpose flour
- 50 gr water
- 20 gr sugar
Dough if using sourdough:
- 222 gr bread flour (12.7% protein content)
- 5 gr salt
- 80 gr milk
- 110 gr heavy cream
- 45 gr sugar
- 20 gr softened butter plus more to brush on the pine cone buns later
For decorating the bread loaf:
- ½ tsp matcha powder
- 2 ½ tsp rice flour
For pine cones rolls:
- 1 tsp cocoa powder
Instructions
Prepare sweet stiff starter for sourdough version:
- This recipe will give you sourdough bread that doesn't taste sour. Why? Because we use a Sweet Stiff Levain, which is built from regular 100% hydration sourdough starter. I don't maintain stiff starter. I build it whenever I need it. I love baking enriched bread/buns and steamed buns using sweet stiff starter.
- I recommend using a starter that is at least two months old and consistently doubles or triples in 4-6 hours when you feed it at 1:1:1 ratio. Young starter will not give the best result
- Mix all ingredients for sweet stiff starter. Cover loosely with a plastic wrap or a lid. It takes about 7-10 hours to triple
Prepare the dough:
- If you use active dry yeast, dissolve active dry yeast in the milk in a mixing bowl of a stand mixer. Let it sit for 10 minutes until foamy. If you use instant yeast, you can skip this step. Add all of the sweet stiff levain (for sourdough version), sugar and salt. Add the flour. Use the dough hook to stir the mixture a bit so the flour won't fly around when you start the mixer. Knead on the lowest speed for 2-3 minutes and then increase to speed 2 and knead for 3 minutes and then speed 4 for another 3 minutes or until it forms a dough that clears the side of the bowl, but not smooth yet
- Add the softened butter and knead on speed 2 for about 2-3 minutes and then increase speed to to 4 and knead for 5-8 minutes or until the dough is elastic, smooth, and reaches a window pane stage, meaning when you gently and gradually stretch the dough thin, it won't break easily. You can stop kneading when it has reaches this point
If you want to make some chocolate pine cones:
- Pinch off about 80-100 grams of dough. This will make 3-4 medium-size pine cones. You can get more if you make them smaller. Add about 1 teaspoon of cocoa powder and knead to distribute the cocoa powder evenly onto the dough
First proofing:
- Lightly oil the bowl, cover with a kitchen towel or loosely with plastic wrap, and let rise in a warm place for about 45 minutes to 1 hour, or until double in volume. if it's colder, it may take longer to proof the dough. Place the cocoa dough in a different small bowl and let it proof together with the main dough at a warm place
- For sourdough version, it may take 2 – 2 1/2 hours or longer for the dough to double at a warm place. It took mine about 2 1/2 hours
- To make ahead and bake the next day, please read more on the details above
Shaping:
- Line a medium-size baking sheet with a parchment paper for the pine cones rolls. Prepare your loaf tin by brushing all sides with some oil to prevent sticking
- Transfer the big and small doughs to a lightly floured work surface. Knock out all the gas, round the big dough up into a dough ball, cover with a cling wrap to prevent them from drying. Rest for 15 minutes to relax the gluten.
- Flatten the dough with your palm and roll it into a rectangle shape, the width should be about twice the width of the loaf pan and about the same length as the loaf pan. Fold the two sides over to meet in the middle and then roll the dough up, not too tight, not too loose, like a Swiss roll
- Place the shaped dough into the pan. Slightly flatten the dough to fill up the pan more evenly
- For pine cones rolls, divide the small dough into 3 or 4 (or whatever number you want) equal size dough. Shape them into ovalish shape, kinda pointy at one end. Keep them covered and let them do the final proofing until they are puffy and almost doubled in size
Final proofing:
- For the bread loaf, cover and let the dough proof again at a warm place until it fills up about 90% of the pan. This may take about 45 minutes to 1 hour or longer, depending on temperature. For sourdough version, this takes about 3-4 hours at 82 F
- For chocolate pine cones, once the pine cones are puffy and light, use a sharp scissors and hold it at a 45-degree angle over the dough and snip the surface all over to create a pinecone effect. You want to snip and kinda lift it up a bit so the effect will be more pronounced
Scoring the bread loaf:
- Mix matcha powder with 1/2 teaspoon of rice flour. This helps to prevent the matcha powder from turning brown after being baked
- Place two pieces of paper on top of the bread pan, looking like a triangle (like a Christmas tree). Sift the matcha powder mixture on top of the uncovered surface on the triangle. Then use the paper to cover the Christmas tree so you can sift some rice flour on the area outside of the Christmas tree (like a snow). Use a toothpick to poke some holes to make them look like snow flakes (refer to the photo above)
- Use a sharp razor to score the outline of the Christmas tree and then score some lines inside the tree and use a pointy scissors to snip the end of each "branch" (refer to the photo above)
Baking:
- 10 minutes before the end of proofing, preheat your oven to 350 F (180 C) for a conventional bottom-heat only oven. For convection top and bottom heat, lower the temperature by 20 F or 15 C
- The pine cones will done proofing before the big loaf. Bake in a preheated oven at 350 F (180 C) for 12-15 minutes. Brush the pine cone rolls with some melted butter while they are still warm to keep the crust soft.
- Place the loaf pan on the middle rack and bake for 35-40 minutes. Place the baking sheet with the pine cones next to the loaf pan. Tent the top of the loaf pan loosely with aluminum foil (shiny side up) after 15 minutes of baking. We don't want too much browning on the top so the Christmas tree won't turn brown. Rotate the pan halfway through baking.
Cooling:
- Brush the pine cone rolls with some melted butter while they are still warm to keep the crust soft. Once the bread loaf is out of the oven, immediately remove from the pan on a cooling rack. Let the bread cools down completely on the rack
- Once they have cooled down, you can put them in an air-tight container and can be kept at room temperature for 2-3 days
Nutrition
Serving: 1serving | Calories: 164kcal | Carbohydrates: 25g | Protein: 4g | Fat: 5g | Saturated Fat: 3g | Polyunsaturated Fat: 0.4g | Monounsaturated Fat: 1g | Trans Fat: 0.1g | Cholesterol: 14mg | Sodium: 176mg | Potassium: 43mg | Fiber: 1g | Sugar: 4g | Vitamin A: 177IU | Vitamin C: 0.1mg | Calcium: 11mg | Iron: 0.3mg