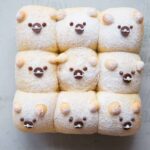
Cute Bear Milk Buns
Servings: 9 buns
Calories: 301kcal
If you love Kawaii food, make these easy and cute bear-shaped milk buns. Not only are they adorable, they are super soft and fluffy!!
Print Recipe
Ingredients
- 300 g bread flour (12.7% protein content) plus more for dusting
- 40 g sugar
- 20 g milk powder
- 4 g instant yeast
- 50 g egg
- 80 g whole milk or more as needed
- 5 g salt
- 40 g unsalted butter softened
For filling: (optional)
- 350 g sweet red bean paste
For decorating:
- White chocolate
- Milk chocolate
- Semi-sweet chocolate chips
Instructions
Prepare the dough:
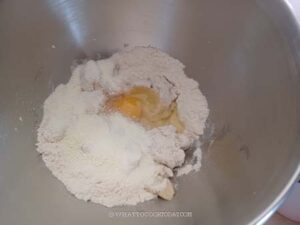
- Add all ingredients for the dough except for the butter. Use the dough hook to stir the mixture a bit so the flour won't fly around when you start the mixer.
- Knead on the lowest speed for 2-3 minutes and then increase to speed 2 and knead for 3 minutes and then speed 4 for another 3 minutes or until it forms a sticky dough, but not smooth yet
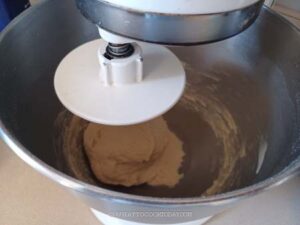
- Add the softened butter and knead on speed 2 for about 2-3 minutes and then increase speed to 4 and knead for 5 minutes or until the dough is soft, smooth, elastic. You may need to stop the machine halfway and scrape the sides of the bowl and continue to knead again. The dough is slightly sticky, but try not to add more flour.
- If you stretch a small amount of the dough thinly, it won't break easily. This is called a window-pane stage. It shows that the gluten development is sufficient and you can stop kneading

First proofing:
- Lightly oil your hands and use a bench scraper to help you scrape the dough off the bowl and round it up into a dough ball. Spray the bowl with some non-stick spray or use an oil, then put it back into the bowl to let it proof until it is doubled in volume. It may take 1 hour or so at a warm temperature. If it's colder, it may take longer to proof the dough
Shaping:
- I use 8 x 8 inch square pan. Lightly oil the bottom of the pan. Line with parchment paper.
- Shape the red bean paste into about 40-45 gram-portions. Round into a ball for easier wrapping
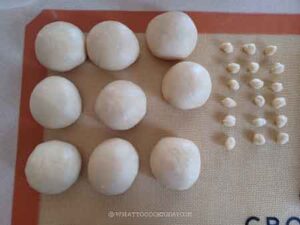
- Punch down the dough to deflate all the air from fermentation. Divide the dough into 9 smaller dough balls. Pinch off two tiny pieces of dough from each dough to make the "ears" for the bears later
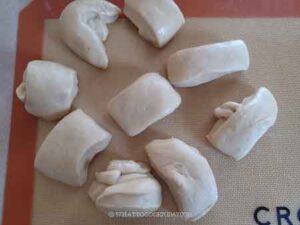
- Round each dough into a round shape. Cover and let them rest for about 5 minutes to relax the gluten.
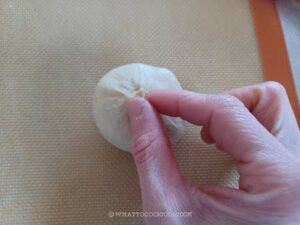
- Flatten each dough and roll into about 5-inch circle, it doesn't have to be exact Place the filling on the center .

- Wrap the dough around it and pinch the seams together to seal it.
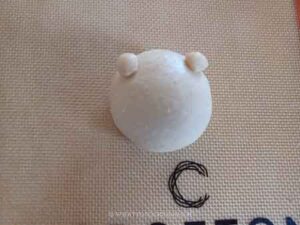
- Roll the tiny ears into a ball shape and attach them on the bigger dough.
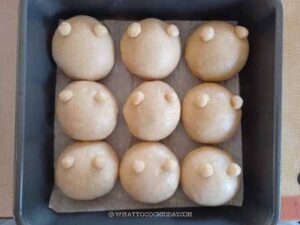
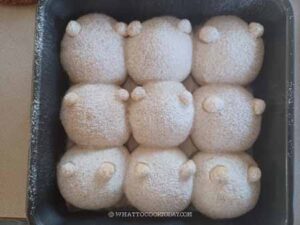
- Place inside the prepared pan
Final proofing:
- Loosely cover with a lightly oiled plastic wrap. Let the dough proof at a warm place until they puff up and fill up the pan, about 1 hour or so, depending on the tempearture. Preheat the oven to 375 F (190 C) for conventional oven, 350F (180 C) for convection oven.

Baking:
- Dust the top of the buns with some flour. Place the baking pan in the middle rack. Bake in the preheated oven for 15-18 minutes until the top edge is just lightly golden brown. The internal temperature should be about 190 F (88 C)
- Let the baked buns cool in the pan for 2-3 minutes and then gently loosen the edges with an offset spatula and remove the baked buns to cool on cooling rack
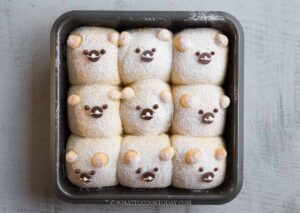
Decorate:
- The buns have to be cooled down completely before you start decorating with chocolate
- Melt a bit of white chocolate and milk chocolate, separately. You can use a microwave or with bain-marie(water bath) method
- I transfer the melted chocolate into a small plastic bag. Use a scissors to snip off a tiny hole. Squeeze a small amount of chocolate to make the eyes for the bear
- I use a semi-sweet chocolate chip for the nose. I flip the pointy end of the chip downward and gently press it into the dough
- Use the melted white chocolate to draw the white line on the chocolate nose
- Let the chocolate harden, which won't take long.
- They are best served on the same day if possible. If you are making the buns ahead, definitely decorate only on the day you plan to serve them
- You can read more details on ingredients, substitutions, variations, and other tips in my post that may answer your questions not covered in the recipe card
Nutrition
Serving: 1serving (with chocolate filling) | Calories: 301kcal | Carbohydrates: 54g | Protein: 8g | Fat: 6g | Saturated Fat: 3g | Polyunsaturated Fat: 1g | Monounsaturated Fat: 1g | Trans Fat: 0.1g | Cholesterol: 33mg | Sodium: 236mg | Potassium: 89mg | Fiber: 2g | Sugar: 24g | Vitamin A: 177IU | Vitamin C: 0.2mg | Calcium: 48mg | Iron: 1mg
