This post may contain affiliate links. Please read our disclosure policy.
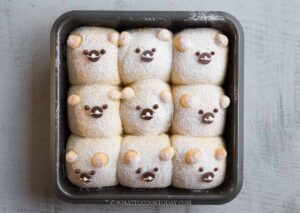
If you love Kawaii food, make these easy and cute bear-shaped milk buns filled with sweet red bean paste. Not only are they adorable, they are super soft and fluffy!!

What are kawaii bear milk buns?
“Kawaii” (かわいい) is a Japanese word that means “cute” or “adorable.” It is used to describe anything that is charming, lovable, or attractive, often in a playful or childlike way. This “cute” style is popular in various forms, from toys and clothing to food and design, like these bear-shaped milk buns! With their cute bear faces, soft pillowy texture, and rich chocolate filling, these kawaii bear milk buns will surely bring smiles to anyone who sees and tastes them! My kids said they looked more like Shiba Inu than bears, LOL! Perhaps because of their squarish shape instead of round shape. Nevertheless, they are still pretty adorable, I think!
Ingredients for Kawaii Bear Milk Buns
1. Bread flour: This flour’s high protein content helps form a sturdy yet soft structure for the buns.
2. Sugar: Adds mild sweetness and aids in browning during baking.
3. Milk powder: Boosts the milky flavor and softness of the dough.
4. Instant yeast: Helps the dough rise quickly and evenly. If you use active dry yeast, make sure to dissolve in a bit of lukewarm water (NOT hot) and wait for about 10 minutes until it is foamy before mixing with the rest of the ingredients
5. Egg: Adds richness and tenderness to the dough.
6. Whole milk: Enhances moisture and softness in the buns.
7. Salt: Balances sweetness and deepens the flavor.
8. Unsalted butter: Adds softness and richness to the dough, making the texture light and fluffy.
9. Sweet red bean paste: You can use store-bought or homemade sweet red bean paste
10. Powdered sugar: A light dusting for a delicate finish on the bear faces.

Cute Bear Milk Buns
Ingredients
- 300 g bread flour (12.7% protein content) plus more for dusting
- 40 g sugar
- 20 g milk powder
- 4 g instant yeast
- 50 g egg
- 80 g whole milk or more as needed
- 5 g salt
- 40 g unsalted butter softened
For filling: (optional)
- 350 g sweet red bean paste
For decorating:
- White chocolate
- Milk chocolate
- Semi-sweet chocolate chips
Instructions
Prepare the dough:
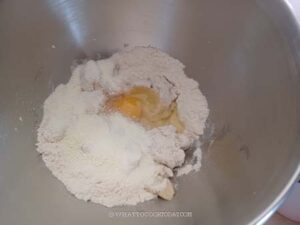
- Add all ingredients for the dough except for the butter. Use the dough hook to stir the mixture a bit so the flour won't fly around when you start the mixer.

- Knead on the lowest speed for 2-3 minutes and then increase to speed 2 and knead for 3 minutes and then speed 4 for another 3 minutes or until it forms a sticky dough, but not smooth yet
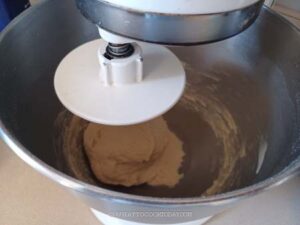
- Add the softened butter and knead on speed 2 for about 2-3 minutes and then increase speed to 4 and knead for 5 minutes or until the dough is soft, smooth, elastic. You may need to stop the machine halfway and scrape the sides of the bowl and continue to knead again. The dough is slightly sticky, but try not to add more flour.
- If you stretch a small amount of the dough thinly, it won't break easily. This is called a window-pane stage. It shows that the gluten development is sufficient and you can stop kneading

First proofing:
- Lightly oil your hands and use a bench scraper to help you scrape the dough off the bowl and round it up into a dough ball. Spray the bowl with some non-stick spray or use an oil, then put it back into the bowl to let it proof until it is doubled in volume. It may take 1 hour or so at a warm temperature. If it's colder, it may take longer to proof the dough
Shaping:
- I use 8 x 8 inch square pan. Lightly oil the bottom of the pan. Line with parchment paper.
- Shape the red bean paste into about 40-45 gram-portions. Round into a ball for easier wrapping
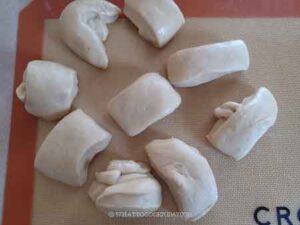
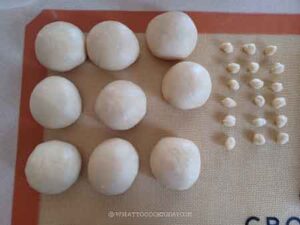
- Punch down the dough to deflate all the air from fermentation. Divide the dough into 9 smaller dough balls. Pinch off two tiny pieces of dough from each dough to make the "ears" for the bears later
- Round each dough into a round shape. Cover and let them rest for about 5 minutes to relax the gluten.
- Flatten each dough and roll into about 5-inch circle, it doesn't have to be exact Place the filling on the center .
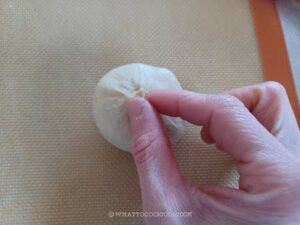
- Wrap the dough around it and pinch the seams together to seal it.
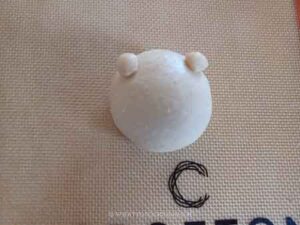
- Roll the tiny ears into a ball shape and attach them on the bigger dough.
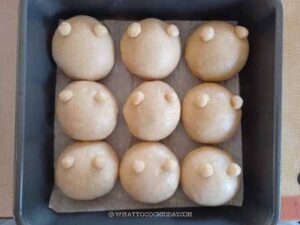
- Place inside the prepared pan

Final proofing:
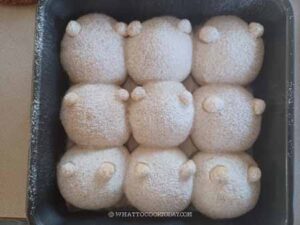
- Loosely cover with a lightly oiled plastic wrap. Let the dough proof at a warm place until they puff up and fill up the pan, about 1 hour or so, depending on the tempearture. Preheat the oven to 375 F (190 C) for conventional oven, 350F (180 C) for convection oven.

Baking:
- Dust the top of the buns with some flour. Place the baking pan in the middle rack. Bake in the preheated oven for 15-18 minutes until the top edge is just lightly golden brown. The internal temperature should be about 190 F (88 C)
- Let the baked buns cool in the pan for 2-3 minutes and then gently loosen the edges with an offset spatula and remove the baked buns to cool on cooling rack
Decorate:
- The buns have to be cooled down completely before you start decorating with chocolate
- Melt a bit of white chocolate and milk chocolate, separately. You can use a microwave or with bain-marie(water bath) method
- I transfer the melted chocolate into a small plastic bag. Use a scissors to snip off a tiny hole. Squeeze a small amount of chocolate to make the eyes for the bear
- I use a semi-sweet chocolate chip for the nose. I flip the pointy end of the chip downward and gently press it into the dough
- Use the melted white chocolate to draw the white line on the chocolate nose
- Let the chocolate harden, which won't take long.
- They are best served on the same day if possible. If you are making the buns ahead, definitely decorate only on the day you plan to serve them
- You can read more details on ingredients, substitutions, variations, and other tips in my post that may answer your questions not covered in the recipe card
RECOMMEDED TOOLS


*Nutrition facts are just estimates and calculated using online tools*

Tips for super soft milk buns
1. Use bread flour: The higher protein content in bread flour helps create the structure necessary for light, airy buns.
2. Milk powder for a soft texture: Milk powder not only adds flavor, but also contributes to a tender crumb. It enriches the dough and adds moisture, ensuring the buns remain soft for days.
3. Butter at the right time: Adding butter after some kneading ensures that the fat doesn’t inhibit gluten formation, leading to a fluffier dough.
4. Don’t skip the second rise: This second proofing step allows the buns to develop a light and airy texture. Skipping this step can lead to denser buns.
5. Control your oven temperature: Baking the buns at a moderate temperature (350°F) ensures they bake evenly without getting too dark or drying out.
Variations
There are many fun and delicious variations of these kawaii bear milk buns. Here are a few ideas to change up the flavor, filling, and appearance:
1. Flavored Dough Variations
Matcha (Green Tea) Milk Buns: Add 1-2 teaspoons of matcha powder to the dry ingredients for a soft, earthy flavor and a beautiful green color.
Cocoa Milk Buns: Add 1-2 tablespoons of cocoa powder to the dough for a chocolatey twist.
2. Filling Variations
Custard-Filled Milk Buns: Make a creamy custard filling and pipe it into the buns after they’ve baked, or fold it inside before baking for a creamy surprise.
Nutella or Chocolate Spread: Replace the chocolate chips with a spoonful of Nutella or your favorite chocolate spread for a rich, indulgent center.
Red Bean Paste: For a traditional Japanese twist, use sweetened red bean paste (anko) as the filling.
Fruit Jams: Use strawberry, raspberry, or apricot jam to create a sweet, fruity filling.
Cream Cheese and Fruit: Mix cream cheese with a touch of sugar and fold in small fruit pieces (like blueberries or raspberries) for a tangy-sweet center.
How to store and reheat
1. Room Temperature: These buns will stay fresh at room temperature for 1-2 days. Store them in an airtight container or wrap them in plastic wrap to prevent them from drying out.
2. Freezing: To keep them longer, wrap the cooled buns individually in plastic wrap, then place them in a freezer bag. They can be frozen for up to 2 months. To enjoy them, simply let them thaw at room temperature, and warm them briefly in the oven or microwave.
3. Reheating: For the best texture, reheat your buns in a preheated oven at 300°F for about 5 minutes or until warmed through. Just know that the chocolate decorations most likely melt when you reheat, but it’s still tasty!

