This post may contain affiliate links. Please read our disclosure policy.
Learn how to make soft fluffy milk buns made with tangzhong and filled with two different custards, the traditional creamy custard cream, and a firmer custard cream. Both are delicious and a perfect breakfast treat or as snack.

What is a custard cream milk bun (cream pan)?
Custard cream buns are popular buns that originated in Europe, although they are enjoyed in many other parts of the world as well. The origins of cream pan can be traced back to the Meiji era in Japan, when Western-style baking was introduced to the country. Over the years, cream pan has become a beloved treat for many Japanese people, who enjoy its sweet and creamy flavor and its soft, tender texture. They are typically made by filling a soft, fluffy bun with a sweet and creamy custard filling that is made from eggs, sugar, and milk. The buns are then baked in the oven until they are golden, resulting in a delicious and satisfying treat that is perfect for any time of day.
Cream pan is a popular Japanese pastry that is a staple in many Japanese bakeries and cafes. This pastry is a soft and fluffy bun filled with a sweet cream that is made from milk, cream, sugar, and eggs. The cream is then surrounded by a layer of golden, flaky bread that is made from a light and airy dough.
These buns are super soft and airy
These buns are made using Tangzhong method (water roux starter). From what I read, this method comes from Japan and it helps to keep your baked bread and buns soft and fluffy, even after days. It’s truly a game-changer for me. It’s basically a mixture of water and flour cooked into a paste and then mix into the dough. A little bit extra work, but SOOOOO worth it!!! You can read more about it from this Soft and fluffy Hokkaido Milk Bread.

How to make custard cream milk buns
1. Prepare the custard filling. Whisk egg yolks, sugar, and salt in a bowl. Gradually add in milk and vanilla extract as you are whisking. Sift in the flour and/or starch (depending on which custard you are preparing, firm or soft type) into the mixture and whisk again until no lumps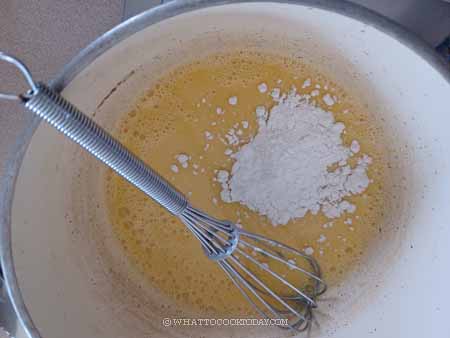
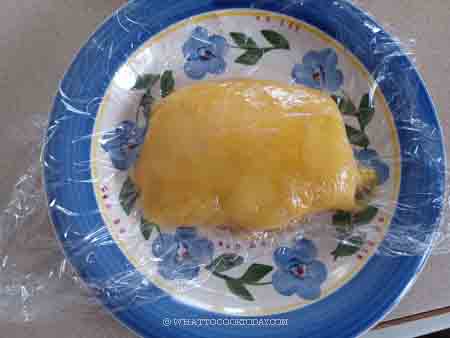
2. Put the saucepan over low heat. Add butter and continue to stir until butter started to melt and continue to cook. For firm custard, cook until the custard thickened to a thick paste consistency. Cover with a cling wrap touching the custard to prevent a layer of skin from forming. Chill in the fridge until it’s firm for at least 30 minutes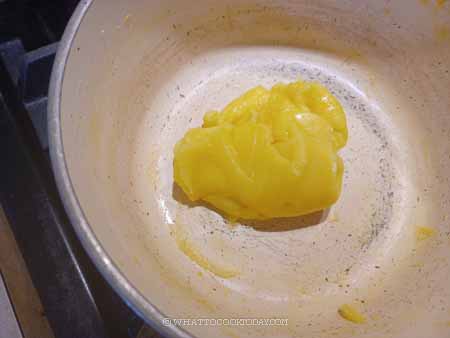
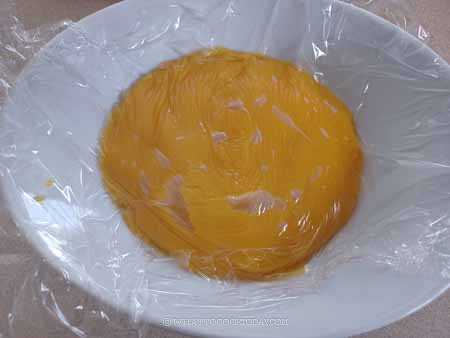
3. For the soft custard, cook until when you lift the whisk, it hangs down as a V shape but will drop down. Remove from the heat. Cover with a cling wrap touching the custard to prevent a layer of skin from forming. Chill in the fridge until it’s firm for at least 30 minutes
4. Prepare the bread following this instruction here
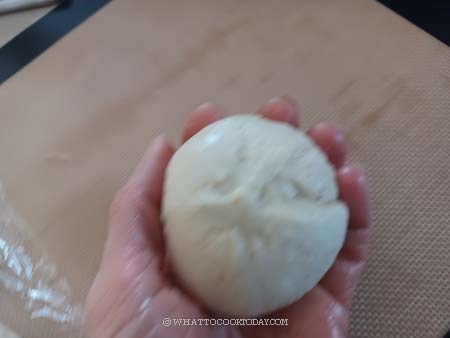
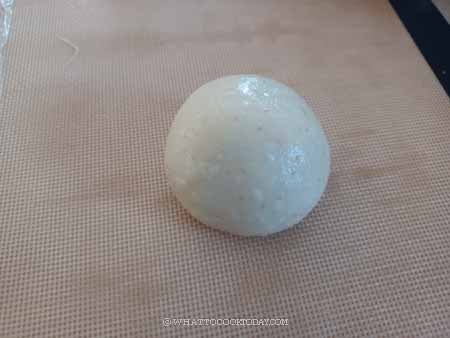
5. Once the dough has doubled in size after the first proofing, punch the dough down, divide into 8 and round them up into dough balls. Cover these doughs loosely with plastic wrap and let them rest for 15 minutes. Make sure you don’t skip this part of resting the dough before shaping
6. When ready to use the custard, for the firm custard, portion into 10 portions and roll into balls for easier wrapping. For the soft custard, stir to loosen it so it’s smooth and creamy again and transfer to a piping bag
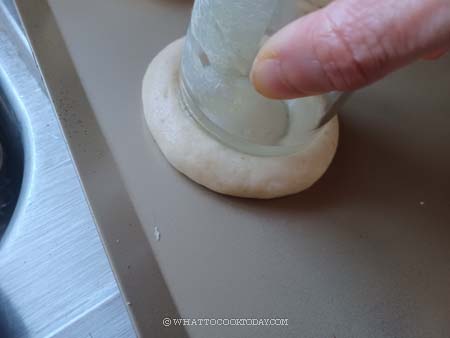
7. To top custard on top of the dough, take one dough and flatten with your palm to about 3-4 inch round. Dip a base of a round cup in a flour to prevent sticking and press the base of the cup on the dough to create a “crater” for you to pipe the custard filling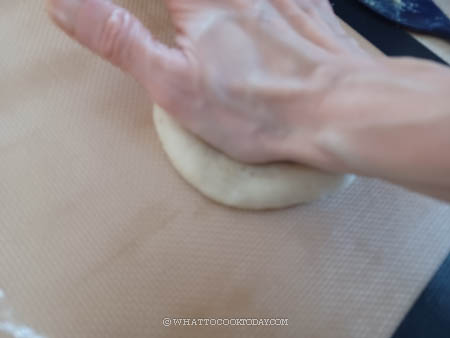
8. Pipe the filling into the crater. Proceed to 2nd proofing
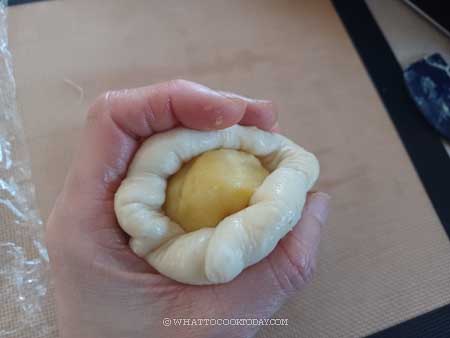
9. To wrap the filling inside the dough with a firm custard, flatten one dough and roll into about 4-5-inch circle. Place one filling ball in the middle. Gather the edge of the dough to enclose and pinch to seal the bun. Place the seam side down on a baking pan lined with parchment paper and repeat with the rest of the dough. Cover with plastic wrap or a clean kitchen towel and proceed to 2nd proofing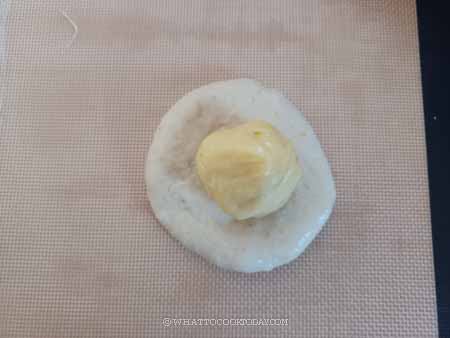
10. Let the dough proof again until they are about 1.5x their original size. It may take about 45 minutes to one hour, depending on the temperature. 10 minutes before the end of the proofing, preheat the oven to 375 F (190 C) for a conventional oven and 350 F (180 C) for a convection oven
11. Pop the baking sheet into the oven (3rd rack from the top) and let them bake for the next 15 minutes or golden brown on top. While the buns are baking, prepare the simple syrup by mixing sugar with hot water until the sugar melts. When the buns are out of the oven, immediately brush the simple syrup on the buns (not on the custard if you pipe custard on top, brush on the bread part)

Did you make this custard cream buns (cream pan) recipe?
I love it when you guys snap a photo and tag it to show me what you’ve made. Simply tag me @WhatToCookToday #WhatToCookToday on Instagram and I’ll be sure to stop by and take a peek for real!

This recipe was last published in 2016 and has been updated with improved recipe for the fillings and new photos on January 30, 2023.
Custard Cream Milk Buns (Cream Pan)- 2 ways
Ingredients
ROUX STARTER (TANG ZHONG):
- 15 gr bread flour
- 90 ml whole milk
DRY INGREDIENTS:
- 300 gr bread flour
- 5 gr instant yeast
- 5 gr milk powder
WET INGREDIENTS:
- 120 ml whole milk
- 1 large egg lightly beaten
- 40 g sugar
- ¼ tsp salt
INGREDIENT TO ADD LAST TO THE DOUGH:
- 40 gr butter softened
EGG WASH:
- 1 egg beaten
- 1 tsp water
SIMPLE SYRUP: (To brush on the buns)
- 15 g sugar
- 15 g hot water
FIRM CUSTARD FILLING: (suitable for wrapping)
- 53 g egg yolks about 3 large yolks
- 40 g sugar
- ¾ tsp vanilla extract
- ⅛ tsp salt
- 200 g milk
- 20 g cornstarch
- 20 g cake flour
- 45 gr unsalted butter
SOFT PIPEABLE CUSTARD FILLING: (for topping on top)
- 53 g egg yolks
- ⅛ tsp salt
- 40 g sugar
- 255 g milk
- ¾ tsp vanilla extract
- 30 g cake flour
- 15 g unsalted butter
Instructions
PREPARE CUSTARD FILLING (can be done the day before):
- Decide which consistency of custard filling you want to make. The firm one is suitable for wrapping inside the dough. The soft one is for piping on top of the dough. If you want the soft custard inside the buns, you can pipe it in after the buns have been baked and have cooled down
- Whisk egg yolks, sugar, and salt in a bowl. Gradually add in milk and vanilla extract as you are whisking. Sift in the flour and/or starch (depending on which custard you are preparing, firm or soft type) into the mixture and whisk again until no lumps
- Put the saucepan over low heat. Add butter and continue to stir until butter started to melt and continue to cook. For firm custard, cook until the custard thickened to a thick paste consistency. For the soft custard, cook until when you lift the whisk, it hangs down as a V shape but will drop down. Remove from the heat. Cover with a cling wrap touching the custard to prevent a layer of skin from forming. Chill in the fridge until it's firm for at least 30 minutes
PREPARE TANG ZHONG: (prepare one day before)
- Place milk and the bread flour in a small saucepan. Whisk until there is no more lumps. Cook this mixture over low-medium heat until it reaches 65 C (149 F). Remove from the heat and cover with a plastic wrap, touching the tangzhong so the skin won't form. I highly suggest using this the next day instead of using it on the same day. Store this in the fridge
MAKE THE DOUGH:
- Mix all the dry ingredients together in a mixing bowl. Make a well in the center and pour in the wet ingredients and the tang zhong you made earlier. Use a dough hook attachment to knead the dough until all the crumbly dough starts to come together into one mass, it may take about 5 minutes for this to happen. Don't be tempted to add any liquid. You may need to stop halfway and scrape the dough off the hook and the sides of the bowl and knead again
- Once you have a smoother dough, add the softened butter gradually. The dough will turn into a REAL sticky mess again because of the butter, just keep kneading and stop halfway and scrape the dough off the hook and bowl again and continue to knead until the butter is absorbed by the dough. IT WILL HAPPEN, don't worry! DO NOT be tempted to add any extra flour. You will get a shiny smooth dough that is very elastic and it reaches a window pane stage. When you stretch the dough slowly and thinly, it won't break. This may take about 15-20 minutes or longer to knead the dough to this stage on my kitchen aid stand mixer.
1ST PROOFING:
- Place this dough in a lightly oiled large bowl, cover it with a clean and damp tea cloth or plastic wrap and let it rise at a warm place for about 1 hour. It may not double in size, but it will puff up some for sure.
SHAPING:
- Punch the dough down, divide into 10 and round them up into dough balls. Cover these doughs loosely with a plastic wrap and let them rest for 15 minutes. Make sure you don't skip this part of resting the dough before shaping
- When ready to use the custard, for the firm custard, portion into 10 portions and roll into balls for easier wrapping. For the soft custard, stir to loosen it so it's smooth and creamy again and transfer to a piping bag
TO TOP CUSTARD ON TOP OF THE DOUGH:
- Take one dough and flatten with your palm to about 3-4 inch round. Dip a base of a round cup in a flour to prevent sticking and press the base of the cup on the dough to create a "crater" for you to pipe the custard filling
- Pipe the filling into the crater. Proceed to 2nd proofing
TO WRAP THE FILLING INSIDE THE DOUGH:
- Flatten one dough and roll into about 4-5-inch circle. Place one filling ball in the middle. Gather the edge of the dough to enclose and pinch to seal the bun. Place the seam side down on a baking pan lined with parchment paper and repeat with the rest of the dough. Cover with a plastic wrap or a clean kitchen towel and proceed to 2nd proofing
2ND PROOFING:
- Let the dough proof again until they are about 1.5x their original size. It may take about 45 minutes to one hour, depending on the temperature. 10 minutes before the end of the proofing, preheat the oven to 375 F (190 C) for a conventional oven and 350 F (180 C) for a convection oven
BAKING:
- Pop the baking sheet into the oven (3rd rack from the top) and let them bake for the next 15 minutes or golden brown on top
- While the buns are baking, prepare the simple syrup by mixing sugar with hot water until sugar melts
- When the buns are out of the oven, immediately brush the simple syrup on the buns (not on the custard if you pipe custard on top, brush on the bread part)
STORING:
- Leftover buns with a firm custard can be kept at room temperature for 3 days. Leftover buns with creamy custard on top need to be kept in an air-tight container in the fridge for up to one week
REHEATING:
- Wrap the buns in aluminum foil and reheat in oven or toaster oven or air fryer at 350F for about 10 minutes to warm up, or simply warm it in the microwave oven in a 30 seconds increment until warmed through
*Nutrition facts are just estimates and calculated using online tools*
You may also like this soft fluffy steamed custard buns (nai wong bao)


28 comments
Is there an alternate to the milk powder or can you leave it out? Growing up I had lots of these buns in kopi Kedais and never see them anywhere anymore
Hi Bea, you can just leave it out. I grew up with these buns too 🙂
I’ve twice now had trouble with the custard. It is not nearly thick enough to roll into balls. When you measure, are you using the weight provided, or the volume? They are very different by my measurements. Also, does the custard need to be heated to a certain temperature? And/or for a certain amount of time? It thickened on the stove, but even after refrigerating for several hours it was still too liquid-y to put in the buns.
The buns (even though they weren’t filled) were delicious! I just want to be able to make the custard right so I can fill them!
I used the weight measurement, I prefer to weigh my ingredients as it is more accurate. I have just made this custard for another recipe and didn’t have an issue with it not thickening. I didn’t measure the temperature of the custard, but you need to cook it until it’s like thick paste consistency. I hope this helps.
The total cooking time is way off. I had to cut the rising times way back because I trusted the total time instead of reading through the recipe!
I’m sorry to say that the system is not perfect. You forgot to push one button and the total time didn’t add up. Please go by the details in the recipe.