This post may contain affiliate links. Please read our disclosure policy.
Learn how to make the softest fluffiest shokupan milk bread using tangzhong and autolyse methods. A bread that you can just tear layer by layer. A complete tutorial with step-by-step photos and a video recipe to make sure you can replicate this in your own kitchen.
WHAT IS SHOKUPAN?
Shokupan means food bread or eating bread in Japan. In general it means plain bread. Sometimes you may hear people refer to this shokupan as Hokkaido milk bread. But a Japanese friend told me that there’s no such thing as Hokkaido milk bread lol! Perhaps the term Hokkaido milk bread is popular outside of Japan, but the locals only know this as shokupan. In Japan, shokupan is prepared with yudane, which is similar method with the Chinese tangzhong, but the ratio of water and flour is different.In this recipe I use tangzhong method. You can’t go wrong with either yudane or tangzhong.
TANGZHONG MILK BREAD
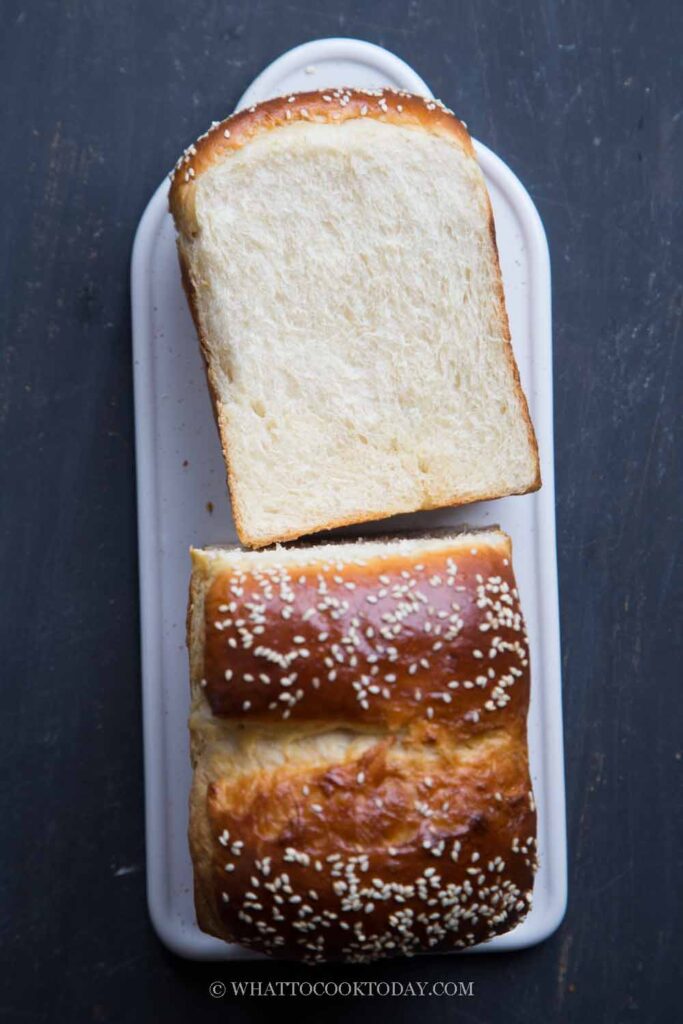
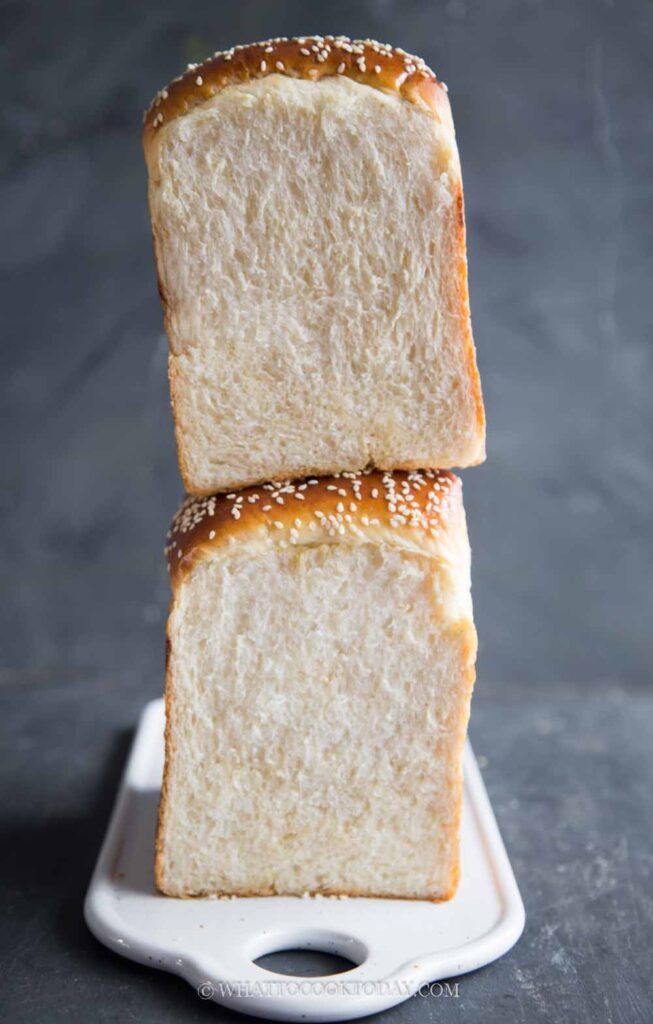
Tangzhong is a technique of bread making in Asia by using a roux starter, which is basically made with milk (or water) and flour that is being cooked into a paste and then incorporated into the dough. This tangzhong method contributes to the ultra soft, pillowy and tearable texture or this milk bread. So soft that my daughter who isn’t crazy about bread, love this milk bread. The first bite into this bread and she said “Mommy, this is one delicious bread”. I know babe !! that’s the exact memory I have of me when I had that bread as a little girl. Tangzhong milk bread is seriously soft and fluffy! I’ve been “tang zhong-ing” every bread and roll I’ve made ever since. Won’t you?
HOW TANGZHONG MAKES DOUGH SOFTER
From what was explained to me, tangzhong adds extra hydration to the dough. BUT HOW? Imagine incorporating the extra 90 ml of liquid (for making tangzhong roux in the recipe) directly into the dough making process, it would be a wet mess, which means you need to add more flour so you have a workable dough (kinda defeats the purpose for that extra hydration!). To solve this problem, the bakers back in the old days thought of this method of thickening the liquid with the flour (in this case bread flour) into the paste and THEN only this gelatinized paste is incorporated into the dough later. I thought…WOW! that was brilliant! It works. The dough is rather sticky at first, but we can work through the whole process to achieve soft, stretchy dough without adding any more additional flour.
AUTOLYSE IN BREADMAKING
I learned about autolyse from here. This method was developed by a French bread expert and scientist. I won’t elaborate in this post but in a nutshell, you are basically hydrating the flour with water and then let them rest for the period of as short as 20 minutes to as long as 1 hour or sometimes longer. During this resting period, some magic happens. Once flour absorbs the water, it activates enzymes in the flour that stimulate the proteins to start gluten development and then the enzymes also break down the starch to simple sugar, which later will feed the yeast when we proof the dough. All this happens before we even knead the dough. I used to think the more we knead the dough the better. Well, the dough needs to be kneaded, BUT, overworking it will deteriorate its flavor, texture, and color. So, autolyse reduces kneading time, which in turn improves the quality of your bread. All you need to do is that little break!. Just like how my misbehaved kids need a little time-out somedays 😉
A MODIFIED AUTOLYSE (FERMENTOLYSE)
If I may call it so! Hopefully, the French scientist won’t kill me for this!!! In this recipe, I didn’t do the simple autolyse as I mentioned above with just flour and water (that’s how it is usually done). Because we’re making milk bread and the recipe calls for milk, I use milk instead and I also included yeast and a few other ingredients in the process. We call this a fermentolyse when you mix everything.
USE A GOOD-QUALITY INSTANT DRY YEAST
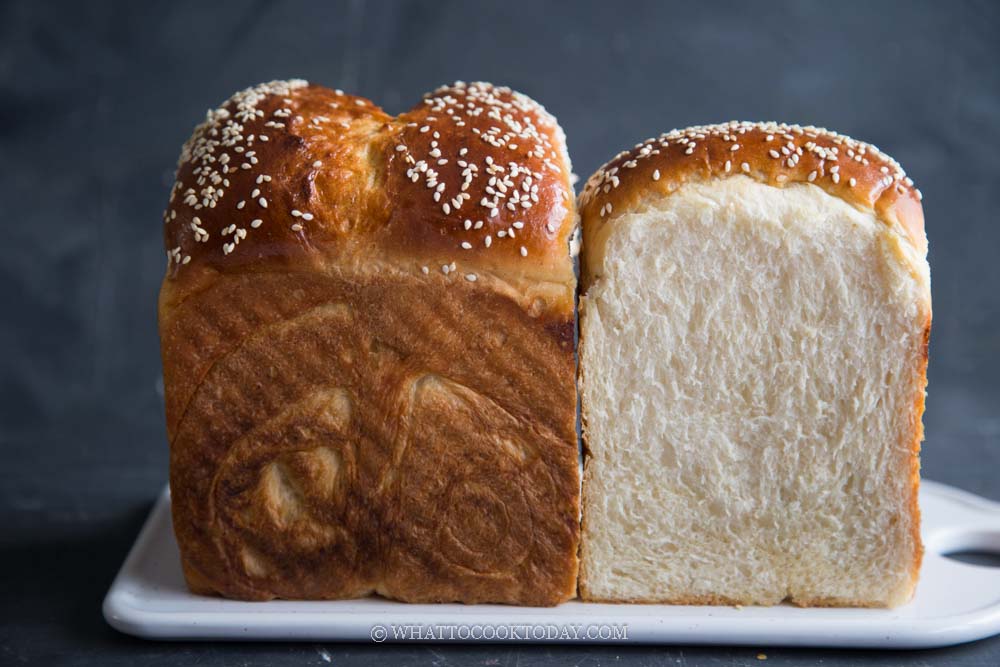
I swear by this SAF Gold instant yeast for enriched bread dough recipes. It’s a game-changer. This yeast is strong and made for dough that has high sugar and high fat. It gives the loaf a really high rise, airy, and works quickly. The total flour used in this recipe is only 315 grams but it filled up my tall bread pan and beyond!!!! I usually couldn’t get a high rise like this if I use active dry yeast with that amount of dough.
TOP TIPS YOU NEED TO READ BEFORE YOU START MAKING THIS RECIPE
SALT AND BUTTER (OIL) INTERFERE WITH GLUTEN DEVELOPMENT
1. Don’t mix salt in too early
I used to just throw everything in and start kneading. I’ve learned that salt interferes with gluten development. It tightens the gluten network and making it hard to stretch. Only add salt after a smoother dough is formed, this is called a “delayed salt method” in the breadmaking world.
2. Don’t mix in oil or butter too early
Butter or oil also interferes with gluten development. They coat the protein that we need to develop the gluten in our bread. Softened butter is added only after a relatively smooth dough is formed
3. Use a machine if possible
I’m not sure about you, but I prefer to use a stand mixer with a dough hook attachment to get this job done. It’s really going to make your life easier. REALLY! But of course, it’s possible to use your elbow grease too! Just not me!
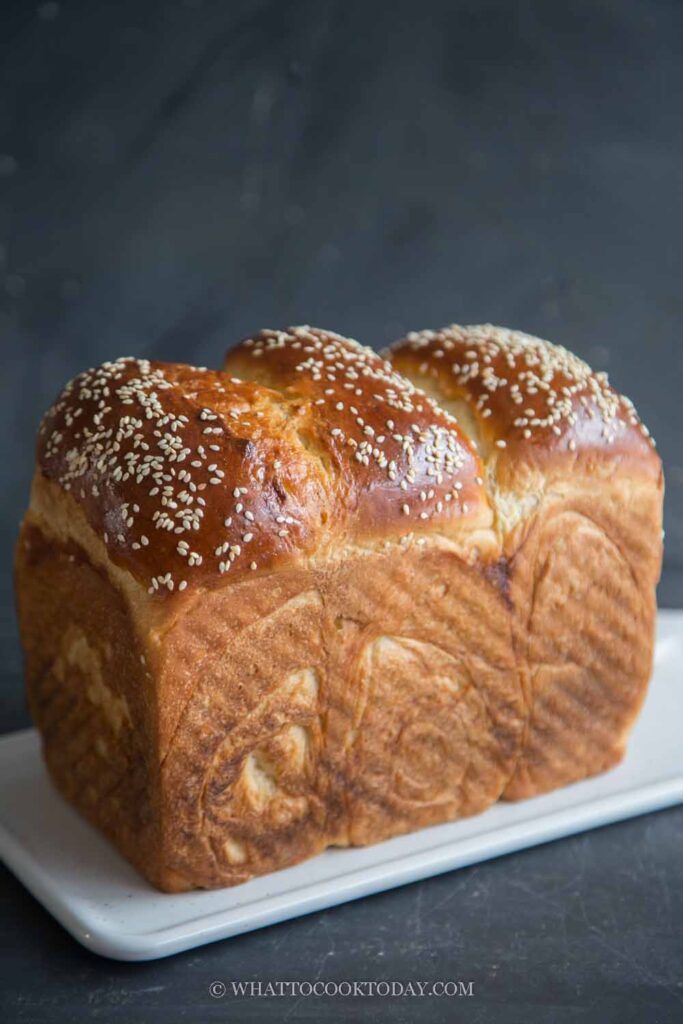
How To Make Soft and Fluffy Shokupan/Hokkaido Milk Bread (Tangzhong Method)
Ingredients
Roux starter (Tangzhong): prepare one day before for the best result
- 15 g bread flour (12.7% protein content)
- 90 g whole milk
Dry ingredients:
- 300 g bread flour (12.7% protein content)
- 4 g SAF Gold instant yeast or instant yeast, see notes
- 28 g milk powder
Wet ingredients:
- 80 g whole milk plus more as needed
- 55 g egg lightly beaten, 1 large egg
Ingredient to add last to the dough:
- 40 g unsalted butter softened
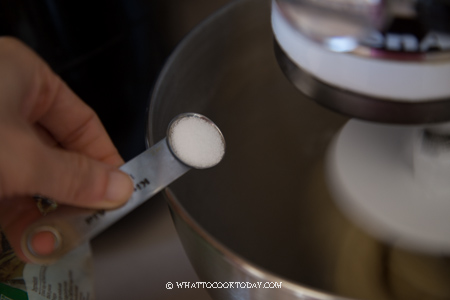
- 4 g salt
- 30 g sugar see notes
Egg wash:
- 1 egg beaten
Toppings (optional):
- Sesame seeds for sprinkling (optional)
- Almond Thinly sliced
Instructions
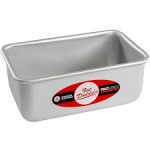
- I use this Pullman loaf pan that measures 8.3x 4.8 x 4.5 inch on the exterior and the interior measures 7.5 x 4x 4.4 inch. It's a tall loaf pan. You can also a standard regular 8.5 x 4.5 x 2.75 inch loaf pan
- To adjust the recipe to different pan size, please see my post below
Prepare tang zhong:
- Place milk and the bread flour in a small saucepan. Whisk until there is no more lumps. Cook this mixture over low-medium heat until it reaches 65 C (149 F). Remove from the heat and cover with a plastic wrap, touching the tangzhong so the skin won't form. You can use it on the same day once it has cool down, but I highly suggest using this the next day. It improves the taste of the bread. Store this in the fridge
Make the dough:
- If you use active dry yeast, mix the yeast with 2 tablespoons of warm milk you are going to use in the recipe to bloom the yeast. Let it sit for 10 minutes until it is foamy and bubbly.
- Mix all the dry ingredients together in a mixing bowl. Make a well in the center and pour in the wet ingredients and the tang zhong you made earlier. Use a dough hook attachment to knead the dough on speed 2 until all the crumbly dough starts to come together into one mass, it may take about 2-3 minutes for this to happen. Don't be tempted to add any liquid. You may need to stop halfway and scrape the dough off the hook and the sides of the bowl and knead again several times
- Once it comes into a rough dough, stop the machine. The dough will not be smooth, don't worry. Cover the dough and let it rest for 20 minutes. This is an important rest that bakers refer to as an autolyse (though in our case it's a short one. Read my post above for detail)
- After the rest, turn on and knead the dough again on speed 2 and knead for 1-2 minutes until it is a bit smoother. Then add the salt and sugar into the dough. Continue to knead until the dough is relatively smooth. You need to stop and scrape the dough off the hook and the bowl several times during this process. I promise it's worth the effort!
- Once you have a smooth dough, turn the machine back on again to knead and increase speed to 4. Gradually add in the softened butter a bit by a bit. The dough will turn into a REAL sticky mess again because of the butter, just keep kneading and stop halfway and scrape the dough off the hook and bowl again and continue to knead until the butter is absorbed by the dough. IT WILL HAPPEN, don't worry! DO NOT be tempted to add any extra flour. You will get a shiny smooth dough that is very elastic. This may take about 10-15 minutes. The dough must pass a windowpane test, meaning, when you stretch a small amount of dough thinly, it won't break and a light can pass through
1st proofing:
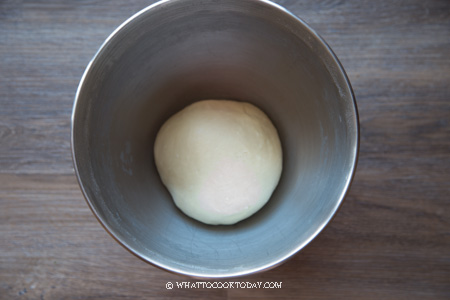
- Place this dough in a lightly oiled large bowl, cover it with a clean and damp tea cloth or plastic wrap and let it rise at a warm place for about 1 hour until the dough doubles in volume
To bake the next day:
- If you don't plan to bake on the same day, deflate the dough and then round it up into a dough ball and keep in an air-tight container and put it in the coldest part of your fridge (not freezer) for up to 12 hours. I don't recommend any longer than that. Proceed to shaping
Shaping:
- Lightly oil your loaf pan all over. You can also use a non-stick spray. If the dough is cold from the fridge, let it sit at room temperature for about 15-20 minutes and the proceed to shaping
- Deflate the dough and separate it into 3 equal-weight dough. Cover the dough with plastic wrap and let them rest for 10 minutes to relax the gluten
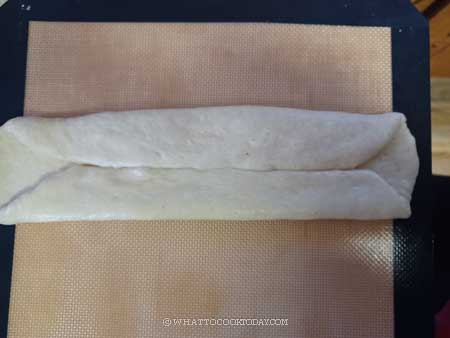
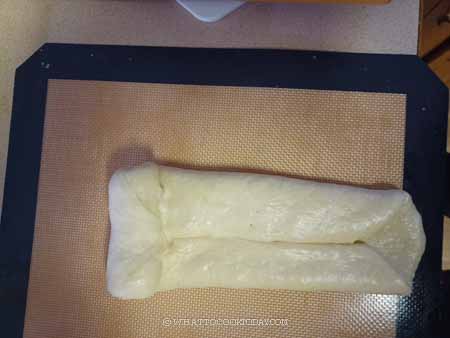
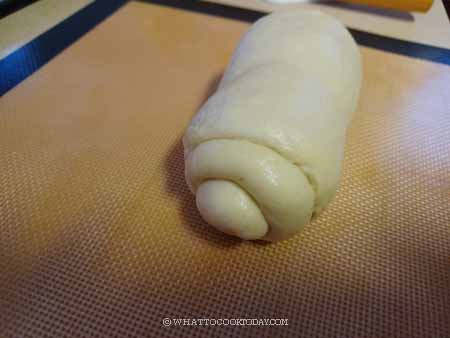
- Roll each ball out into a rectangle shape (don’t have to be exact). Fold the two long sides up and then roll it from the bottom to top. Place the seam side down in the loaf pan and repeat with the other 2 doughs. Place them next to each other. Cover with a plastic wrap
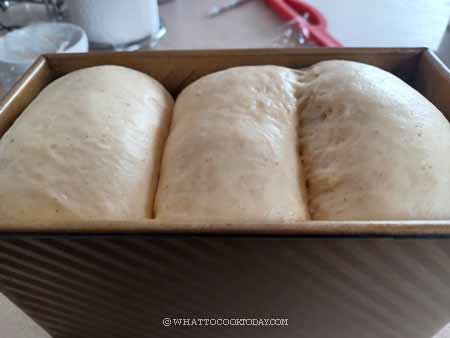
2nd proofing:
- Let the dough proof again for another 45 minutes to one hour (or longer depending on the temperature and the yeast you use) or until they fill up the loaf pan, about 90%. Brush the top of the dough with egg wash
- Sprinkle with some white sesame seeds or other seeds of your choice if you like
- 15 minutes before the end of proofing, preheat oven to 375 F (190 C) for conventional oven. If you use a convection oven, lower the temperature by 20 F or 15 C.
Baking:
- Put the pan on the middle rack and let it bake for the next 25-30 minutes depending on the oven, mine took about 25 minutes. The internal temperature on the center of the bread is at least 190 F (88 C). I highly recommend a digital thermometer to take out the guess work!
- Remove from the oven and remove the bread from the pan and cool down completely on the cooling rack. Enjoy and once it's cooled down completely, wrap it up with plastic wrap and it's good for about 3 days or so at room temperature (it didn't last that long in our house)
RECOMMEDED TOOLS

Marv’s Recipe Notes
- I highly recommend using instant yeast that is made for leavening enriched sweet bread. I love SAF Gold Instant Yeast. It leavens the bread beautifully and gives the bread a tall rise. If you use regular instant yeast or active dry yeast, expect the fermentation to be much longer. If you use active dry yeast, use 5 g (1 1/4 tsp) and bloom the yeast first before using.
*Nutrition facts are just estimates and calculated using online tools*
How to adjust the recipe for different pan sizes
If this is your first time making this recipe with Pullman loaf pan, I suggest baking without the lid first to figure out how the dough fills the pan after baking. The type of flour you use and hydration affect how much the dough rises too.
1. For 8.5 x 4.5 x 2.6 inches loaf pan, follow the recipe as is, but loaf will be shorter and wider
2. For 9 x 5 x 2.75 inches loaf pan, follow the recipe as is, but loaf will be shorter and wider
3. For small Pullman loaf pan 9 x 4 x 4 inches loaf pan from USA Pan, you can 1.2 x the recipe
4. For large Pullman loaf pan 13 x 4 x 4 inches loaf pan from USA Pan, you can 1.6 x the recipe
How to make tangzhong starter
Fortunately, making tangzhong starter is a no-brainer. It’s fast and it’s pretty fool-proof, you really can’t mess it up. Here’s how:
1. Mix bread flour with milk (or water). Stir until they are combined and no more lumps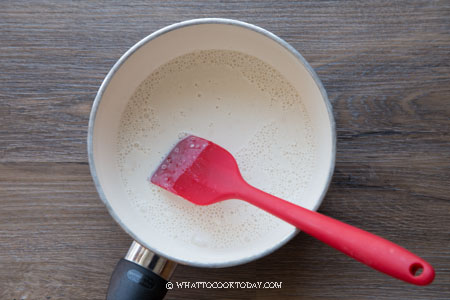
2. Cook this mixture over low-medium heat until it reaches 65 C (149 F). Remove from the heat and cover with plastic wrap, touching the tangzhong so the skin won’t form. You can use it on the same day once it has cool down but, I highly suggest using this the next day instead of using it on the same day. Store this in the fridge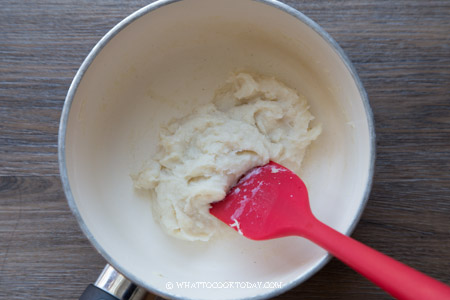
How to make ultra soft shokupan with tangzhong
Now that you have your tangzhong, you can proceed to prepare the bread dough. Here’s how:
1. Mix all the dry ingredients together in a mixing bowl. Make a well in the center and pour in the wet ingredients and the tang zhong you made earlier. 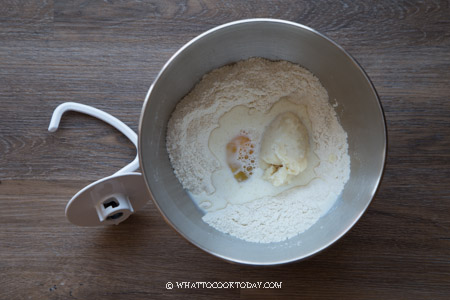
2. Use a dough hook attachment to knead the dough on speed 2 until all the crumbly dough starts to come together into one mass, it may take about 2-3 minutes for this to happen. Don’t be tempted to add any liquid. You may need to stop halfway and scrape the dough off the hook and the sides of the bowl and knead again several times 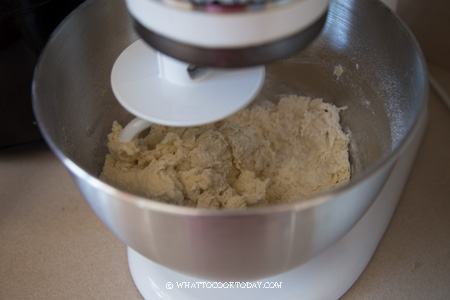

3. Once it comes into a rough dough, stop the machine. The dough will not be smooth, don’t worry.Cover the dough and let it rest for 20 minutes. This is an important rest that bakers refer to as an autolyse (though in our case it’s a short one. Read my post above for detail)
4. After the rest, turn on and knead the dough again on speed 2 and knead for 1-2 minutes until it is a bit smoother. Then add the salt and sugar into the dough. 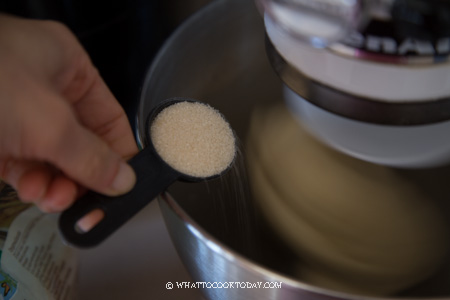
5. Continue to knead until the dough is relatively smooth. You need to stop and scrape the dough off the hook and the bowl several times during this process. I promise it’s worth the effort!
6. Once you have a smooth dough, turn the machine back on again to knead and increase speed to 4. Gradually add in the softened butter a bit by a bit. The dough will turn into a REAL sticky mess again because of the butter, just keep kneading and stop halfway and scrape the dough off the hook and bowl again and continue to knead until the butter is absorbed by the dough. IT WILL HAPPEN, don’t worry! DO NOT be tempted to add any extra flour. 

7. You will get a shiny smooth dough that is very elastic. This may take about 10-15 minutes. 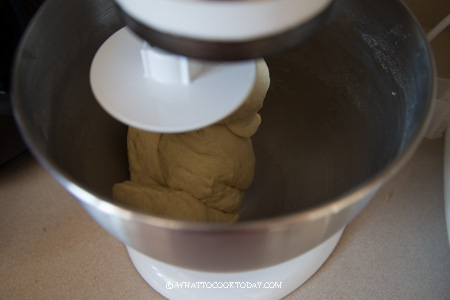
8. The dough must pass a windowpane test, meaning, when you stretch a small amount of dough thinly, it won’t break and a light can pass through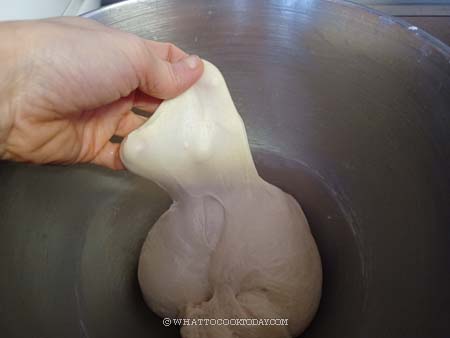
9. Place this dough in a lightly oiled large bowl, cover it with a clean and damp tea cloth or plastic wrap and let it rise at a warm place for about 1 hour until the dough doubles in volume. When you poke your finger into the dough, the indentations stays and the dough doesn’t collapse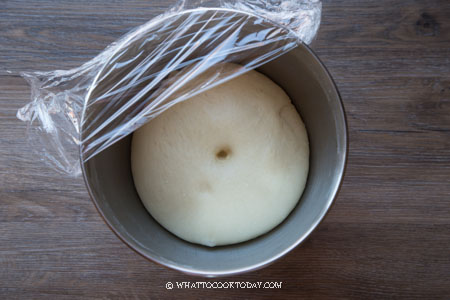
10. Lightly oil your loaf pan all over. You can also use a non-stick spray. Deflate the dough and separate it into 3 equal-weight dough. Cover the dough with plastic wrap and let them rest for 10 minutes to relax the gluten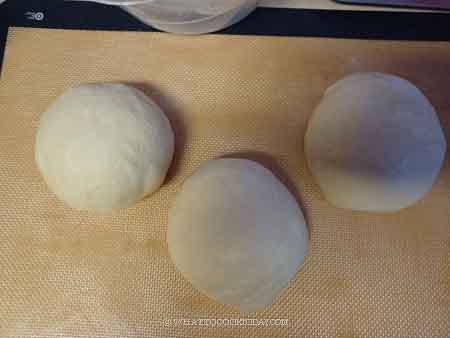
11. Roll each ball out into a rectangle shape (don’t have to be exact). Fold the two long sides up and then roll it from the bottom to top. 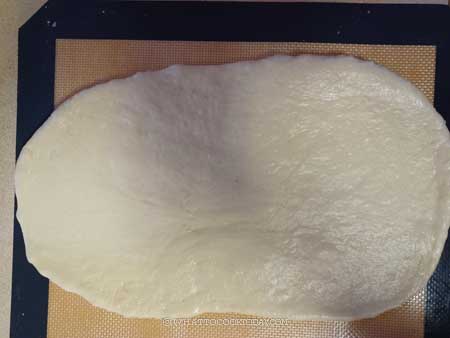
12. Place the seam side down in the loaf pan and repeat with the other 2 doughs. Place them next to each other. Cover with a plastic wrap. Let the dough proof again for another 45 minutes to one hour (or longer depending on the temperature and the yeast you use) or until they fill up the loaf pan, about 90%. Brush the top of the dough with egg wash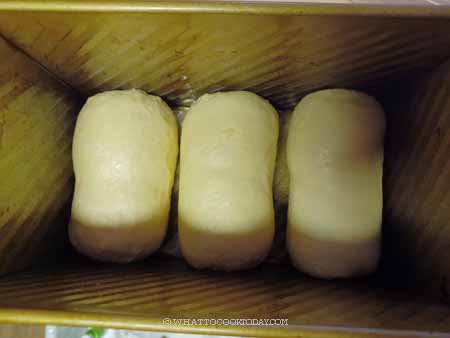
13. Sprinkle with some white sesame seeds or other seeds of your choice if you like. 15 minutes before the end of proofing, preheat oven to 375 F (190 C) for conventional oven. If you use a convection oven, lower the temperature by 20 F or 15 C.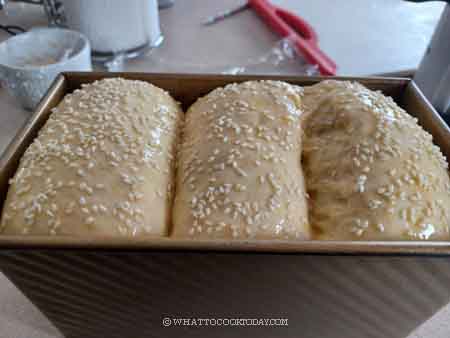
14. Put the pan on the middle rack and let it bake for the next 25-30 minutes depending on the oven, mine took about 30 minutes. It will be golden brown on top and the internal temperature on the center of the bread is 190 F (88 C). Remove from the oven and remove the bread from the pan and cool down completely on the cooling rack. Enjoy and once it’s cooled down completely, wrap it up with plastic wrap and it’s good for about 3 days or so at room temperature (it didn’t last that long in our house)

Can I substitute bread flour with all-purpose flour ?
I won’t if I were you, but if you must, yes you can. Bread made with all-purpose flour (lower gluten content) usually doesn’t rise as high compared to bread flour. It is also less chewy compared to bread flour. If all those aren’t important to you, then all-purpose flour it is! Also, you may need to start with a lesser amount of liquid if you use all-purpose flour because it absorbs water differently compared to bread flour.
Can I use a bread maker to make this recipe ?
The order of ingredients that go into the bread maker is slightly different from the traditional recipe, as far as I know. I don’t own a bread maker or bread machine, so I really can’t tell you for sure. I’m pretty sure you probably can, I just don’t have enough knowledge to advise on how to do so.
To make the dough and freeze (not recommended)
I personally don’t recommend doing this, but I know freezing unbaked yeasted dough is a great idea to be ahead of your game. A few modifications need to be done because some yeast that has been activated may die in the cold freezer. I actually prefer to bake and then freeze, but if you must make ahead and freeze the unbaked dough, here are what you can do:
1. Prepare the dough as instructed in the recipe up to the point where you have done kneading until it reaches a windowpane stage
2. DO NOT let the dough rise. Divide the dough and shape them immediately
3. Place them on a baking sheet lined with parchment paper and put the shaped buns not touching each other in the coldest part of your freezer, for about an hour or so until they are hard but may not be completely frozen. We want them to be frozen as quickly as possible to avoid ice crystals from interfering with the yeast
4. Transfer them to a freezer bag and push all the air out and seal and keep them frozen
5. I recommend not to freeze them for more than 2 weeks for the best result (I would do only one week if I were you). Freezing them for too long will decrease the yeast ability to rise well because some of them may have died in the cold
6. When ready to bake, thaw at room temperature and then proceed to let them rise at a warm place and bake as instructed in the recipe
To make the dough and refrigerate (recommended)
1. Prepare the dough as instructed in the recipe up to the point where you have done kneading until it reaches a windowpane stage
2. Put it in a lightly oiled bowl and cover with a lid or wrap to prevent the dough surface from drying out. Let it do its first rise at a warm place for about 30 minutes or until you notice it is about 50% puffy. Put this in the fridge to continue the first rise in the fridge. The dough can be kept in the fridge for up to 12 hours for the best result. Make sure your bowl is large enough as the dough will rise and grow larger
3. On the day you are ready to do the baking, get the dough out and let the dough sit at room temperature for about 30 minutes, and then proceed to shape and continue with second proofing at a warm place. Please note that the final proofing will take longer than usual because of the colder dough
Did you make this shokupan/Hokkaido milk bread using tangzhong recipe?
I love it when you guys snap a photo and tag it to show me what you’ve made. Simply tag me @WhatToCookToday #WhatToCookToday on Instagram and I’ll be sure to stop by and take a peek for real!

101 comments
Hi! Have you tried combining the tangzhong method with preferments like poolish/nakadane for shokupan? Would you recommend it?
Hello! I haven’t tried preferment like poolish with tangzhong, but I have done sourdough with tangzhong, so I don’t see why you can’t do poolish with tangzhong. I think it should work too!
Great recipe! The bread turns out so nice n fluffy. Nicest bread I made thus far. 👍👍👍
Hi Karen, I’m happy to know that the recipe worked out for you 🙂