
Pineapple Roll Tarts
Servings: 45 pieces (depends on the size)
Calories: 63kcal
These buttery, melt-in-your-mouth tarts encase a sweet-tart pineapple jam filling, symbolizing good fortune and prosperity.
Print Recipe
Ingredients
For the pastry:
- 113 g unsalted butter softened, use European butter. See notes
- 35 g powdered sugar
- 36 g egg yolks 2 egg yolks from large eggs
- ½ tsp vanilla
Dry ingredients:
- 100 g cake flour plus more as needed
- 30 g cornstarch
- 20 g milk powder
- ¼ tsp salt
Filling:
- 400 g Pineapple jam homemade or store-bought, keep it chilled in the fridge
Egg wash:
- 1 egg yolk
- ½ tsp oil
- tiny pinch of salt
Instructions
Prepare the pastry dough:
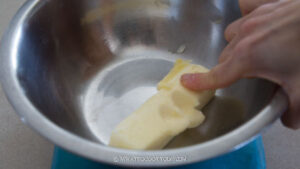
- Make sure the butter is really soft but not melting
- Combine cake flour, cornstarch, milk powder, salt in a bowl and set aside
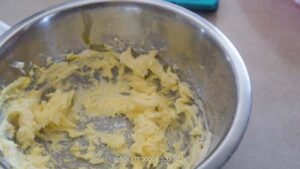
- Using and electric mixer, cream the softened butter and sugar until creamy and pale, about 2 minutes. If using standmixer, use the paddle attachment.
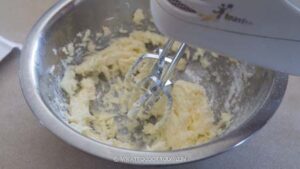
- Then add egg yolks and vanilla extract mix again until just combined. Don't overbeat it
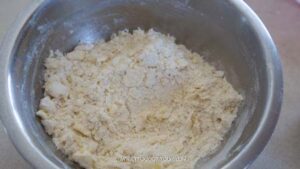
- Add the flour mixture. Use a sturdy spatula to cut the dry ingredients into the butter.
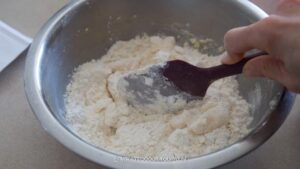
- They resemble crumbles
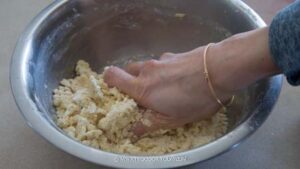
- Then use your hand to mix into a soft dough. It will be slightly sticky. If it is very sticky, you can add a bit more cake flour and mix again, but it should be slightly sticky.
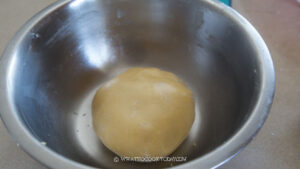
- Wrap it with a cling wrap tightly to prevent the dough from drying out. Let it rest for 30 minutes. Do not skip the resting part. The dough won't be sticky anymore after resting
Prepare the jam:
- The pineapple jam is easier to shape when it's cold.
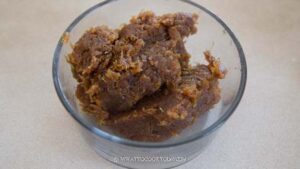
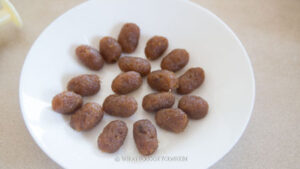
- Divide the pineapple jam into about 8 grams pieces and roll them into round balls or slightly oval shape. Cover and keep them chilled in the fridge while you prepare the dough
Shaping:
- Preheat oven to 350 F (180 C) for conventional oven, 330 F (165 C) for convection oven.
- I use this cookie pump my mom bought from Poon Huat in Singapore. It is made in Malaysia. I can't even find it on Amazon.
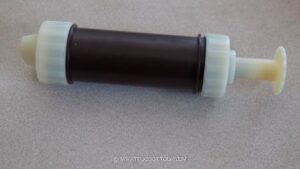
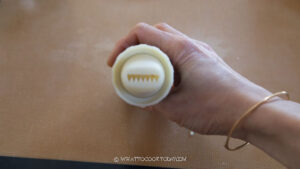
- I use the tip with straight teeth. It comes with many different attachment, so choose whatever you like
- Pinch off some dough and fill it into the tube of the cookie pump. I highly recommend NOT to stuff too much dough into the pump. It's really hard to pump it out. Im not sure if it's the pump I have or what, but if I fill it up all the way to the top, it's almost impossible to push the dough out. It's probably the bad design of the pump. I'm not sure. So, I only fill up a little less than half the tube. It makes my life so much easier
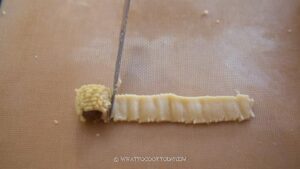
- With one hand holding near the tip of the pump, with the jagged teeth facing down, and another palm on the lever, steadily push the lever down as you move the pump with the other hand to form a straight dough strip, about 8 to 10 inches long.
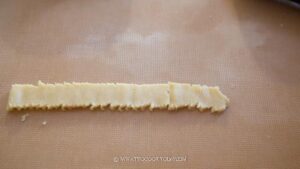
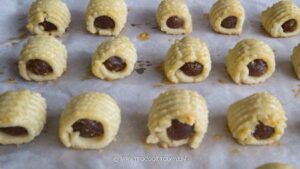
- Place one shaped pineapple jam on the edge of the dough strip and then use the side of a knife or bench scraper to help you lift the dough up to roll over the filling to enclose it, slightly overlapping a bit.
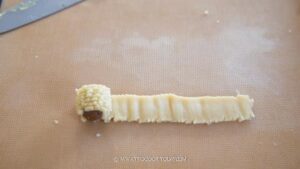
- Use a knife or bench scraper to cut. Repeat with the next. You can probably get about 3 tarts per dough strip
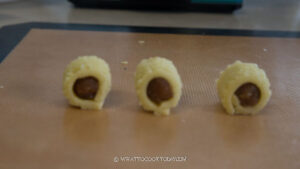
- Place the shape tarts on a baking sheet, about 1/2 inch apart, they don't expand much during baking
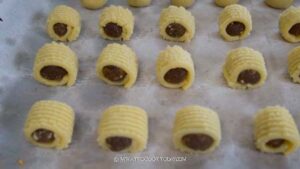
- Reload the cookie pump again and continue to shape the rest of the dough and filling
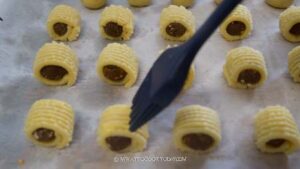
Apply 1st round of egg wash:
- Combine egg yolk with oil and tiny pinch of salt. Use a pastry brush to gently apply the first egg yolk coating on the surface of the dough
Bake:
- I recommend baking one tray at a time. Bake for 10 minutes and then remove from the oven. Let them cool for about 2-3 minutes.
Apply 2nd round of egg wash:
- Gently apply the second layer of egg wash
Continue baking:
- Return the pan to the oven, rotate the pan, and continue baking for another 12-15 minutes or until the pastry is lightly golden brown
Cool:
- Let the tarts cool on the pan set on a cooling rack for 5 minutes. Remove from the pan and transfer to a cooling rack to let them cool down completely
Don't serve immediately on the same day:
- The pineapple tarts won't look as good and taste good on the first day you make them. That's because we need to allow time for the flavor to develop, or the Chinese term to "return oil". That's when you will see the pineapple tart starts to look shinier and more tender and flavorful. I recommend allowing 24-48 hours before serving them
Video
Notes
- If you used tinned European-style salted butter, you may not need 2 egg yolks. Omit the salt calls for in the recipe. You may only need 1 to 1 1/2 egg yolk. Start with one first and add more if needed
Nutrition
Serving: 1piece | Calories: 63kcal | Carbohydrates: 9g | Protein: 1g | Fat: 3g | Saturated Fat: 1g | Polyunsaturated Fat: 0.1g | Monounsaturated Fat: 1g | Trans Fat: 0.1g | Cholesterol: 19mg | Sodium: 19mg | Potassium: 17mg | Fiber: 0.2g | Sugar: 5g | Vitamin A: 84IU | Vitamin C: 1mg | Calcium: 8mg | Iron: 0.1mg
