Thai Milk Buns
Servings: 12 buns
Calories: 342kcal
If you love milk-based desserts, this is one recipe you can’t miss. They’re fun to make, impressive to serve, and honestly—one of the most addictive buns you’ll ever bake at home.
Print Recipe
Ingredients
Tangzhong
- 30 g bread flour 12.7% protein
- 150 g whole milk
Dough
- 300 g bread flour (12.7% protein content) plus more for dusting
- 5 g instant yeast
- 28 g milk powder
- 100 g whole milk add more as needed
- 50 g egg about 1 large egg
- 7 g salt
- 40 g sugar
- 40 g unsalted butter softened
Filling
- 250 g heavy cream
- 1 tsp cornstarch
- 1 tsp vanilla extract
- 70 g condensed milk
Topping
- 100 g softened salted butter If using unsalted, add a pinch of salt
- 10 g condensed milk
- Generous dusting of milk powder
- Dusting of powdered sugar
Instructions
Prepare tangzhong:
- Place milk and the bread flour in a small saucepan. Whisk until there is no more lumps. Cook this mixture over low-medium heat until it reaches 65 C (149 F) if you have a instant-read digital thermometer. Otherwise, it's about 1 1/2-2 minutes.
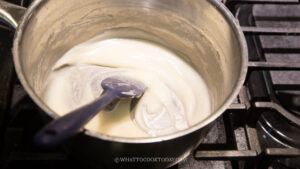
- Remove from the heat and cover with a plastic wrap, touching the tangzhong so the skin won't form. I highly suggest using this the next day instead of using it on the same day. Store this in the fridge
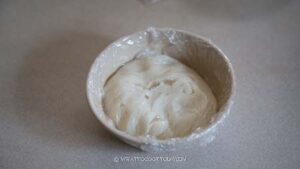
- If you decide to use it on the same day, let it cool down to lukewarm before mixing with the rest of the ingredients
Make the dough:
- Add the rest of the ingredients for the dough, except for the butter, into the mixing bowl of a stand mixer fitted with a dough hook attachment. Make a well in the center and pour in the wet ingredients and the tangzhong. Start the machine and knead the dough on speed 2 until the dough starts to come together into one sticky mass, about 3 minutes
- Increase the speed to 4 and continue to knead until the dough is relatively smooth. You need to stop and scrape the dough off the hook and the bowl several times during this process
- Gradually add the butter, one pat at a time. It is a REAL sticky mess again because of the butter, just keep kneading and stop halfway and scrape the dough off the hook and bowl again and continue to knead until the butter is absorbed by the dough. Don't add any flour. You will get a shiny smooth dough that is very elastic and sticky. It may take 10-15 minutes of kneading with a machine on speed 4.
- The dough will clear the sides of the bowl but still stick to the bottom of the bowl and that's ok.
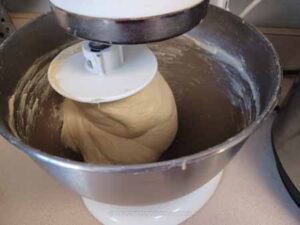
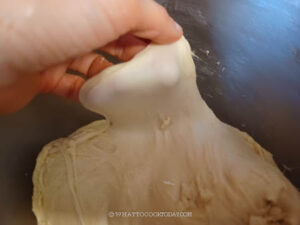
- If you gently stretch a small amount of the dough slowly, it shouldn't break easily. This shows that the dough has good gluten development already and you can stop kneading
First proofing:
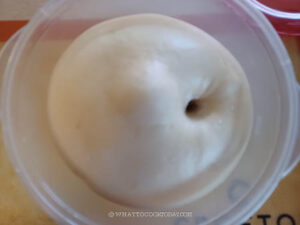
- Place this dough in a lightly oiled large bowl, cover it with a clean and damp tea cloth or plastic wrap and let it rise at a warm place for about 1 hour. The dough will puff up and double in volume.
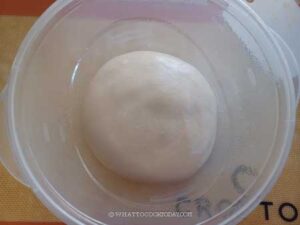
- When you poke your finger into the dough, the indentation stays and the dough won't deflate
Shaping:
- Lightly oil your pan, I used two 8 x 8 inch pans and line them with a parchment paper overhanging on the sides. You can also use one pan only, about the size of 9 x 13 inches. Deflate the dough and knead a few times to push out all the air. Cover and let it rest for about 5 minutes
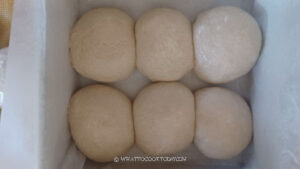
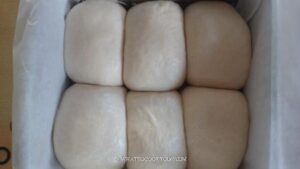
- Divide the dough into 12 equal pieces.
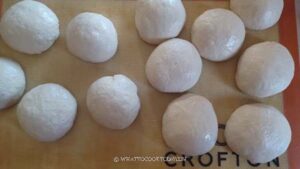
- Round them up into dough balls. Place them inside the pans, 6 doughs each, seam side down.
Final proofing:
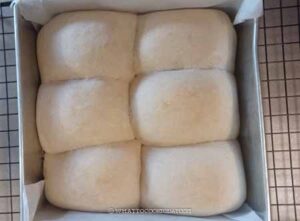
- Let the shaped dough proof again for another 45 minutes to 1 hour or until they fill up the pan.
Baking:
- 10 minutes before the end of the final proofing, preheat the oven to 350 F (180 C) for conventional oven, 330 F (165 C) for convection oven. Position the oven rack in the middle of the oven
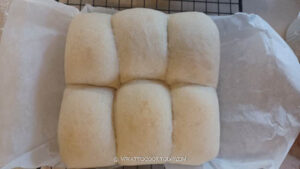
- Place the baking pan in the positioned rack. Bake for 20-25 minutes or until the top is just lightly golden brown. If you have an instant digital thermometer, it should read at least 190 F (88 C)
- Remove from the oven and let them cool down in the pan placed on a cooling rack for about 1 minute
- Then lift the rolls up by grabbing the parchment paper. Peel off the parchment paper on the sides and let them cool on a cooling rack.
Prepare the filling:
- Make sure the heavy cream is cold. Whip the heavy cream and cornstarch using a whisk attachment until it has soft peak, add vanilla and condensed milk and continue to whip until it is firm. Do not overwhip until it turns grainy and separate. Cover and keep it chill in the fridge until it is ready to be used

Prepare the topping:
- Combine the softened butter with condensed milk until creamy and spreadable in texture
Assembling:
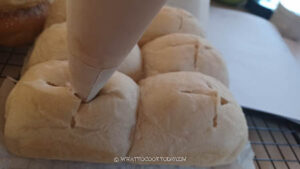
- I put the cooled-down buns back into the pan along with the parchment paper. Use a piping bag fitted with a nozzle. Transfer the cream filling into the piping bag. You can also just use a large sturdy plastic bag and cut one of the corners, large enough, about 1-inch wide
- Use a kitchen shears to cut the top of each bun to create an opening, about 1-inch deep. Use a spoon to kinda push the crumbs to the side, to make room for the filling.
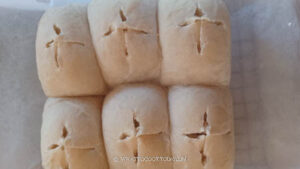
- Insert the piping bag into the bun and gently squeeze the cream out to fill the bun
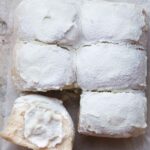
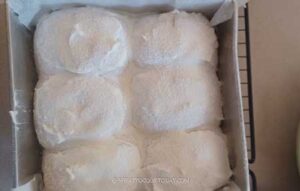
- Use a small offset spatula to spread the topping on top of each bun. Dust generously with powdered sugar. Then dust a final layer of milk powder on top
To serve:
- You can serve immediately or keep them covered in a cling wrap and chilled in the fridge for about an hour to serve them cold
Nutrition
Serving: 1serving | Calories: 342kcal | Carbohydrates: 32g | Protein: 7g | Fat: 21g | Saturated Fat: 13g | Polyunsaturated Fat: 1g | Monounsaturated Fat: 5g | Trans Fat: 0.4g | Cholesterol: 74mg | Sodium: 329mg | Potassium: 189mg | Fiber: 1g | Sugar: 12g | Vitamin A: 723IU | Vitamin C: 1mg | Calcium: 118mg | Iron: 0.4mg
