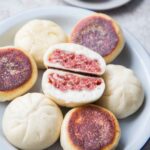
Pan-Fried Steamed Buns
Servings: 30 mini buns
These pan-fried steamed buns (sheng jian bao) have fluffy dough, a juicy savory filling, and a crispy golden bottom. They’re easier than you think to make at home.
Print Recipe
Ingredients
For the dough:
- 180 g all-purpose flour plus more for dusting
- 180 g cake flour
- 4 g Instant yeast
- 30 g sugar
- 2 Tbsp cooking oil
- ½ tsp salt
- 1 tsp baking powder
- 200 g cold milk plus more as needed
For the filling:
For pan-frying:
- Oil as needed
Dipping sauce: (optional)
- 2 Tbsp soy sauce
- 2 tsp chili crisp
- 1 tsp Chinese black vinegar or use rice vinegar
- 1 Tbsp Toasted sesame seeds
Instructions
Prepare the dough with a machine:
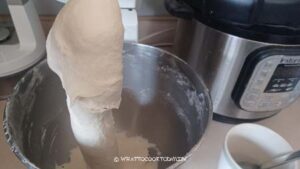
- Place the flour and starch, instant yeast, sugar, salt, baking powder, milk and oil in a mixing bowl of a stand mixer fitted with a dough hook attachment. Give it a stir using the hook to roughly combine so the dry ingredients won't "fly" all over the place when you start the machine
- You may or may not need more liquid. If the dough feels dry and stiff, add a bit more milk, one teaspoon at a time. Continue to knead at low speed (speed 2 on KA) for 12-15 minutes or until the dough is smooth and elastic. It may feel slightly sticky to the touch and that's okay.
- You don't need to develop a window pane here but the dough needs to be smooth and elastic. Oil your hands a bit to help you pick up the dough and to prevent the stickyness
Prepare the dough by hands:
- Place the flour, instant yeast, sugar, salt, baking powder, and oil in a mixing bowl. Start with 200 g of liquid, most likely you will need more liquid than called for in the recipe. I usually need a little over 200 g of liquid. Mix until you get a rough dough (it's not going to be smooth yet). Cover and rest it for 15 minutes
- Then go back and knead it. You'll be surprised by how easier it is to knead it now. Knead until the dough is smooth and pliable. The kneading motion is like washing a cloth by hands. At any point during kneading, you can always stop and rest the dough if you find it hard to knead and so much resistant. This is to relax the gluten. Then go back to knead again and you'll be surprised by the difference it makes by just resting the dough before kneading again. It's easier for you too. You want the dough that is smooth, silky, and elastic. Just to warn you that it's going to take some time to knead by hands. It may take 20-30 minutes total of time to knead by hands
Fill and shape:
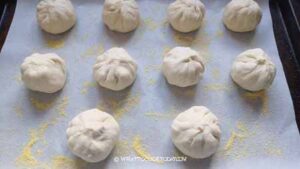
- Dust a large baking pan with some cornmeal to prevent the bottom from sticking during proofing (and the cornmeal adds some extra crunch too). If you don't have one, just line baking pan with parchment paper and brush lightly with some oil to prevent the dough from sticking to the paper
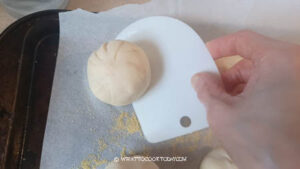
- Lightly dust your work surface with a bit of flour, not too much. The more flour you use, the drier the dough will be. Divide the dough into 30 equal portions. Flatten and gather the edge to round them up into dough balls. Cover and rest the dough for 5 minutes. This is not to proof the dough. It shouldn't double in size. This is to relax the gluten for easier shaping and rolling the dough
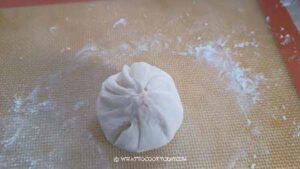
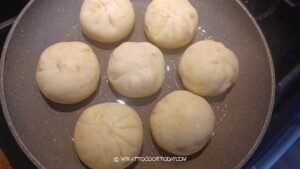
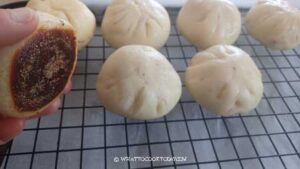
- Work with one dough at a time. Flatten the dough with your palm and then use a rolling pin to roll it out to form a circle about 3-4 inches, with a slightly thicker middle part. This is to support the weight of the filling. Place about 1 Tbsp of filling at the center
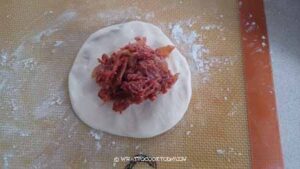
- Gather the sides to enclose the bun and pinch to seal. Flip the bun so the seam side is down now if you want a smooth top, or leave the seam up for a "pleated" look
- Place the shaped buns on the prepared baking pan. Repeat with the rest of the dough. Cover with a clean kitchen towel and proceed to proofing
Proofing:
- Let the dough rise at room temperature or at a warm place. If it's winter where you are, you can use your oven "bread proof" function to let them proof in there, or simply turn on your oven to the lowest temperature and then turn off and after 15 minutes, place the shaped buns in there to let them proof. They won't necessarily double in size, but at least puff up to about 50% of the original size. This may take about 1 hour or longer at a warm temperature
Cooking:
- Use a pan that has a lid or a lid you can use to cover the pan. Preheat a large non-stick pan or a well-season cast iron pan over medium heat. When the pan is hot, add 2 Tbsp of oil and swirl the pan to coat the bottom of the pan evenly
- Use a dough scraper on one hand to help you pick up the proofed buns, trying not to deflate the dough too much, and place on the pan
- Leave about 1 inch of space in between to allow the dough to expand. I could have fit in more buns, but I didn't.
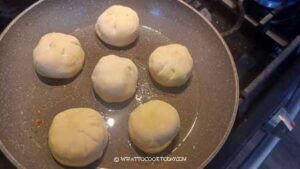
- Let them cook for about 2 minutes until the bottom is golden brown. Make sure to watch the heat. We don't want to burn the bottom.
- Carefully pour about 1/4 cup of water into the pan. It will sizzle a lot. Immediately cover the lid. You can lower the heat a little bit and let them steam for about 4-5 minutes, or until the buns expand and puff up
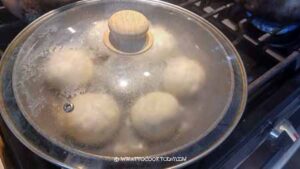
- Uncover the lid. There might still be a bit of water left in the pan. Continue to cook until the water evaporates and leave you with some oil
- Remove cooked buns from the pan. I like the put them on a cooling rack to preserve the crispy bottom and keep them warm in the oven while cooking the rest
- Bring the pan back to hot and add a bit more oil if necessary. Arrange the next batch into the pan and continue to cook the same way
To serve:
- Combine all the ingredients for dipping sauce in a small bowl. These are best served hot on its own or with dipping sauce
