This post may contain affiliate links. Please read our disclosure policy.
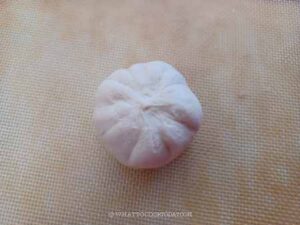
Soft pillowy baozi wrapped around a flavorful pork and leeks filling. The sweetness of leeks enhances the savory richness of seasoned ground pork.

My son gets very excited when I make steamed buns. He loves baozi filled with savory meat like pork and leek baozi. Leeks (suànmiáo, 蒜苗) have been used in Chinese cooking for centuries, particularly in regions like Shandong and Beijing, where they are prized for their mild onion-garlic flavor. Their natural sweetness enhances the pork filling, making this particular bun variation a popular choice for both home cooking and street food. In some northern regions, chives (jiǔcài, 韭菜) or scallions (cōng, 葱) are used instead of leeks, depending on seasonal availability and personal preference.
The perfect juicy flavorful filling
The key to a delicious pork and leek filling is seasoning and preparation. A few key techniques help elevate the flavor:
1. Sautéing the leeks before mixing them into the pork brings out their natural sweetness and mellows their sharpness.
2. Marinating the filling for at least 15 minutes (or up to 24 hours) allows the flavors to meld, making each bite more flavorful.
3. Adding cornstarch keeps the filling juicy by helping retain moisture during steaming.
Pork and Leek Steamed Buns
Ingredients
For the dough:
- 180 g all-purpose flour plus more for dusting
- 180 g cake flour
- 4 g Instant yeast
- 30 g sugar
- 2 Tbsp cooking oil
- ½ tsp salt
- 1 tsp baking powder
- 200 g cold milk plus more as needed
For the filling:
- 200 g leek about 1 large leek before trimming
- 1 Tbsp oil for cooking the leeks
- 450 g ground pork about 80% lean
- 1 Tbsp oyster sauce
- 2 Tbsp soy sauce
- 1 tsp sugar
- ½ tsp ground white pepper
- 1 tsp Shaoxing wine
- 1 Tbsp toasted sesame oil
- 1 Tbsp cornstarch
Instructions
How to cut and wash leeks:
- Cut off the bulb end and the dark green part of the leek. Don't throw those away, they are great for making stock
- Slice the leek thinly. Leek needs to be washed properly as many sands get trapped in each layer of the leek. Transfer the leek slices to a bowl filled with water. Swirl the leek pieces around and then let them sit undisturbed for about 5 minutes
- Use your hands or slotted spoon or skimmer to remove the leek pieces from the water. You will see some sand or dirt at the bottom of the bowl. Discard this water, rinse the bowl, fill up with some water, and put the leek pieces back into the water again. Swirl them around and let them sit for another 5 minutes again. Remove from the water and you shouldn't see much dirt anymore. You can do one more round if you want to be sure
Prepare the filling:
- The filling can be prepared 3 days in advance, well-covered and kept in the fridge
- Preheat a medium to large skillet with 1 Tbsp of oil over medium heat. Add the leeks and saute until the leeks wilted and soft, about 3-4 minutes. They will brown slightly. Remove from the heat and spread it out to let it cool down for about 5 minutes

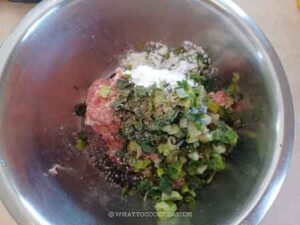
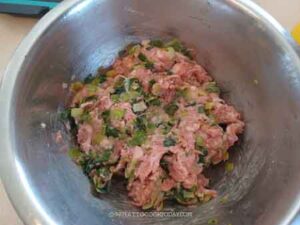
- Put the ground pork, oyster sauce, soy sauce, sugar, ground white pepper, cooking wine, sesame oil, cornstarch, and the precooked leeks in a large mixing bowl.
- Stir to combine everything into a homogenous paste consistency. Cover and set aside to let everything marinade for at least 15 minutes at room temperature or up to 24 hours in the fridge
- When read to use the filling, microwave a small amount to check on the taste. You can also boil a small amount in water. Adjust the seasoning to your preference if you feel like it needs more seasoning.

Prepare the dough:
- I use my soft and fluffy steamed buns recipe (option 1) to make this pork and leek baozi. So you can take a look at the step-by-step photo there if you need to
- Place the flour, instant yeast, sugar, salt, baking powder, milk and oil in a mixing bowl of a stand mixer fitted with a dough hook attachment. Give it a stir using the hook to roughly combine so the dry ingredients won't "fly" all over the place when you start the machine
- You may or may not need more liquid. If the dough feels dry and stiff, add a bit more milk, one teaspoon at a time. Continue to knead at low speed (speed 2 on KA) for 12-15 minutes or until the dough is smooth and elastic. It may feel slightly sticky to the touch and that's okay. Oil your hands a bit to help you pick up the dough and to prevent the stickyness
Fill and shape:
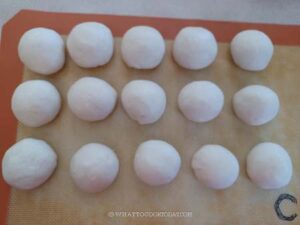
- Lightly dust your work surface with a bit of flour. Divide the dough into 15 equal portions. Flatten and gather the edge to round them up into dough balls. Cover and rest the dough for 5 minutes. This is not to proof the dough. It shouldn't double in size. This is to relax the gluten for easier shaping and rolling the dough
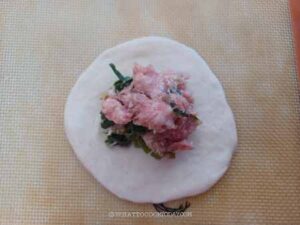
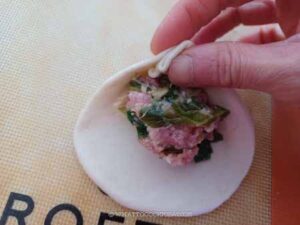
- Work with one dough at a time. Flatten the dough with your palm and then use a rolling pin to roll it out to form a circle about 4-5 inches, with a slightly thicker middle part. This is to support the weight of the filling.
- Don't roll the dough too thin. If you roll the dough too thin, the filling might make the steamed buns "wrinkle" later when you steam. You can see in the photo that the one on the left wasn't as smooth as the one on the right. I roll out the dough too thin and the filling make the dough "wet" and create that "burnt" look
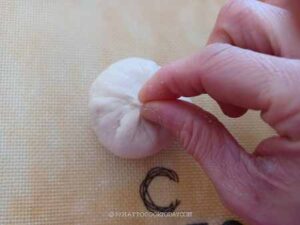
- Place a spoonful or two of meat filling at the center and then gather the sides to enclose the bun and pinch to seal.
- Flip the bun so the seam side is down now
- You can also pleat the dough if you want to
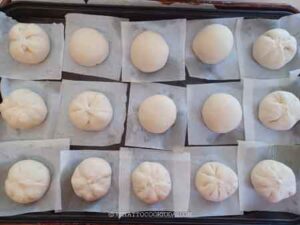
- Cup the dough with both palms and move the dough in a circular motion to shape it taller. This part is important so your steamed buns come out tall instead of spreading to the side after steaming. Repeat with the rest of the dough. Cover with a clean kitchen towel and proceed to proofing
Proofing:
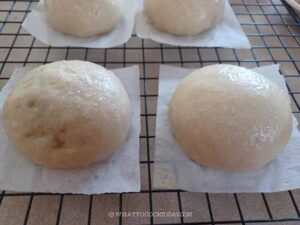
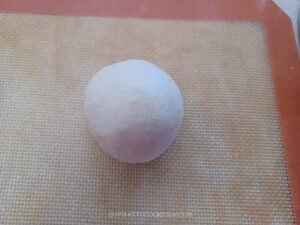
- Let the dough rise at room temperature or a warm place. If it's winter where you are, you can use your oven "bread proof" function to let them proof in there, or simply turn on your oven to the lowest temperature and then turn off and after 15 minutes, place the shaped buns in there to let them proof. They won't necessarily double in size, but at least puff up to about 50% of the original size. This may take about 1 hour or longer at a warm temperature.Don't go by the time however. Observe the dough instead!
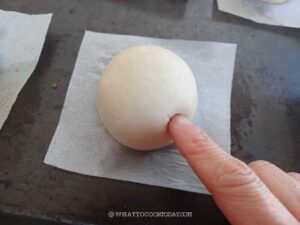
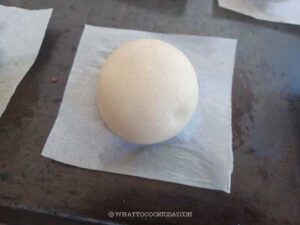
- How do you know if your buns have proofed ? They will be about 50% bigger than their original size AND when you lift them up, they should feel significantly lighter. If not, let them proof a bit longer. They may not visually look bigger. Use a finger test too. When you gently push on the dough, it will leave an indentation but it will spring back slowly. This dough is perfectly proofed. If it springs back right away, it needs to be proofed a bit longer. If it never springs back, then you have over-proofed the dough. Loosely cover them with plastic wrap and put the over-proofed buns in the fridge to slow down the proofing while waiting for the steamer
- In this photo you can still see some indentation on the dough
Steaming:
- Fill up the steamer with water but do not turn on the stove yet. Carefully arrange the proofed buns in the steamer, giving about 2 inches of space in between as they will expand quite a bit. Cover with a lid wrapped with a cloth to prevent condensation from dropping on the surface of the buns. If you use a bamboo steamer, you don't need to wrap the lid as bamboo steamer absorbs liquid
- Please note that I use the largest burner on my stove. Different sizes of burners will produce different amount of heat, so use your largest burner. TURN THE HEAT TO MEDIUM (6/10)
- When the water comes to a simmer, crack the lid open about 1/2 inch gap and start the timer. Steam with the lid cracked open like that for 10 minutes
- After steaming, turn off the heat. DO NOT OPEN THE LID of the steamer. Let the buns sit there for 3 minutes. The buns will not sink or wrinkle due to the sudden change in temperature
- Proceed with the next batch and steam with the same method and setting as I mentioned above. You don't have to wait for the water in the steamer to cool down to start. Just turn on the stove to medium heat, crack the lid open immediately and the time starts when water is back to a simmer again
To serve:
- Serve them while they are warm

*Nutrition facts are just estimates and calculated using online tools*

Can I pan fry the baozi instead?
Yes, you can, also known as sheng jian bao. Instead of steaming, try pan-frying these buns in a skillet with a bit of oil until golden brown on the bottom, then add water and cover the pan to steam over medium heat until cooked through, about 10 minutes. This method creates a crispy-bottomed bun with a juicy interior.
How to store leftovers
Refrigeration: If you plan to eat them within 3 days or so, store the buns in an airtight container in the fridge.
Freezing: To store longer, place steamed buns on a tray in a single layer and freeze until firm. Then, transfer them to a sealed bag or container. They can last up to 1 month in the freezer. Thaw at room temperature before reheating
How to reheat leftovers
Steaming: The best way to reheat is by steaming for 5–7 minutes until heated through. The wet heat helps to keep the steamed buns soft and fluffy
Microwave: Cover the bun with a damp paper towel and microwave for about 30 seconds to 1 minute or until heated through.
Pan-frying: If you want a crispier texture, thaw frozen buns slightly and then pan-fry them like sheng jian bao.
Whether you’re making them for a casual snack, a dim sum feast, or meal prep, pork and leek steamed buns are a delicious, satisfying treat. Give them a try and enjoy the magic of homemade baozi!

