This post may contain affiliate links. Please read our disclosure policy.
Learn how to make Japanese-style old-fashioned sponge cake that is soft, moist, with a nice chewy texture, and with an amazing rich aroma of honey and pandan.
What is Japanese Honey Kasutera?
Japanese honey kasutera, also known simply as “kasutera” or “Castella,” is a type of sponge cake that has its origins in Portugal but has become a beloved dessert in Japan. Nagasaki, being a significant port city with historical connections to Portuguese trade, played a crucial role in the dissemination of this sweet treat throughout Japan. Japanese castella is characterized by its moist, soft, and slightly chewy texture and is slightly sweet with a subtle honey flavor.
Japanese castella vs Taiwanese castella
Japanese kasutera/castella is different from the Taiwanese castella I made a while ago. They are both so good and spongy in texture. The Japanese castella has a soft yet chewy texture (thanks to the bread flour). The Taiwanese castella is soft with that melt-in-mouth texture and usually is baked using water-bath method. Japanese honey kasutera also doesn’t use any additional oil in the recipe.
No egg separation
I like the method that doesn’t involve egg separations and beats egg white separately. I really don’t mind doing that considering how many chiffon cakes and sponge cakes I’ve baked in my life so far LOL!, but if we can have a more straight forward method with good result, then that’s where I go! It’s an old-fashioned way of making sponge cake. It reminds me of the Chinese old-fashioned egg sponge cake.
Bread flour vs all-purpose flour vs cake flour
Traditional Japanese kasutera is made with bread flour, which gives that nice chewy texture that I really like. You can use all-purpose flour, but you won’t have much of that chew if you don’t mind all that. I definitely won’t use a cake flour because this is not meant to be a soft and melt-in-the-mouth type of cake like chiffon cake.
Do I have to bake honey kasutera in a wooden box?
Traditional honey kasutera is baked in a wooden box known kastuera-ki. The wooden box helps maintain the characteristic shape and texture of kasutera while baking and gives it a unique appearance.
No, you don’t have to bake it in a wooden box. Many modern recipes and home bakers use regular baking pans to prepare kasutera. These alternatives work well and will still result in a delicious cake with a similar flavor and texture.
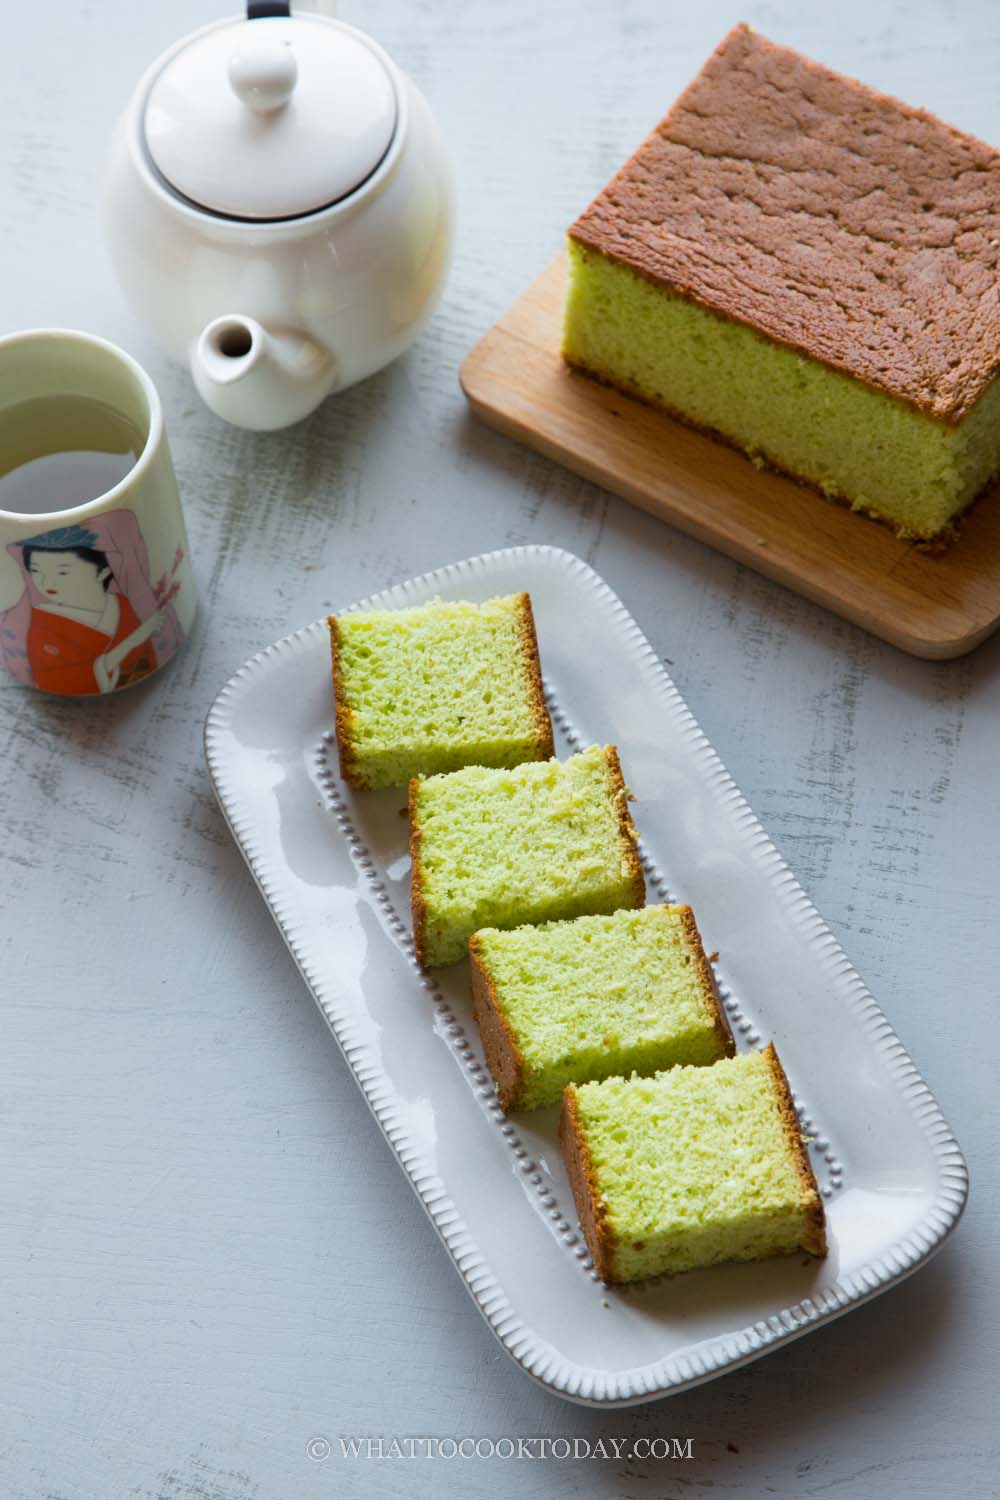
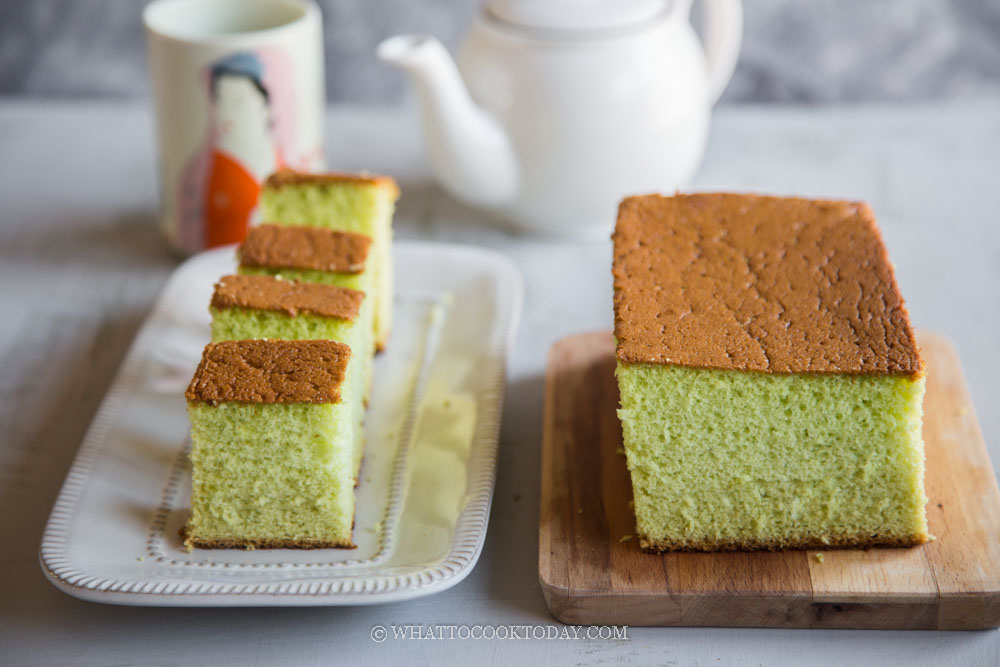
I use a 9 x 5 loaf pan to bake this cake. You can also use a 8 1/2 x 4 1/2 loaf pan, however, you want to fill it up only 3/4 full and bake the rest of the batter in a smaller cup or mold. You can also use 7-inch square pan with at least 2.5 inches height. I use a lighter color pan so the cake won’t be too dark. This cake has quite a good amount of honey that gives the cake its dark brown color on the outside.

This recipe was last published in 2021 and has been updated to improve the recipe and techniques on September 1,2023.
Pandan Honey Kasutera (Nagasaki Castella Cake)
Ingredients
- 4 large eggs (room temperature) about 50 grams each without the shell
- 100 g granulated sugar
- 25 g warm milk
- 50 g honey
- 1 tsp pandan essence omit if you want original flavor
- 135 g bread flour I don't recommend all-purpose flour
- ⅛ tsp salt
Instructions
Things to do before you start working on the recipe:
- Preheat oven to 320 F (160 C). If your oven has top and bottom heat, you may want to adjust by lowering temperature by about 20 F /15 C. It is VERY important that the eggs are at room temperature.
- You can use 9 x 5 loaf pan or 7 x 7 inch square pan. Oil the baking pan or use a non-stick spray. Line the bottom and sides with parchment paper. Trim off excess paper. Can I bake without lining the pan with parchment paper? Read my post at the bottom for this.
- Sift the bread flour with salt. This extra steps will aerate the flour, remove lumps so that it's easier to mix into the batter at a later step
- Combine honey with milk and set aside
Beat the eggs:
- Beat the eggs in a stand mixer with a whip attachment on speed 8 for about one minute. Then increase the speed to 10 and add sugar in 3 batches, about 1-minute interval each time. Beat until the mixture is tripled or even quadrupled in volume, thick, and creamy. This may take about 5 minutes over high speed. If you use a hand mixer, this will take much longer. We call this "ribbon stage"
- If you put a toothpick in the batter. It will stand without falling. You can also test the consistency by lifting some of the batter with the whisk and the batter should drop down in trail and remains visible before disappearing into the batter. It is VERY important to beat to ribbon stage. It took me about 5 minutes with stand mixer at speed 10
Incorporating flour mixture and liquid:
- You can stop the mixer and do this manually by hands OR lower the speed of the stand mixer to 2 and add the honey into the batter and let it beat on low speed until combined, about 20 seconds or so
- Add 1/3 of the flour mixture over low speed, then add the next 1/3 until you run out of flour. The flour may not be thoroughly combined and you will still see some on the side of the mixing bowl. Don't worry, don't try to beat until they are combined. Stop the mixer and use a rubber spatula to gently scrape the sides of the bowl and gently fold it into the batter using the swipe down and fold over motion until you no longer see any pockets of flour. Do not overmix
Baking:
- Pour the batter into the prepared pan. It should be only about 3/4 full. You can bake the remaining extra in a smaller pan. Tap the pan on counter 3-4 times to release any large bubbles. Use a skewer or a chopstick to draw a zigzag to pop any large bubbles inside the batter
- Put the pan in a preheated oven, middle rack and bake for 45 minutes or until cake is no longer jiggly and the top is dry to touch and feels bouncy
Cooling down:
- Remove the cake pan from the oven and drop the pan on the counter 2-3 times to minimize shrinkage. Invert the cake upside down on the parchment paper. Wrap a cling plastic wrap around it. You can peel the parchment paper off the cake then wrap with a cling wrap directly. Read my post below on why it's important to cool it upside down the whole time
Age the cake:
- Then let the cake cool down in this postition for 1-2 days. I usually do 2 days at room tempearture. Some people age the cake in the fridge for 1 day. You can do either way
To serve:
- Carefully remove the plastic wrap. Trim the 4 edges and slice with a serrated knife to serve. Japanese castella is served as is without any cream or topping. It is perfect with a cup of tea or coffee
To store:
- The cake can be kept at room temperature in an air-tight container for 3 days


*Nutrition facts are just estimates and calculated using online tools*
How to bake pandan honey kasutera (Japanese castella)
1. Preheat oven to 320 F (160 C). If your oven has top and bottom heat, you may want to adjust by lowering the temperature by about 20 F /15 C. It is VERY important that the eggs are at room temperature.
2. Oil the baking pan or use a non-stick spray. Line the bottom and sides with parchment paper. Read my post after this step-by-step on how to bake without lining the sides of the pan with parchment paper (to prevent the sides of the cake from concave)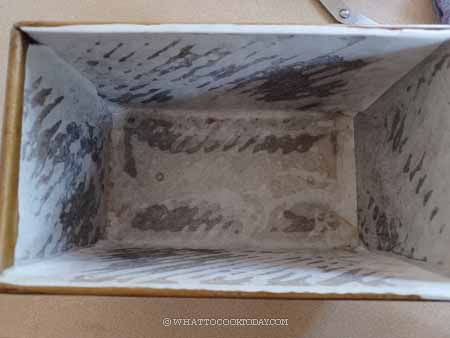
3. Sift the bread flour with salt. This extra step will aerate the flour, remove lumps so that it’s easier to mix into the batter at a later step
4. Combine milk with honey and set aside
5. Beat the eggs in a stand mixer with a whip attachment on speed 8 for about one minute
6. Then increase the speed to 10 and add sugar in 3 batches, about 1-minute interval each time

7. Beat until the mixture is tripled or even quadrupled in volume, thick, and creamy. This may take about 5 minutes over high speed 10 on Kitchen Aid. If you use a hand mixer, this will take much longer. We call this “ribbon stage”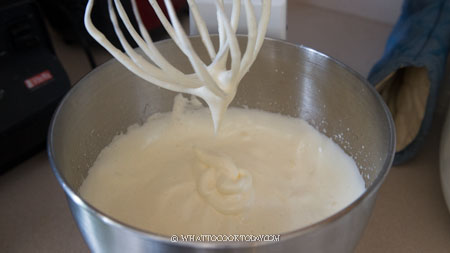
8. If you put a toothpick in the batter. It will stand without falling
9. You can also test the consistency by lifting some of the batter with the whisk and the batter should drop down in trail and remains visible before disappearing into the batter. It is VERY important to beat to ribbon stage
10. You can stop the mixer and do this manually by hands OR lower the speed of the stand mixer to 2 and add the honey into the batter and let it beat on low speed until combined, about 20 seconds or so
11. Add 1/3 of the flour mixture over low speed, then add the next 1/3 until you run out of flour

12. The flour may not be thoroughly combined and you will still see some on the side of the mixing bowl. Don’t worry, don’t try to beat until they are combined. Stop the mixer and use a rubber spatula to gently scrape the sides of the bowl and gently fold it into the batter using the swipe down and fold over motion until you no longer see any pockets of flour. Do not overmix
13. Pour the batter into the prepared pan. It should be only about 3/4 full. You can bake the remaining extra in a smaller pan if it’s too full for your pan. Tap the pan on counter 3-4 times to release any large bubbles
14. Use a skewer or a chopstick to draw a zigzag to pop any large bubbles inside the batter
15. Put the pan in a preheated oven, middle rack and bake for 10 minutes and then lower the heat to 320 F (160 C) for 40-45 minutes or until the cake is no longer jiggly and the top is dry to touch and feels bounce
16. Remove from the oven and drop the pan on the counter 2-3 times to minimize shrinkage. Lift the cake out from the pan by grabbing the parchment paper. Trim off excess parchment paper that extends up so it won’t ruin the surface of the cake when you flip it over later
17. Spread a parchment paper or a silpat on a counter. Brush some oil on the parchment paper
18. Flip the cake upside down on top of it 
19. Wrap a cling plastic wrap around it. You can peel the parchment paper off the cake then wrap with a cling wrap directly. Then let the cake cool down in this postition for 1-2 days. I usually do 2 days at room tempearture. Some people age the cake in the fridge for 1 day. You can do either way
20. Carefully remove the plastic wrap. Trim the 4 edges and slice with a serrated knife to serve. Japanese castella is served as is without any cream or topping. It is perfect with a cup of tea or coffee

How to bake honey kasutera in a pan without lining the sides of the pan with parchment paper
I notice that the sides of my cake will concave a bit when I line the sides of the pan with parchment paper. This is because the cake batter pulls on the parchment paper as it bakes, trying to cling to the paper so it can rise. Though I have oiled the pan really well so the parchment paper clings to the pan, the batter still manages to pull the paper inwards.
Recently I have tried to bake the cake by just lining the bottom of the pan and doesn’t grease the sides of the pan. It actually works out pretty well. Here’s how:
1. I oiled the bottom of the pan and lined the bottom of the pan with parchment paper. Pour the batter into the pan and do a zig zag with a skewer to pop any large air bubbles. Bang the pan on the counter 2-3 times to pop more air bubbles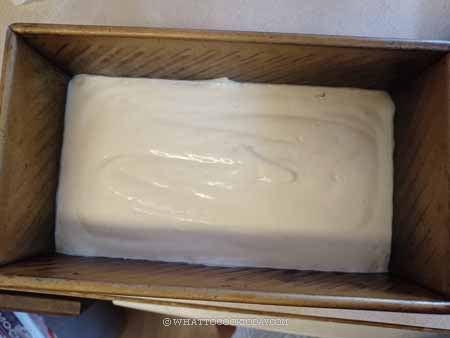
2. Bake the cake as directed in the recipe. When it is out of the oven, bang the pan on the counter 2-3 times 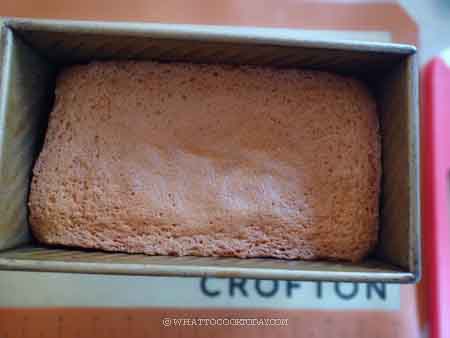
3. Then immediately invert the pan onto a heat-proof surface. I use a silicone pat. I let it cool down this way for about 10 minutes until the pan is warm and not too hot
4. Then I cover the top of the cake with cling wrap, touching the surface directly to capture moisture. Then I invert it back and continue to let it cool down for another 10 minutes

5. I use an offset spatula to loosen the four sides and then remove the pan. The sides of the cake do not concave at all. The bottom is just slightly concave, but that is expected because we need to line it with parchment paper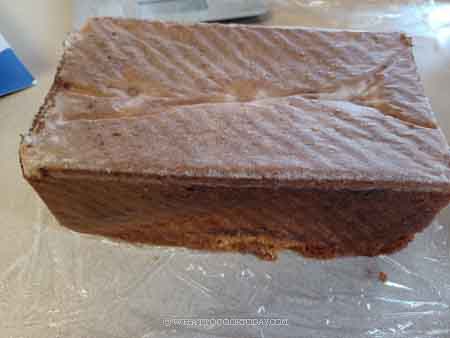
6. I then gently wrap the entire cake with a cling wrap to preserve moisture. Let the cake stand at room temperature wrapped like this and with the top-side down for 1-2 days (It’s important to make sure it is top-side down). You can also put it in the fridge for a few days wrapped like this before serving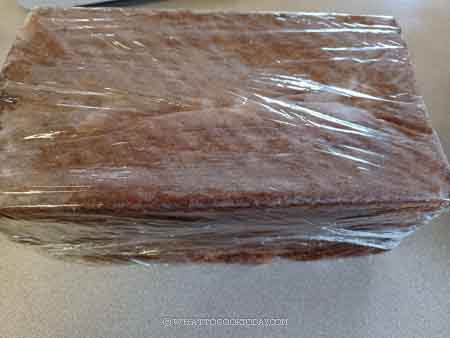
Why we need to cool the cake upside down
Cooling the cake upside down helps to even out the thickness and also the cake is less crumbly because the crumbs are more compact yet moist, giving it that moist and slightly chewy texture. I have tried a batch without cooling it upside down, just wrapping it with a cling wrop, but it’s not cooled upside down and the cake is very crumbly on the top part, while the bottom is evenly moist and chewy.
Did you make this pandan honey kasutera recipe?
I love it when you guys snap a photo and tag to show me what you’ve made 🙂 Simply tag me @WhatToCookToday #WhatToCookToday on Instagram and I’ll be sure to stop by and take a peek for real!

