This post may contain affiliate links. Please read our disclosure policy.
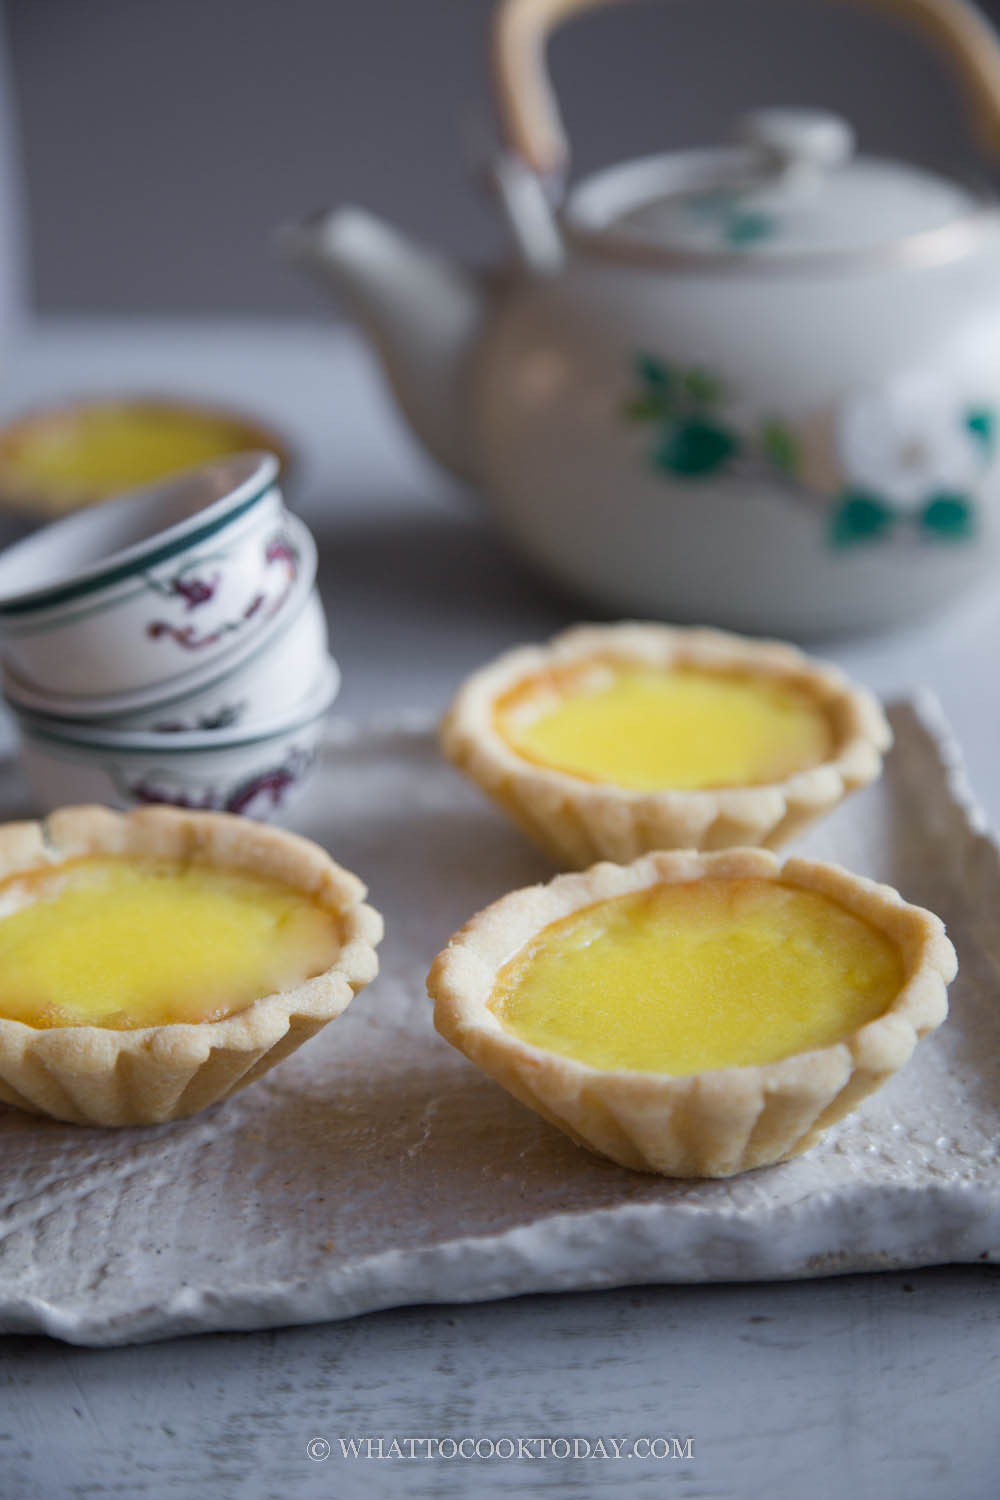
Make these dim sum favorite Hong Kong-style egg tarts with this easy simple recipe. They are highly popular at our house and are gone fast!

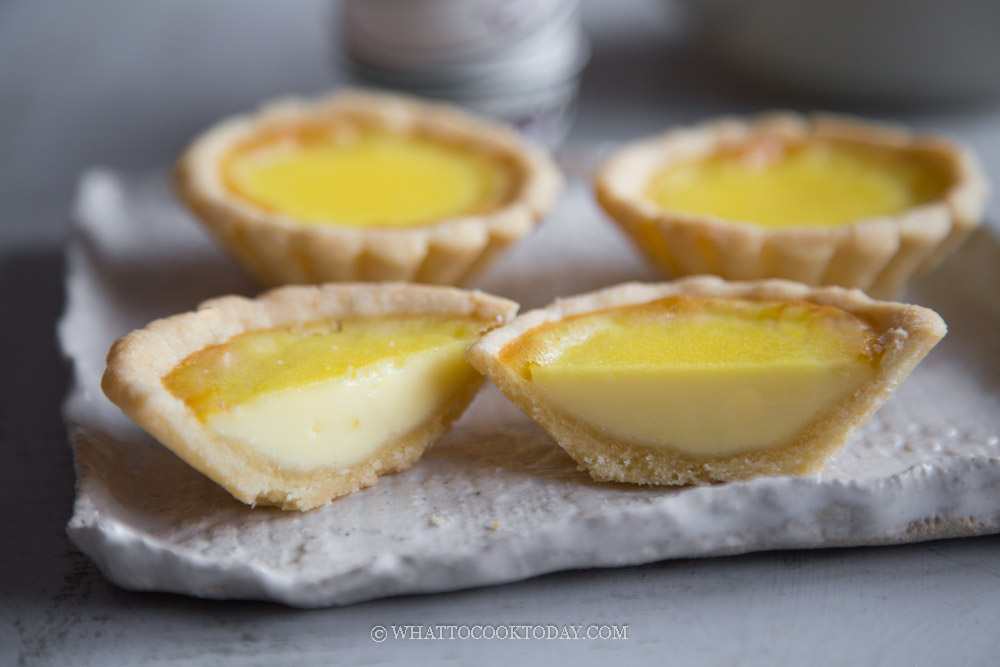
Hong Kong style egg tart is one of our favorite dim sum items that we have to order each time we go for one. My daughter can easily eat 3 of these at one go 🙂
MAKE THE TART SHELLS FROM SCRATCH
Few years ago, I made this dan tat using ready-made pie crust I bought from the store because it’s convenient. I have to admit though, this dan tat tastes the best when you made the tart shells from scratch. It simply tastes so much better and the family agrees too. It worth the effort (not as intimidating as it sounds really!). The tart shells are shortcrust pastry, not the puff pastry kind. For Hong Kong egg tart, I prefer the shells made with shortcrust pastry.
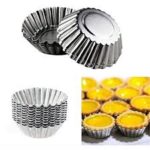
SPECIAL MOULD TO MAKE HONG KONG EGG TART DAN TAT
You can use regular muffin cups too. I recommend using the aluminum type as they bake faster. These are the typical mold used to make Chinese dan tat. My mom actually got these for me from Indonesia. They are made with aluminum and are pretty thin and flimsy actually. But they work to bake the dan tat evenly. You can certainly find them at any store that sells baking ingredients and supplies. You can get it from Amazon too. The size of the tin I have is 3 inch in wide and about 1 1/2 inch deep (Size XL)
HOW TO MAKE DAN TAT FROM SCRATCH
1. MAKE THE DOUGH FOR THE TART SHELLS
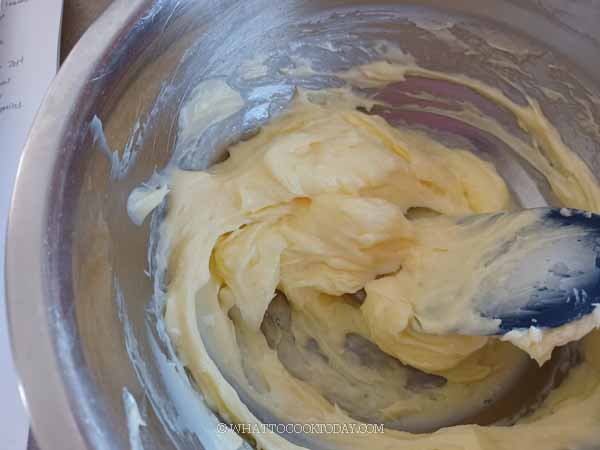
Mix all-purpose flour and salt in a bowl. Stir to combine. Combine the softened butter and sugar using a whisk until creamy

Gradually add in the egg mixture and whisk until combined. It may appear separate at first but just keep whisking and it will come together

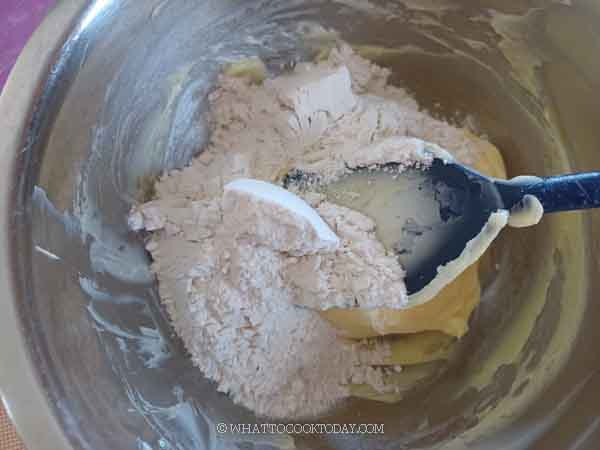
Add the flour mixture and use a rubber spatula to combine at first

Then use your clean hands to knead it into a smooth dough. Flatten into a disc and wrap with a cling wrap and refrigerate for at least 30 minutes

2. SHAPE THE TART SHELLS
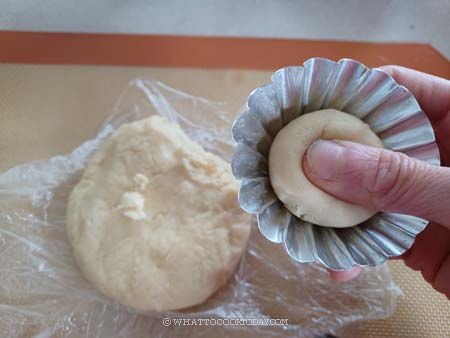
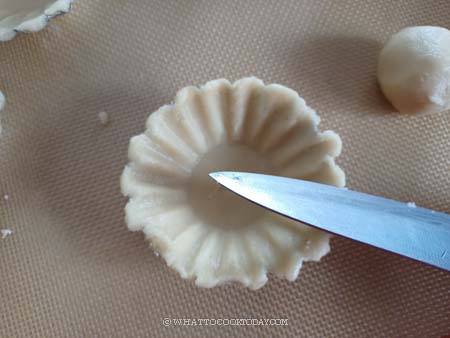
Divide the dough into 9 portions and roll into round balls. Lightly dust your fingers with some flour to prevent sticking if it’s an issue. Place the dough ball in the mold and then use your two thumbs to start spreading the dough from center to fill up the side of the mold.
Cover with a piece of cling wrap on top and then use another mold to press on it

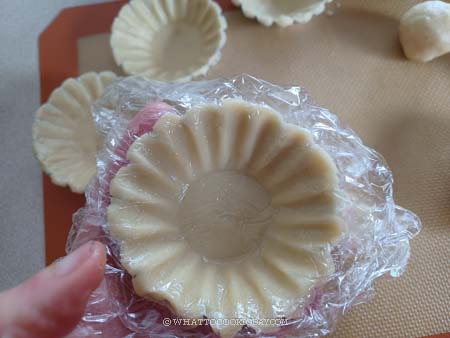
It’s better if you can mold it about 1-2 mm higher on the top edge so it’s easier to release and you can fill up a bit more filling too.
Place the tart shells on a baking pan and place them in the refrigerator for at least 30 minutes while you prepare the custard filling
3. PREPARE THE CUSTARD FILLING
Preheat oven to 400 F (200 C) My oven is a conventional oven, only bottom heat, no fan. Combine hot water with sugar and stir until sugar dissolves. Let it cool down to at least warm
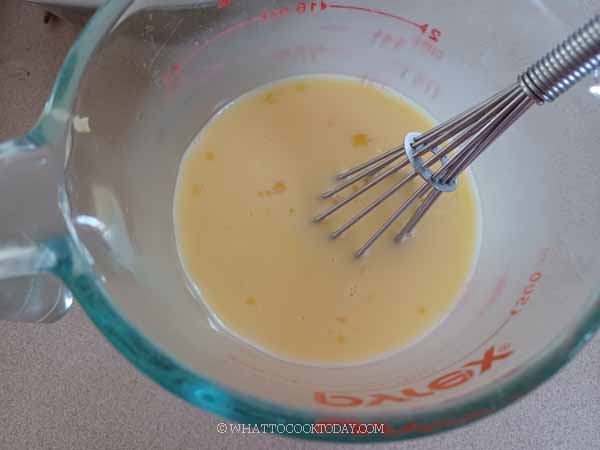
Whisk the eggs with evaporated milk
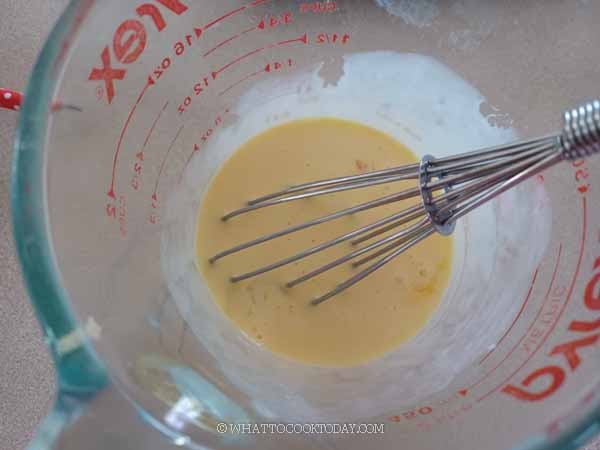
Add the sugar water and vanilla extract and keep whisking
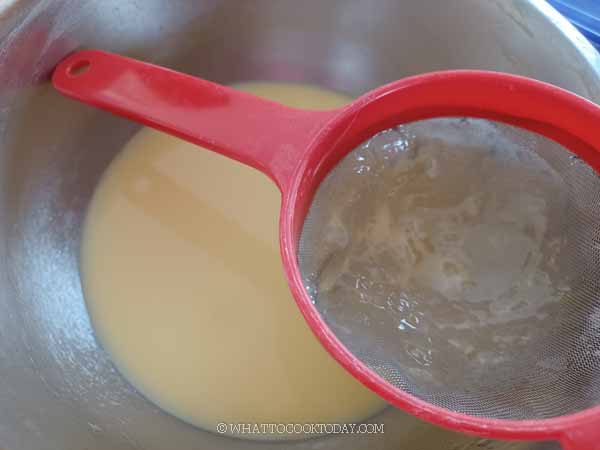
Strain this mixture to get rid of any lumps. Transfer to a jug or large measuring cup with a spout for easier pouring later

3. ASSEMBLE THE EGG TARTS
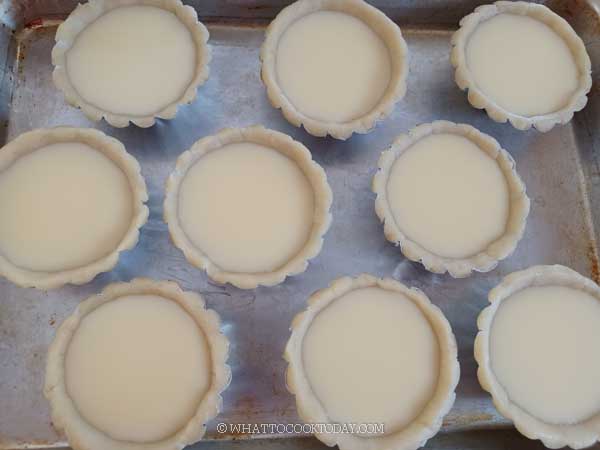
Pour the egg custard into each tart shell, about 3/4 full, but take care not to overfill
4. BAKE THE EGG TARTS
Place the baking sheet at the lowest rack of the oven. Bake for about 10 minutes or until the tart shells are golden brown. Then lower the oven temperature to 350 F (180 C) and let them bake until the egg custard is set, about 10 minutes or until the egg custard is set. You can insert a toothpick into the middle of the custard to check

Keep a close watch on the custard, if you see the custard started to puff up, open the oven door a little bit. The custard is done when it’s no longer wobbly and when you insert a toothpick in the middle of the custard, it can stand on its own.

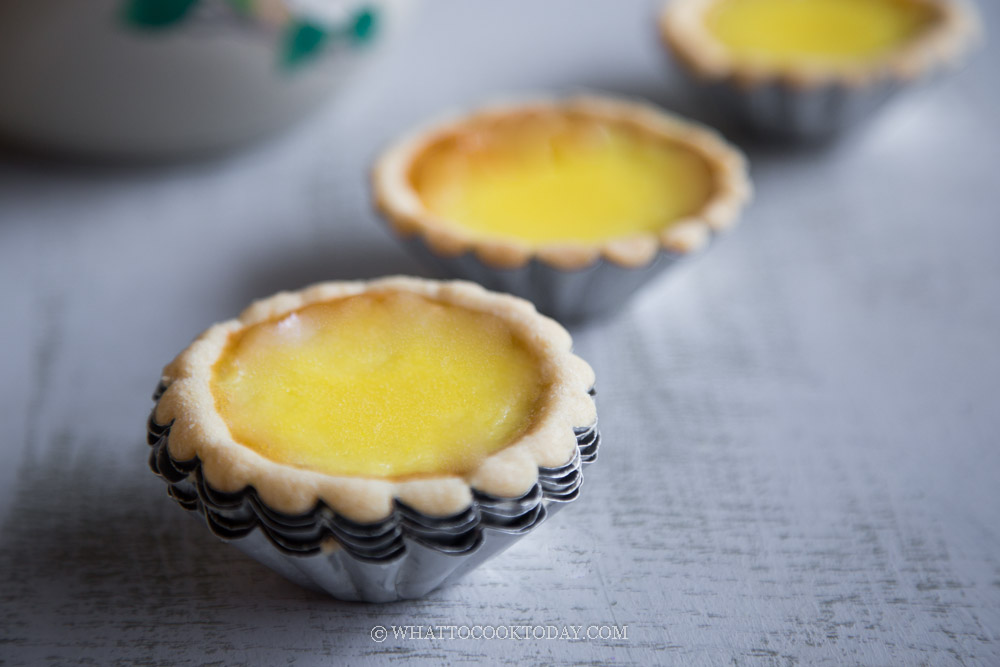
Turn off the oven and I let them sit inside the oven with the door ajar for 10 minutes. This helps to minimize the egg custard from sinking too much. Remove from the oven and let them cool down for about 5 minutes then remove to the cooling rack to let them cool down further. They are best served warm or room temperature.
TIPS TO MAKE DAN TAT SUCCESSFULLY
1. Don’t roll the dough for the tart shells too thin.
2. Place the baking sheet on a lower rack helps to cook the tart shells without overcooking the egg custard, which usually causes the egg custard to puff up and then collapse and sink later.
3. Let the baked egg custard sit in the oven and open the oven door after you turn off the oven. This also helps to minimize the filling from sinking too much.
HOW TO STORE LEFTOVER DAN TAT
STORING: Freshly baked tarts can be kept in an air-tight container in the fridge for 2-3 days. I don’t recommend making in a big batch as the tart shells can get soggy the longer you keep them. You can serve on the same day you make them, but actually tastes even better the next day IMHO
REHEATING: You can reheat the egg tarts in the air fryer or toaster oven/oven at 300 F for about 5 minutes or so or until warm if you like
Nothing excites me more than seeing my kids coming back from school and immediately they dropped everything and ran to the kitchen to see what I baked 🙂 each of the kid ate 3 of these dan tat. There’s really no issue with leftover is all I can tell you. They eat the dan tat faster than I make them LOL!
DID YOU MAKE THIS EASY HONG KONG EGG TARTS (DAN TAT) RECIPE?
I love it when you guys snap a photo and tag to show me what you’ve made 🙂 Simply tag me @WhatToCookToday #WhatToCookToday on Instagram and I’ll be sure to stop by and take a peek for real!
Hong Kong Egg Tarts (Dan Tat)
Ingredients
Tart shells:
- 140 gr butter softened
- 75 gr icing sugar
- 200 gr all-purpose flour
- 25 gr egg 1/2 large egg, room temperature
- ⅛ tsp salt
Egg Custard:
- 130 gr hot water
- 90 gr sugar
- 140 gr eggs about 3 large eggs
- 25 gr evaporated milk see notes
- ½ tsp vanilla extract
Instructions
- Place the butter at room temperature for about 30 minutes and it will soften
- The tart mould that I use has a measurement of 3 inches wide on top, 1 1/4 inches wide at the base and about 1 1/8 inches tall.
Prepare the dough or tart shells:
- Mix all-purpose flour and salt in a bowl. Stir to combine. Combine the softened butter and sugar using a whisk until creamy. Gradually add in the egg mixture and whisk until combined. It may appear separate at first but just keep whisking and it will come together
- Add the flour mixture and use a rubber spatula to combine at first and then use your clean hands to knead it into a smooth dough. Flatten into a disc and wrap with a cling wrap and refrigerate for at least 30 minutes
Shape the tart shells:
- Divide the dough into 9 portions (I would say roughly about 30 grams each if you want to weigh it out) and roll into round balls. Lightly dust your fingers with some flour to prevent sticking if it's an issue. Place the dough ball in the mold and then use your two thumbs to start spreading the dough from center to the side of the mold. It's better if you can mold it about 1-2 mm higher on the top edge so it's easier to release and you can fill up a bit more filling too
- Place the tart shells on a baking pan and place them in the refrigerator for at least 30 minutes while you prepare the custard filling
Prepare the egg custard filling:
- Preheat oven to 400 F (200 C) My oven is a conventional oven, only bottom heat, no fan. Combine hot water with sugar and stir until sugar dissolves. Let it cool down to at least warm
- Whisk the eggs with evaporated milk. Add the sugar water and vanilla extract and keep whisking. Strain this mixture to get rid of any lumps. Transfer to a jug or large measuring cup with a spout for easier pouring later
Assembling the tarts:
- Pour the egg custard mixture into each tart shells, about 3/4 full (as shown in the photo above)
- Place the baking sheet at the lower 3rd of the oven. Bake for about 10 minutes or until the tart shells are golden brown. Then lower the oven temperature to 350 F (180 C) and let them bake until the egg custard is set, about 10 minutes or until the egg custard is set and no longer jiggly. You can insert a toothpick into the middle of the custard to check. It should come out clean
- Keep a close watch on the custard, if you see the custard started to puff up, open the oven door a little bit. The custard is done when it's no longer wobbly and when you insert a toothpick in the middle of the custard, it can stand on its own
- Turn off the oven and I let them sit inside the oven with the door ajar for 5 minutes. This helps to minimize the egg custard from sinking too much. Remove from the oven and let them cool down for about 5 minutes then remove to the cooling rack to let them cool down further. They are best served warm or room temperature


24 comments
Hello Marvellina,
I finally had the chance to try to make this! The crust didn’t turn out nearly as smooth and soft, like it’s pictured. I think maybe because i had to convert measurements from grams to cups, tsp, and tbl. 🙁 As a result, my measurements might be off, esp. on the butter, since the crust was a bit flaky and a bit difficult to roll out and ended up a bit harder than I liked after baking. Maybe you can provide an additional measurements for ease, for those, like me, who are not used to using gram for cooking measurement.
Hi Marvellina,..thanks for updating so quickly. I will try and attempt to make these from stratch! I just have to find the time since I can’t take the short cut, easy route with using pie crust! Lol. Can I use aluminium tray instead of individual cups, since I already have some on hand?
Hi Grace, you can still use the ready-made pie crust too if you want. I have to admit it is easier with the crust. You can use aluminum tray too. I used to use the aluminum muffin trays too before my mom got me these individual ones. They work. You may not get 15 tarts as they are bigger, but definitely works.
Hi Marvellina,
I was planning to make the egg tarts this weekend! Will the recipe be updated that soon? Ok, no salt, got it. I asked about it because it was in mentioned in #1 instruction.
Hi Grace, I’ll definitely have it updated by then. I just made them again today 🙂 The result is much better with a homemade pastry. I actually added a small pinch of salt to the crust this time because it brings out the flavor more 🙂 I’ll update soon!
Hi Grace, just to let you know that the updated recipe is up on the blog now 🙂 This version is much better than the previous one. Well, you’ll be the judge 🙂
Hi Marvellina,
Wooo…can’t wait to make this! My son loves egg tarts. What type of milk can i use (2%, whole milk, almond milk)? Plus, how much salt to add to the sugar? It’s not listed. Thanks.
Hi Grace, if you don’t mind waiting, I plan to improve this recipe soon. You can use whole milk or low fat milk. I’ve never tried with almond milk before, but it should work too. There’s no salt in the recipe.
Hi Marvellina,
Wooo…can’t wait to make this! My son loves egg tarts. What type of milk can i use (2%, whole milk, almond milk)? Thanks.