This post may contain affiliate links. Please read our disclosure policy.
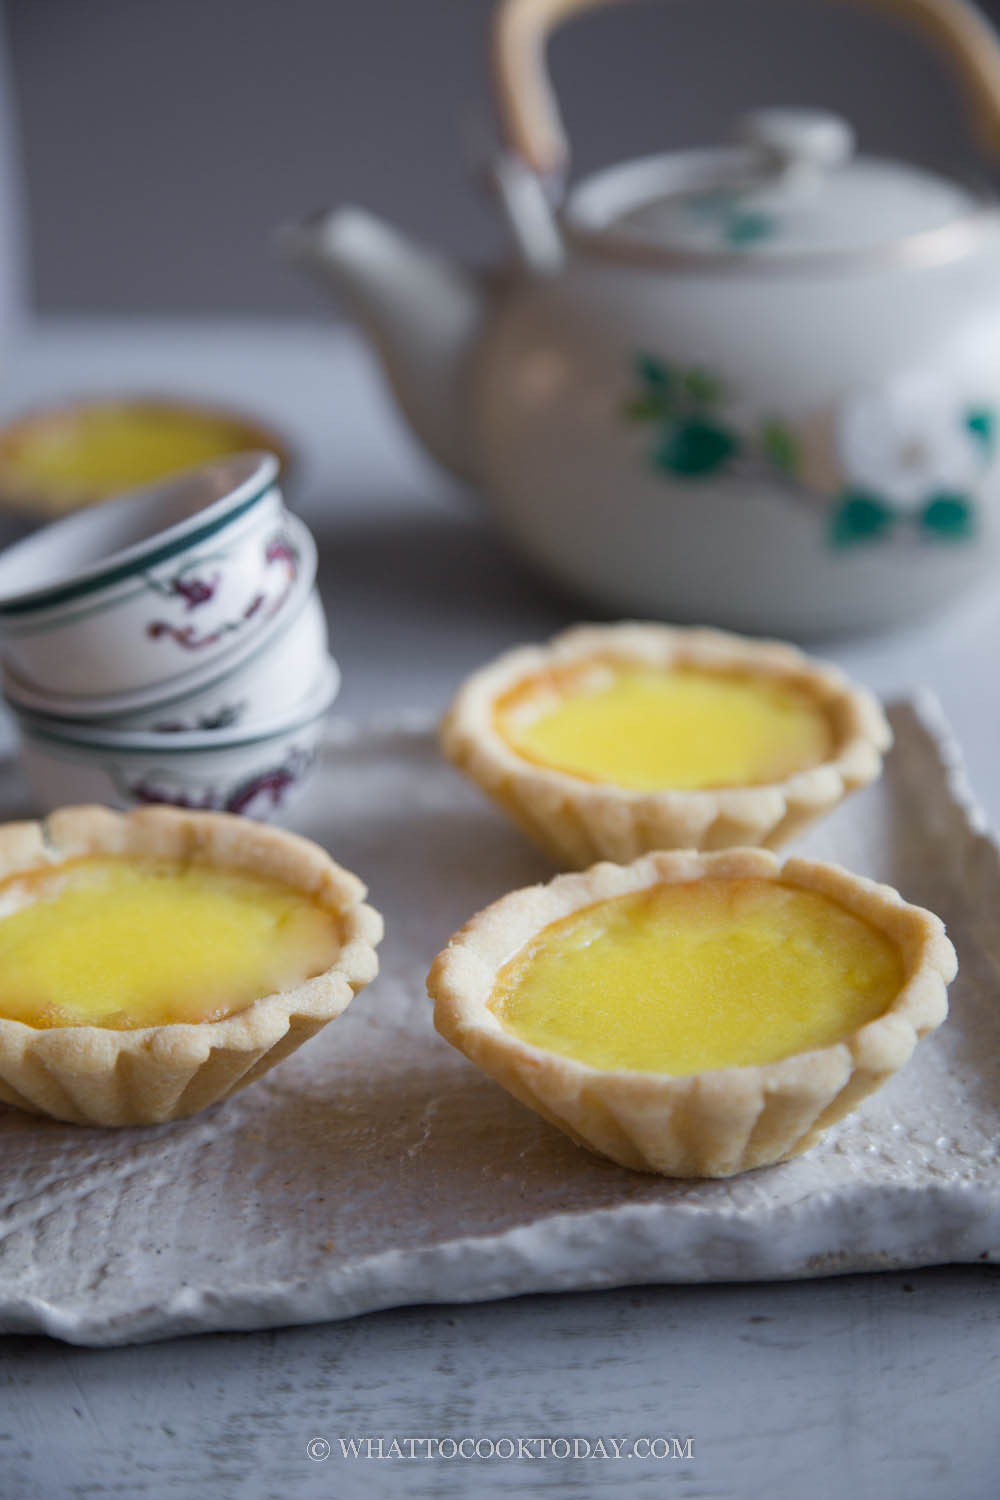
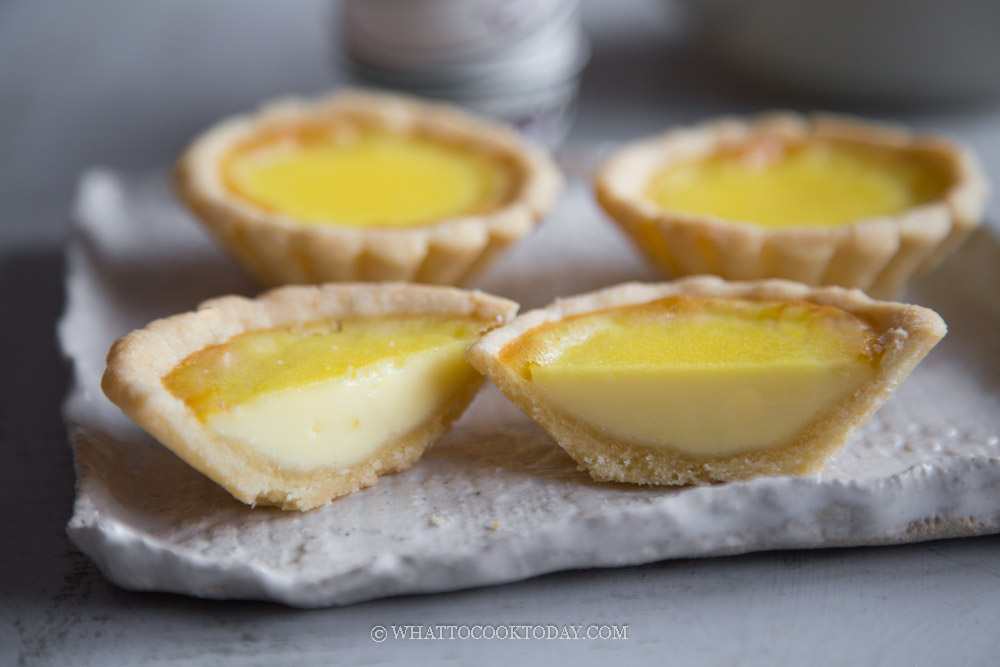
Make these dim sum favorite Hong Kong-style egg tarts with this easy simple recipe. They are highly popular at our house and are gone fast!

Hong Kong style egg tart is one of our favorite dim sum items that we have to order each time we go for one. My daughter can easily eat 3 of these at one go 🙂
MAKE THE TART SHELLS FROM SCRATCH
Few years ago, I made this dan tat using ready-made pie crust I bought from the store because it’s convenient. I have to admit though, this dan tat tastes the best when you made the tart shells from scratch. It simply tastes so much better and the family agrees too. It worth the effort (not as intimidating as it sounds really!). The tart shells are shortcrust pastry, not the puff pastry kind. For Hong Kong egg tart, I prefer the shells made with shortcrust pastry.
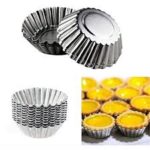
SPECIAL MOULD TO MAKE HONG KONG EGG TART DAN TAT
You can use regular muffin cups too. I recommend using the aluminum type as they bake faster. These are the typical mold used to make Chinese dan tat. My mom actually got these for me from Indonesia. They are made with aluminum and are pretty thin and flimsy actually. But they work to bake the dan tat evenly. You can certainly find them at any store that sells baking ingredients and supplies. You can get it from Amazon too. The size of the tin I have is 3 inch in wide and about 1 1/2 inch deep (Size XL)
HOW TO MAKE DAN TAT FROM SCRATCH
1. MAKE THE DOUGH FOR THE TART SHELLS
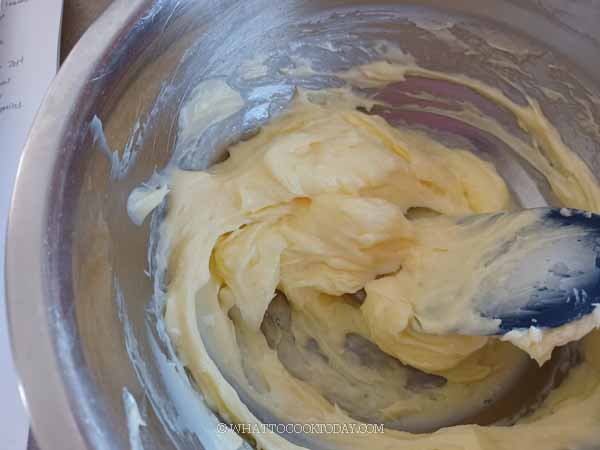
Mix all-purpose flour and salt in a bowl. Stir to combine. Combine the softened butter and sugar using a whisk until creamy

Gradually add in the egg mixture and whisk until combined. It may appear separate at first but just keep whisking and it will come together

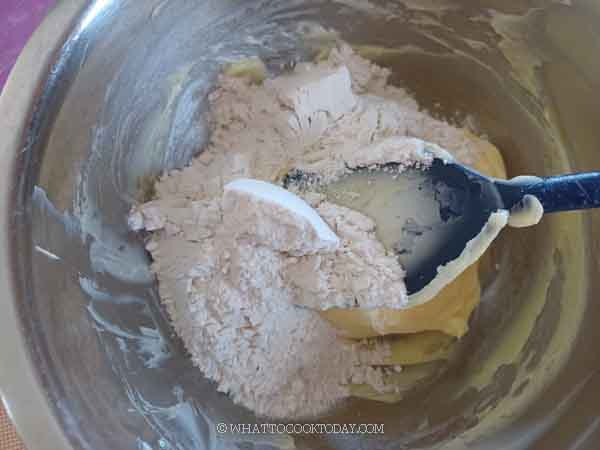
Add the flour mixture and use a rubber spatula to combine at first

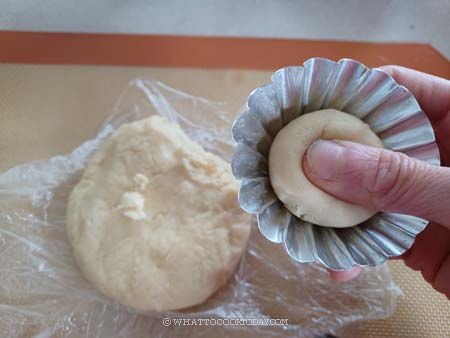
Then use your clean hands to knead it into a smooth dough. Flatten into a disc and wrap with a cling wrap and refrigerate for at least 30 minutes

2. SHAPE THE TART SHELLS
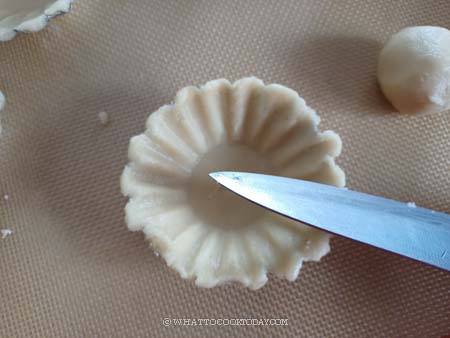
Divide the dough into 9 portions and roll into round balls. Lightly dust your fingers with some flour to prevent sticking if it’s an issue. Place the dough ball in the mold and then use your two thumbs to start spreading the dough from center to fill up the side of the mold.
Cover with a piece of cling wrap on top and then use another mold to press on it

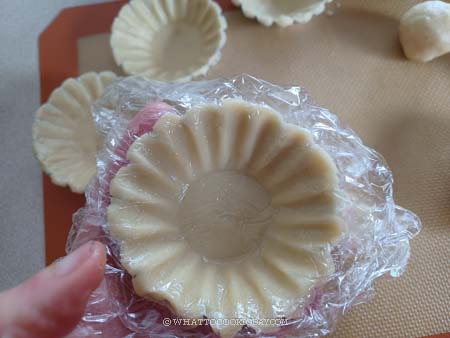
It’s better if you can mold it about 1-2 mm higher on the top edge so it’s easier to release and you can fill up a bit more filling too.
Place the tart shells on a baking pan and place them in the refrigerator for at least 30 minutes while you prepare the custard filling
3. PREPARE THE CUSTARD FILLING
Preheat oven to 400 F (200 C) My oven is a conventional oven, only bottom heat, no fan. Combine hot water with sugar and stir until sugar dissolves. Let it cool down to at least warm
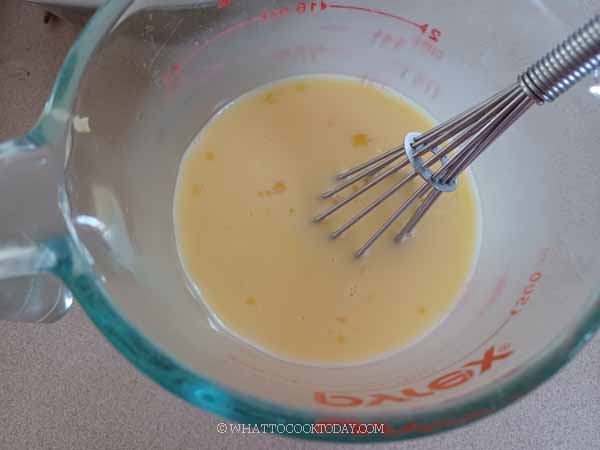
Whisk the eggs with evaporated milk
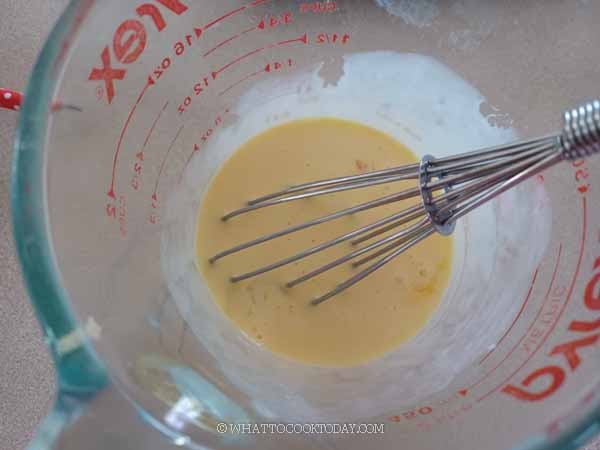
Add the sugar water and vanilla extract and keep whisking
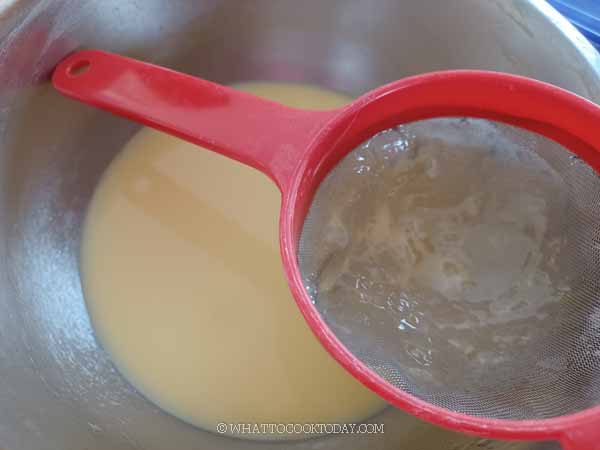
Strain this mixture to get rid of any lumps. Transfer to a jug or large measuring cup with a spout for easier pouring later

3. ASSEMBLE THE EGG TARTS
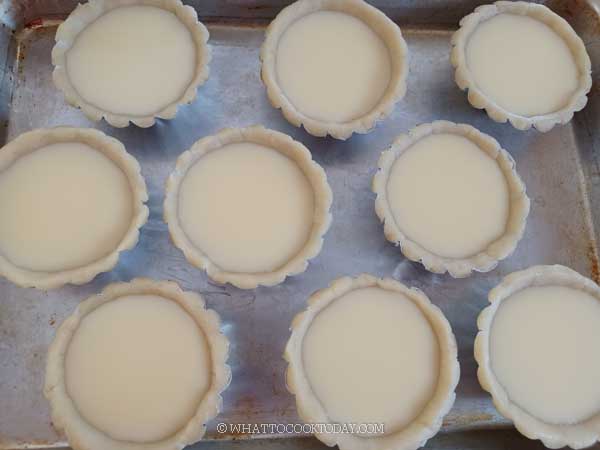
Pour the egg custard into each tart shell, about 3/4 full, but take care not to overfill
4. BAKE THE EGG TARTS
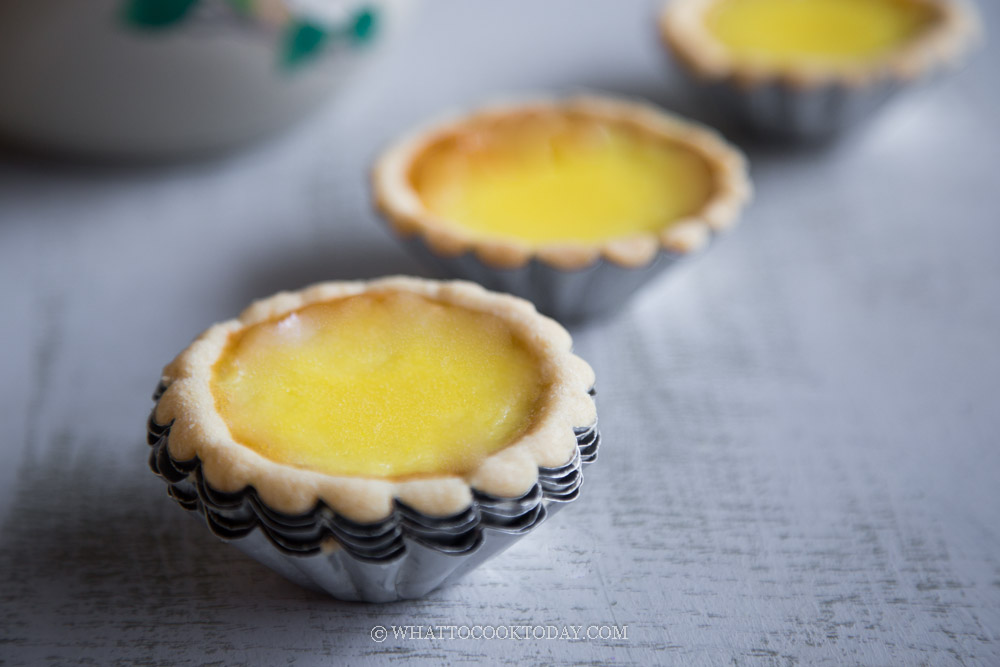
Place the baking sheet at the lowest rack of the oven. Bake for about 10 minutes or until the tart shells are golden brown. Then lower the oven temperature to 350 F (180 C) and let them bake until the egg custard is set, about 10 minutes or until the egg custard is set. You can insert a toothpick into the middle of the custard to check

Keep a close watch on the custard, if you see the custard started to puff up, open the oven door a little bit. The custard is done when it’s no longer wobbly and when you insert a toothpick in the middle of the custard, it can stand on its own.

Turn off the oven and I let them sit inside the oven with the door ajar for 10 minutes. This helps to minimize the egg custard from sinking too much. Remove from the oven and let them cool down for about 5 minutes then remove to the cooling rack to let them cool down further. They are best served warm or room temperature.
TIPS TO MAKE DAN TAT SUCCESSFULLY
1. Don’t roll the dough for the tart shells too thin.
2. Place the baking sheet on a lower rack helps to cook the tart shells without overcooking the egg custard, which usually causes the egg custard to puff up and then collapse and sink later.
3. Let the baked egg custard sit in the oven and open the oven door after you turn off the oven. This also helps to minimize the filling from sinking too much.
HOW TO STORE LEFTOVER DAN TAT
STORING: Freshly baked tarts can be kept in an air-tight container in the fridge for 2-3 days. I don’t recommend making in a big batch as the tart shells can get soggy the longer you keep them. You can serve on the same day you make them, but actually tastes even better the next day IMHO
REHEATING: You can reheat the egg tarts in the air fryer or toaster oven/oven at 300 F for about 5 minutes or so or until warm if you like
Nothing excites me more than seeing my kids coming back from school and immediately they dropped everything and ran to the kitchen to see what I baked 🙂 each of the kid ate 3 of these dan tat. There’s really no issue with leftover is all I can tell you. They eat the dan tat faster than I make them LOL!
DID YOU MAKE THIS EASY HONG KONG EGG TARTS (DAN TAT) RECIPE?
I love it when you guys snap a photo and tag to show me what you’ve made 🙂 Simply tag me @WhatToCookToday #WhatToCookToday on Instagram and I’ll be sure to stop by and take a peek for real!
Hong Kong Egg Tarts (Dan Tat)
Ingredients
Tart shells:
- 140 gr butter softened
- 75 gr icing sugar
- 200 gr all-purpose flour
- 25 gr egg 1/2 large egg, room temperature
- ⅛ tsp salt
Egg Custard:
- 130 gr hot water
- 90 gr sugar
- 140 gr eggs about 3 large eggs
- 25 gr evaporated milk see notes
- ½ tsp vanilla extract
Instructions
- Place the butter at room temperature for about 30 minutes and it will soften
- The tart mould that I use has a measurement of 3 inches wide on top, 1 1/4 inches wide at the base and about 1 1/8 inches tall.
Prepare the dough or tart shells:
- Mix all-purpose flour and salt in a bowl. Stir to combine. Combine the softened butter and sugar using a whisk until creamy. Gradually add in the egg mixture and whisk until combined. It may appear separate at first but just keep whisking and it will come together
- Add the flour mixture and use a rubber spatula to combine at first and then use your clean hands to knead it into a smooth dough. Flatten into a disc and wrap with a cling wrap and refrigerate for at least 30 minutes
Shape the tart shells:
- Divide the dough into 9 portions (I would say roughly about 30 grams each if you want to weigh it out) and roll into round balls. Lightly dust your fingers with some flour to prevent sticking if it's an issue. Place the dough ball in the mold and then use your two thumbs to start spreading the dough from center to the side of the mold. It's better if you can mold it about 1-2 mm higher on the top edge so it's easier to release and you can fill up a bit more filling too
- Place the tart shells on a baking pan and place them in the refrigerator for at least 30 minutes while you prepare the custard filling
Prepare the egg custard filling:
- Preheat oven to 400 F (200 C) My oven is a conventional oven, only bottom heat, no fan. Combine hot water with sugar and stir until sugar dissolves. Let it cool down to at least warm
- Whisk the eggs with evaporated milk. Add the sugar water and vanilla extract and keep whisking. Strain this mixture to get rid of any lumps. Transfer to a jug or large measuring cup with a spout for easier pouring later
Assembling the tarts:
- Pour the egg custard mixture into each tart shells, about 3/4 full (as shown in the photo above)
- Place the baking sheet at the lower 3rd of the oven. Bake for about 10 minutes or until the tart shells are golden brown. Then lower the oven temperature to 350 F (180 C) and let them bake until the egg custard is set, about 10 minutes or until the egg custard is set and no longer jiggly. You can insert a toothpick into the middle of the custard to check. It should come out clean
- Keep a close watch on the custard, if you see the custard started to puff up, open the oven door a little bit. The custard is done when it's no longer wobbly and when you insert a toothpick in the middle of the custard, it can stand on its own
- Turn off the oven and I let them sit inside the oven with the door ajar for 5 minutes. This helps to minimize the egg custard from sinking too much. Remove from the oven and let them cool down for about 5 minutes then remove to the cooling rack to let them cool down further. They are best served warm or room temperature


24 comments
Hi Marv, I tried your recipe today. My custard puffed up during the baking and I did what you suggested, I open my oven door for a few minutes. After my tarts were done ( toothpicks were able to stand on its own) the custard flattened when they cooled, which I expected. However, on the top of my custard was a little liquid. should i have baked a little longer in the oven? i was worried because my crust was already brown in color. Didn’t want to burn the crust. Overall, they were ok, but the filling was a little “off” from the ones I’ve eaten at our Chinatown. Could i add another egg or custard powder for flavor? Btw, crust tasted great!
Hi Gina, is your oven convection (top and bottom heat?). It sounds like the custard may need to be baked a bit longer. You can loosely cover the tart with aluminum foil if you worry about the shells getting too dark. Depending on your oven setting, you can also move it down to prevent the shell from browning too much while the filling is still not fully set yet.
i will try that next time. will an extra egg or egg yolk add more flavor to the tarts or would it ruin the nice texture? Btw, The tarts were more delicious the next day! Even good cold! thank you
Hi Gina, I haven’t tried it with an extra egg or egg yolk, it may be richer, if that’s what you prefer. I might try that myself too next time, make the filling with more eggs and see
Cant wait to start making this. Can you just confirm if the oven has both top and bottom heat on? Assuming no fan? Thank you!
Hi Angela, my oven is a conventional oven, only bottom heat, and no fan. If you are going to use both top and bottom heat, I would recommend lowering the temperature by about 10-15 degrees to adjust. I hope this helps.
Thank you for your advise. I left mine as bottom heat with fan and it works great!!
Btw your chiffon recipes are amazing. Fail proof! And so delicious
Hi Angela, great to know that the oven setting worked for you and you enjoy the chiffon cakes too 🙂
Hi! So excited to make these. I noticed that other recipes have puff pastry shells and use evaporated milk for the filling. Are there different versions of this egg tart?
Hi Maria, yes I noticed some people use puff pastry shells for this HK style egg tart. I’m not sure if it is a different version, but I just remember eating some in Hong Kong and they served the one without puff pastry (at least the place we went to), but the egg tarts at our local dim sum place here, served them with puff pastry. As for evaporated milk, it sure gives a much richer milkier aroma compared to using regular milk. You can use evaporated milk if you prefer.
Love this recipe! A delicious, buttery, short crust pastry tart Compliments the creamy, slightly sweet egg custard. It’s harmonious, and I can’t wait to make it again! Thank you for the recipe!
Hi Tina, I’m so glad to know that you like it too 🙂 Yay!!! Thank you for your feedback!
Sorry, I meant the dough didn’t turn out as smooth and soft, not the crust!
Sorry to hear about the trouble. I prefer to bake in grams or oz instead of cups because it’s more precise. It’s hard to put everything in cups or tsp/tbsp (and less cups for me to wash as I can measure everything on a kitchen scale LOL). I’ve included the additional measurements. Hope it helps!