This post may contain affiliate links. Please read our disclosure policy.
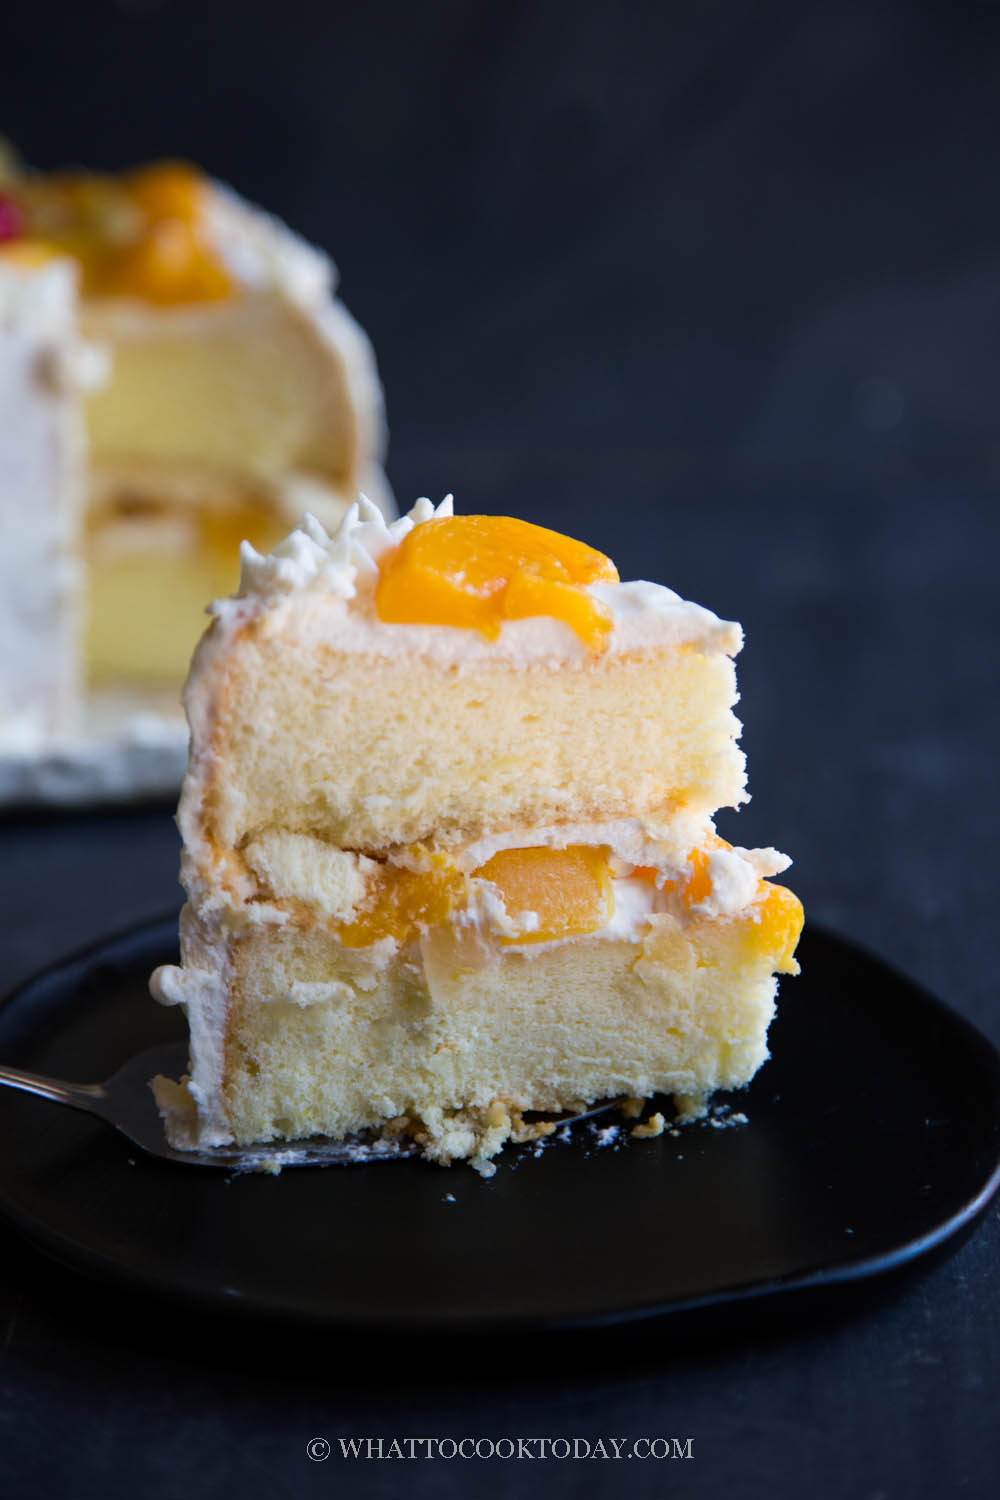
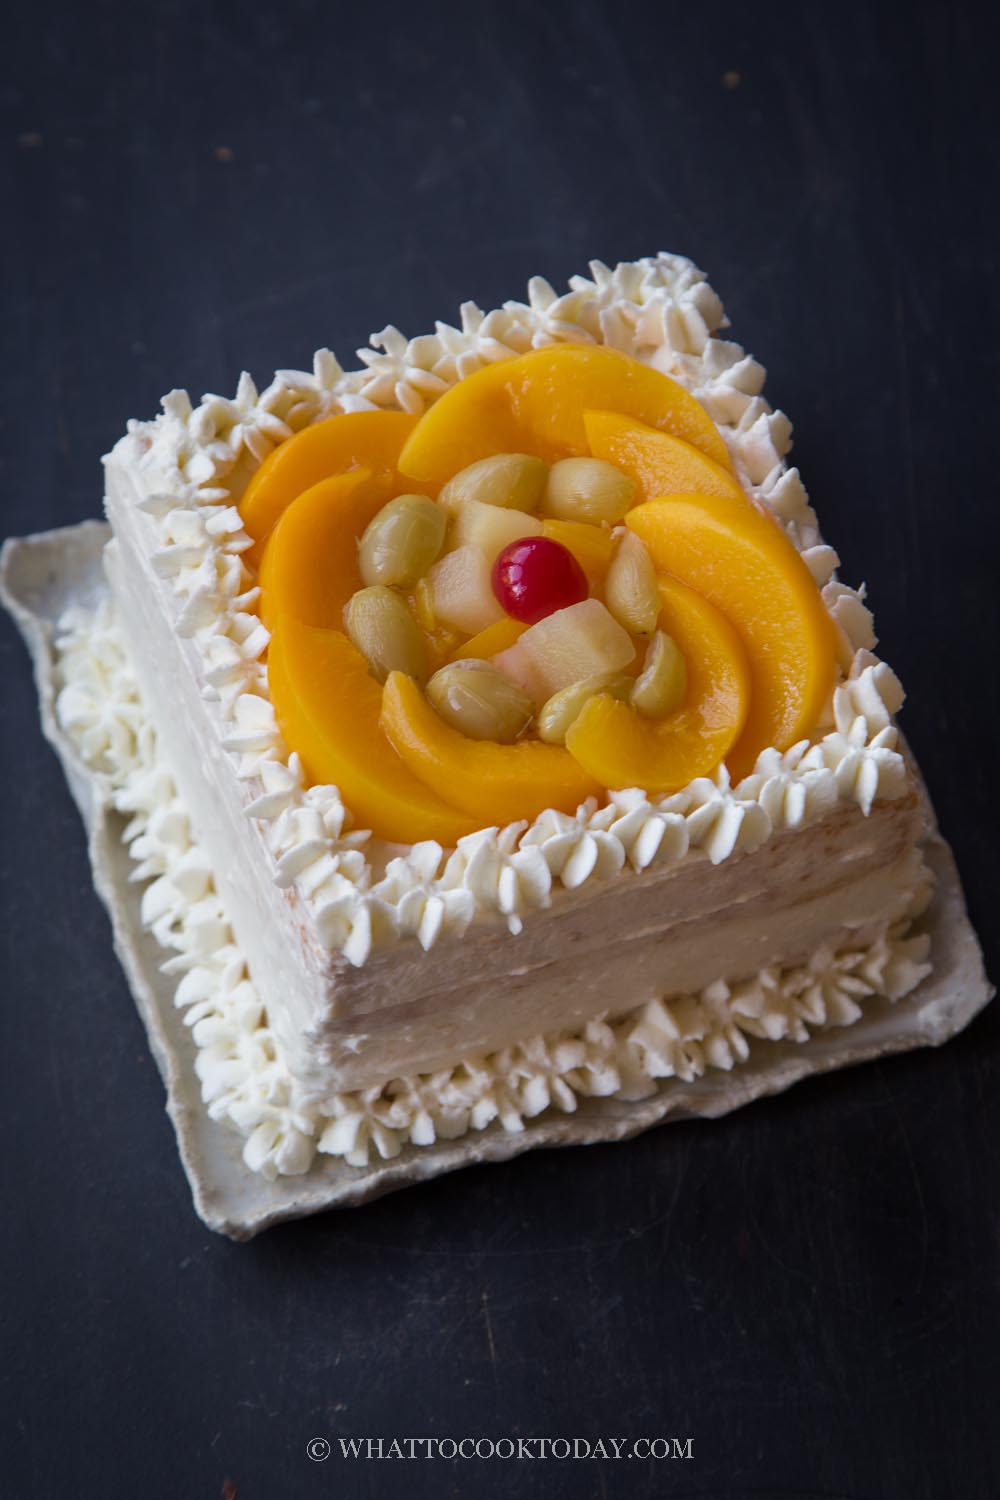
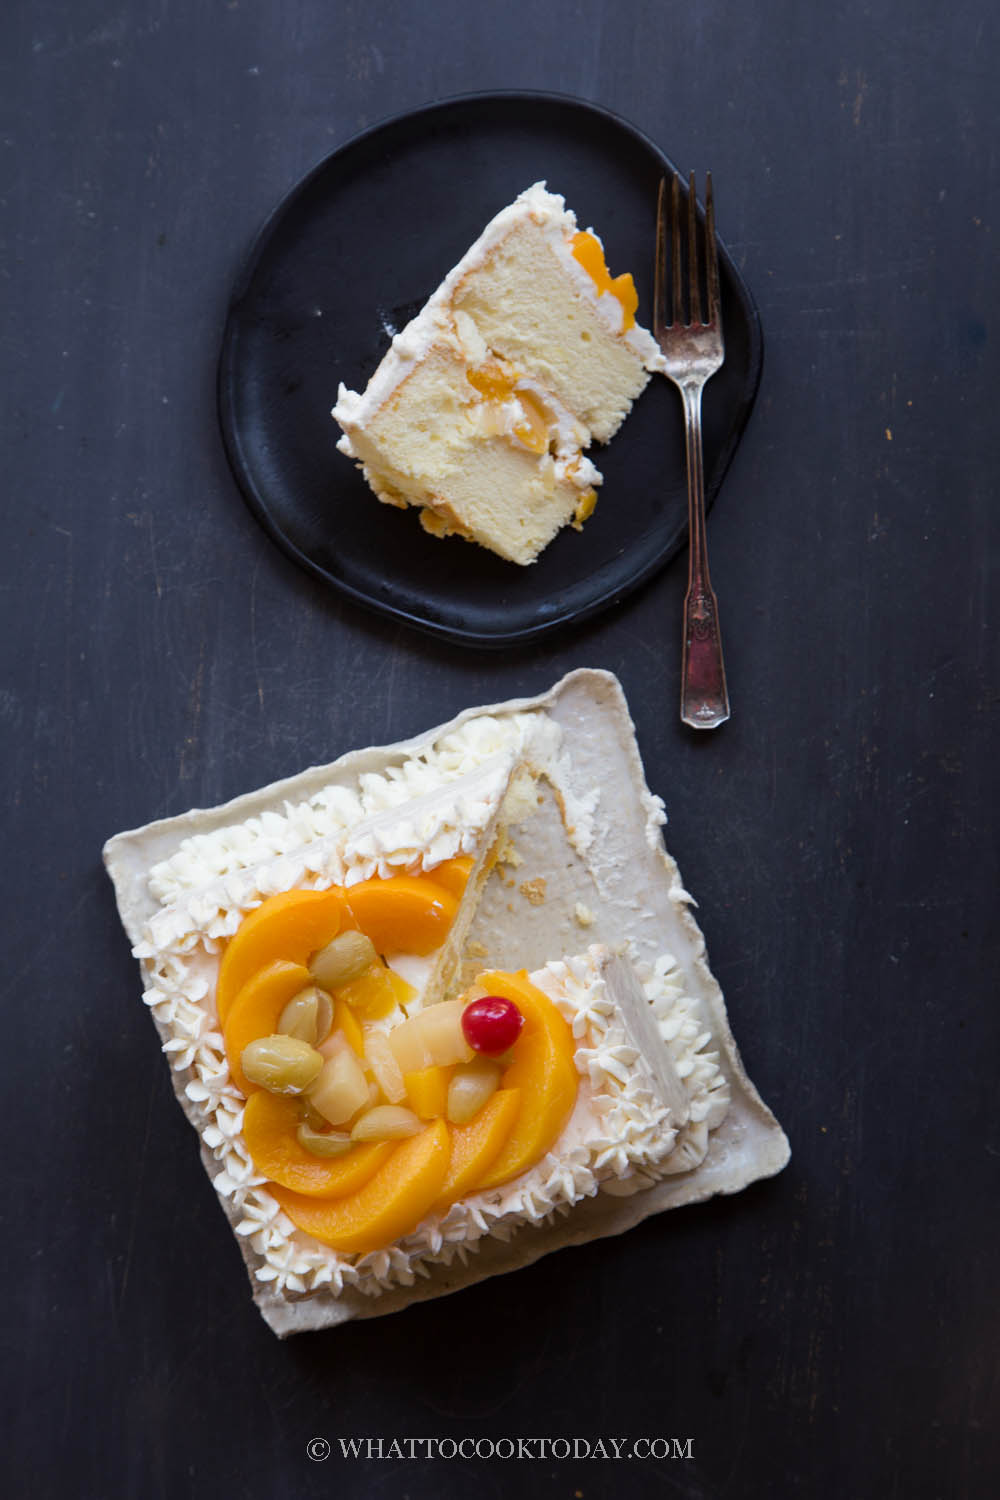
Soft and airy sponge cake decorated with light airy whipped cream and fruit is a classic and popular Chinese bakery-style cake often seen during birthday celebrations and suitable for other events or celebrations too.

If you love airy and spongey cake, this Chinese bakery-style fruit sponge cake is up your alley then! It has that soft and airy texture of chiffon that we love so much.
What is Chinese bakery-style fruit sponge cake?
I grew up with cakes frosted with buttercream as birthday cakes and heavily coated with chocolate sprinkles and I have to be honest that I never was a big fan. The buttercream was so rich that I couldn’t take it. Then along come this light and airy sponge cake. Just lightly sweetened. Usually frosted in white color light and airy whipped cream and decorated with fresh fruit or canned or glazed fruit. They are popping out everywhere at Chinese/Asian bakery shops and it seemed like an instant hit with me (and many others). This was the only cake I requested since then. No more buttercream cake please! ever! LOL!
The recipe rundown
Taste: The cake has the right amount of sweetness (to me anyway). The whipped cream frosting doesn’t weigh you down either
Texture: Soft crumb, airy, and spongey
Level: Intermediate
Pros: It looks more complicated than it actually is. I’m no cake decorator, but this cake can be decorated any way you want. The fruits just make it looks pretty without much effort actually. NO baking powder is used either. You don’t need it if you properly whip your meringue
Cons: If you are used to rich-tasting cake, you may find this cake not sweet and/or rich enough for you
Tips for success
1. Plan on the size of the cake. Don’t make too big of a cake that will give you too much leftover. The longer you keep the cake in the fridge, the drier it gets. So keep that in mind
2. Plan on making the cake the day before you plan to serve it
3. Allow about 2-3 hours for the cake to chill before you can serve it
4. Get the eggs and milk out from the fridge to let them come to room temperature 15-30 minutes (depending on how warm it is where you are) before you plan to start working on this cake
5. Chill the bowl and whisk attachment in the fridge for at least 15 minutes before you plan to whip the cream
6. Always preheat your oven to bake the cake before you start working on the recipe
7. Just breathe and you will be just fine. I can do it, you can definitely do it
How to make Chinese bakery-style fruit sponge cake
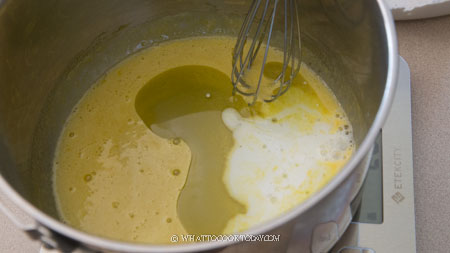
1. Preheat oven to 350 F (180 C). In a mixing bowl, add egg yolks, sugar, oil, milk, vanilla extract, and whisk to combine.
2. Sift in the cake flour and salt
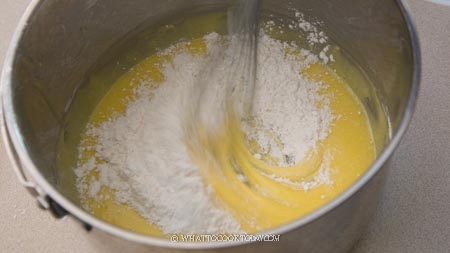
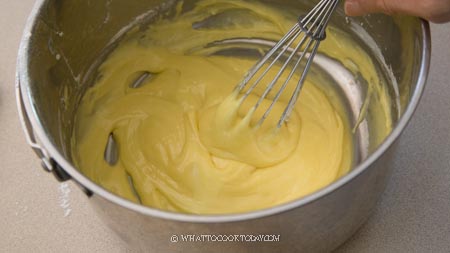
3. Mix to combine. Set aside
4. Make sure your mixing bowl and other equipment are grease-free and clean. Use a whisk attachment to whip the egg white on medium speed until frothy, about 1 minute. Add the vinegar and whip again for another minute. Gradually add sugar in 4 batches
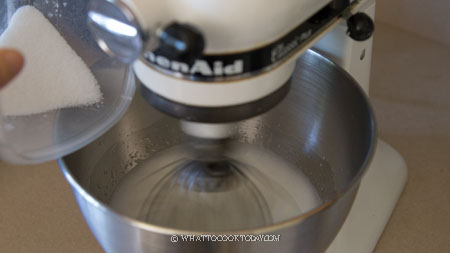
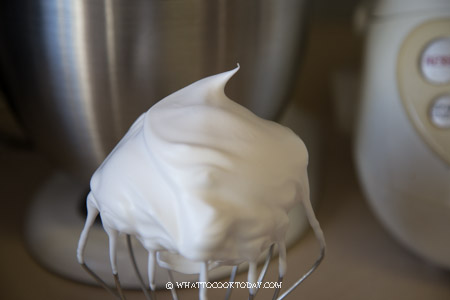
5. Continue to whip until you reach a stiff peak and stop. You can always stop halfway to check too. When you use a whisk to lift up the meringue, it should stay firm with just a slight bent on the tip and not moving. If you turn the bowl upside down, the meringue won’t flop down
6. Scoop 1/3 of the meringue into the cake batter. Use a whisk to gently swipe down and fold over to combine the meringue into the cake batter. Do this gently but quickly.
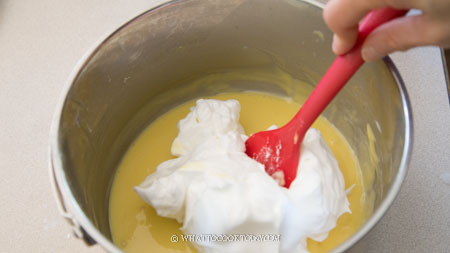
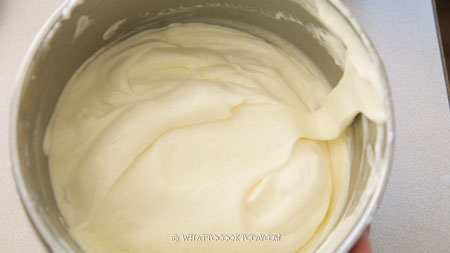
7. Continue with the next 1/3 and then the last 1/3. The final cake batter should be voluminous and airy. If it turns runny and not much volume, you have overmixed and lose most of the air, the cake will turn out dense and won’t rise
8. Pour half of the cake batter into a prepared pan and the other half onto another. Bang on the countertop about 2-3 times to pop large bubbles. I like to use a skewer to run through the cake batter just to pop any extra bubbles inside the cake (these bubbles will create ugly holes inside your cake later)
9. Place the cake pans side by side on the middle rack and bake for 15-20 minutes or until a cake tester inserted comes out clean. I use a conventional oven with bottom heat only. Start checking at around 15 minutes
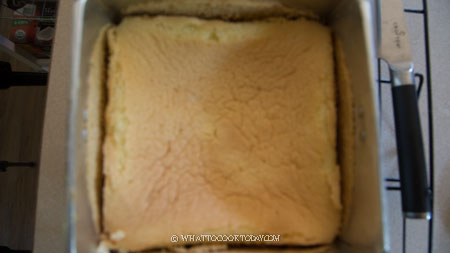
10. Remove from the oven and drop the cake pan from about 5-inch height on the countertop. This helps to minimize shrinkage. Let the cake cools down in the pan for about 5 minutes. The cake will pull away from the side of the pan. You can also run an offset spatula on the edge to help release the cake. Place a plate or something flat on top of the cake pan and flip over. Peel the parchment from the bottom of the cake off and flip back and let the cake cool down completely on a cooling rack

11. Make sure the heavy cream has been chilled in the fridge too. I like whipped cream stabilized with Jello instant pudding because the whipped cream is extremely stable, have a nice spongy texture, and it won’t “sweat” at all when you keep the frosted cake in the fridge or even if you leave the frosted cake out at room temperature for hours. Pour the heavy cream, icing sugar, and the Jello instant pudding mix into a mixing bowl. Start whipping at medium speed until it reaches a firm peak. It should be able to hold its shape. The texture will be smooth and glossy. If you whip too stiff, it will be grainy and not smooth. You know you have gone too far. Please note that you need to use the cream immediately or it will set if you make ahead and you won’t be able to frost the cake smoothly.

Whipped cream with firm peak and not overly beaten
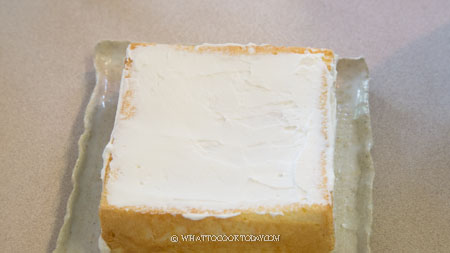
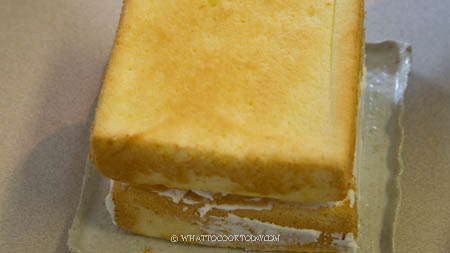
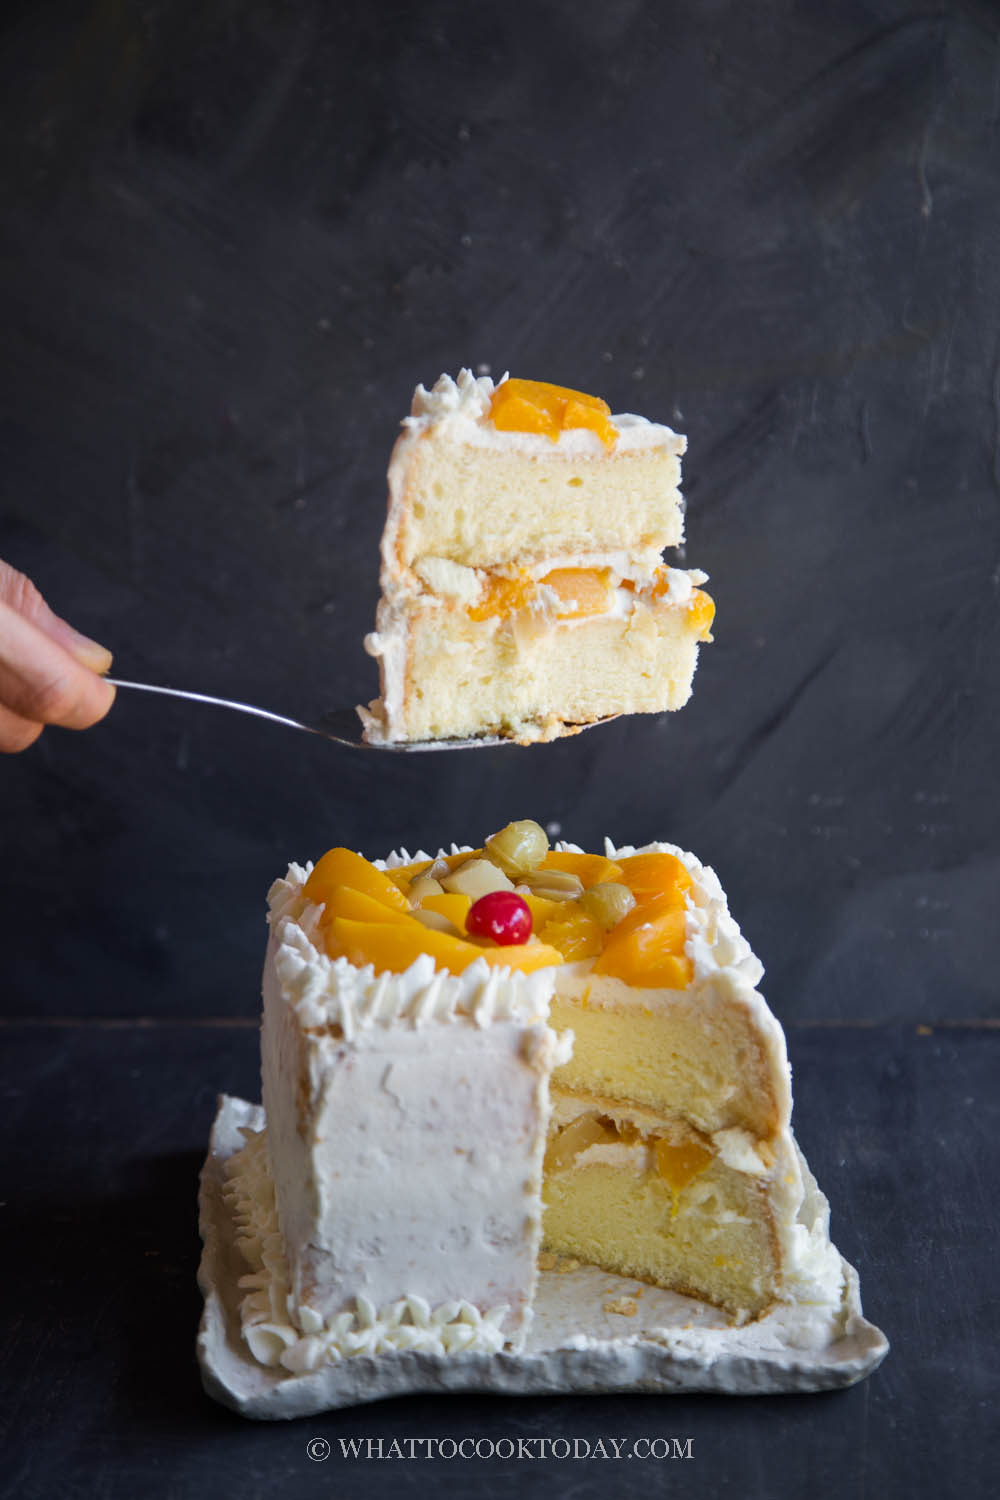
13. Lay the first layer of the cake on a plate. Turn the brown side of the cake down so it becomes the bottom of the cake. Spread 1/4 of the whipped cream on the surface using an offset spatula as evenly as possible
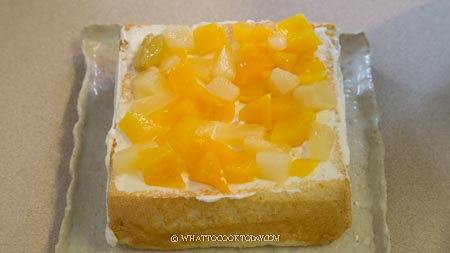
14. Arrange the fruit slices on top of the cream
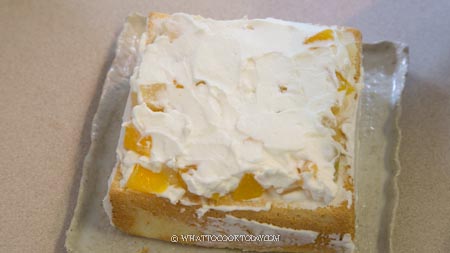
15. Cover with another 1/4 of the whipped cream as evenly and level as possible
16. Top with another layer of the cake. The brown side down (I actually forgot to do so ha..ha..but no big deal, no one noticed it because it’s covered by the cream psssttt!!!)
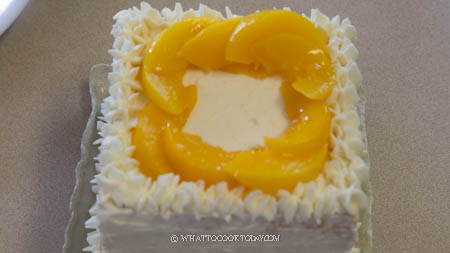
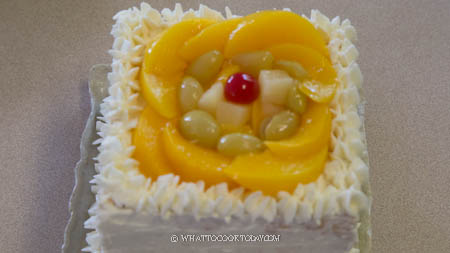
17. Spread again with 1/2 of the whipped cream as level as possible. Now use the rest of the whipped cream to frost the sides of the cake. I didn’t frost it entirely white on the sides, giving it a more semi-naked look. I use the extra whipped cream to pipe some pattern on the edge of the cake. Arrange more fruit on top, covering all the surface
18. Chill the cake for at least 2-3 hours in the fridge to let the frosting set, before you plan to serve the cake. So plan accordingly when the cake needs to be served
Chinese Bakery-Style Fruit Sponge Cake
Not so bad right? It looks complicated at first glance, but really for someone with not much experience decorating a cake, this cake is quite forgiving! As long as you get the cake texture right, the rest is a no-brainer! The fruits really jazz up the cake without much effort on my end, which is great, because I’m horrible at decorating cake LOL!
How to store leftover
It is best to serve this cake on the same day, which is why I usually make a small cake unless I need to serve the cake to more people. Leftover happens, I get it! Here’s how to store the cake:
1. Chill the cake back in the fridge for about 15 minutes or so, since you probably have left it on the counter and the whipped cream has softened
2. The whipped cream will harden back. Cover with a plastic wrap and keep in the fridge for no more than 3 days if possible. The longer you keep, the drier it gets and it will also absorb other smells from your fridge. No good!
Did you make this Chinese bakery-style fruit sponge cake recipe?
I love it when you guys snap a photo and tag to show me what you’ve made 🙂 Simply tag me @WhatToCookToday #WhatToCookToday on Instagram and I’ll be sure to stop by and take a peek for real!
Chinese Bakery Fruit Sponge Cake
Ingredients
This sponge cake recipe uses egg-separation method:
Cake batter:
- 4 egg yolks (room temperature) from 58-60 grams egg with a shell
- 20 g granulated sugar
- 64 g cooking oil
- 80 g whole milk (room temperature)
- 1 tsp vanilla extract
- 120 gr cake flour
- ¼ tsp salt
Meringue:
- 4 large egg whites (room temperature) from 58-60 grams egg with a shell
- 100 g granulated sugar
- 1 tsp vinegar
Simple syrup - to brush on cakes to keep them moist (recommended):
- 2 Tbsp sugar
- 2 Tbsp hot water
Stabilized whipped cream (option 1):
- 6 g gelatin
- 2 Tbsp water
- 480 ml heavy cream
- 80 g icing sugar
- 1 tsp vanilla extract
- 35 g cocoa powder if you want chocolate-flavored whipped cream
Stabilized whipped cream (option 2):
- 480 ml heavy cream
- 60 g icing sugar
- 4 tsp Jello Instant Pudding mix (vanilla) or chocolate flavor pudding mix if you want chocolate-flavored whipped cream
- 20 g cocoa powder if you want chocolate-flavored whipped cream
Decoration:
- a mixture of fresh fruit with different colors you can use fresh or canned fruit
Instructions
Suggestion: Make the cake the day before (less hectic for you)
- Preheat oven at 350 (180 C) for a conventional oven. For a convection oven, reduce the temperature by 20 degrees.
Different shape and dimension of pans you can use:
- There are several ways you can bake this cake. You can use two 7-inch square cake pans or two 8-inch round pans, with at least 2 inches height and divide the cake batter into two. You can also bake in one quarter sheet pan (9x13 inches) which gives a thicker layer, or one large sheet pan about 13 x 18 inch size. Sheet pan give you a square/rectangle cake, depending on how you trim the cake and how many layers you want. Line the bottom of the cake pans or sheet pan with parchment paper
Prepare the cake batter:
- Divide the egg yolks and the whites. In a mixing bowl, add egg yolks, sugar, oil, milk, vanilla extract and whisk to combine. Sift in the cake flour and salt. Mix to combine. The yolk batter will be thick but flowy. Set aside
Make the meringue:
- Make sure your mixing bowl and other equipment are grease-free and clean. Use a whisk attachment to whip the egg white on medium speed (speed 4) until frothy, about 1 minute. Add the vinegar and whip again for another minute. Increase speed to 6 (medium) and gradually add sugar in 4 batches and continue to whip until you reach a stiff peak and then lower speed to 4 and beat one more minute so the air bubbles will be smaller. You can always stop halfway to check too. When you use a whisk to lift up the meringue, it should stay firm with just a slight bent on a tip and not moving. If you turn the bowl upside down, the meringue won't flop down
Fold the meringue into the cake batter:
- Scoop 1/3 of the meringue into the cake batter. Use a whisk to gently swipe down and fold over to combine the meringue into the cake batter. Do this gently but quickly. Continue with the next 1/3 and then the last 1/3. The final cake batter should be voluminous and airy. If it turns runny and not much volume, you have overmixed and lose most of the air, the cake will turn out dense and won't rise
- If you use two pans, pour half of the batter into one of the prepared pan and the rest onto another prepared pan. If you use large sheet pan, pour all the batter in the pan and spread it out as evenly as possible so the surface is even. Shake the pan a bit to evenly distribute and use a rubber spatula to help you smooth the top. Bang the cake pans on the countertop about 2-3 times to pop large bubbles. I like to use a skewer to run through the cake batter just to pop any extra bubbles inside the cake (these bubbles will create ugly holes inside your cake later)
Baking:
- If you use two pans, put both pans side by side on the same rack on the middle rack. If you use one large sheet pan, do the same and put on the middle rack. My oven is conventional with bottom heat only. Place the cake pan/pans on the middle rack and bake for 15-20 minutes or until a cake tester inserted comes out clean and the top is springy and slightly golden brown. Start checking at around 15 minutes
- Remove from the oven and drop the cake pan from about 5-inch height on the countertop. This helps to minimize shrinkage. Let the cake cools down in the pan for about 5 minutes. The cake will pull away from the side of the pan. Then run an offset spatula on the edge to help release the cake. Place a plate or something flat on top of the cake pan and flip over. Peel the parchment from the bottom of the cake off and flip back and let the cake cool down completely on a cooling rack
Store the cake if not decorating on the same day:
- Once the cake has cooled down completely, you can wrap the cake up with a cling wrap at this point if you don't plan to do the decoration on the same day. They can be kept at room temperature for 2-3 days. They can also be kept frozen for up to one month. Simply thaw at room temperature for few hours before decorating
On the day you plan to decorate the cake:
Make the stabilized whipped cream :
- Chill your mixing bowl and whisk attachment in the fridge for 15 minutes. The cream whip better when everything is cold. Make sure the heavy cream has been chilled in the fridge too
- For option 1 (have to be used immediately): Mix the gelatin with water to let it soften for 5 minutes. Melt in the microwave for 10-15 seconds on high. If it's still not melted, microwave for another 3-4 seconds. The gelatin will be clear when it melts.
- Pour the heavy cream, icing sugar, and vanilla extract into a mixing bowl. Start whipping at medium speed until it reaches a very soft peak that barely hold its shape at all. Drizzle in the gelatin and continue whipping over medium speed until it is firm and can hold its shape but not overly firm that it turns grainy and chunky. You have gone too far. This has to be used immediately before the gelatin sets
- For option 2 (have to be used immediately): I like whipped cream stabilized with Jello instant pudding because the whipped cream is extremely stable, have a nice spongy texture, and it won't "sweat" at all when you keep the frosted cake in the fridge or even if you leave the frosted cake out at room temperature for hours. Please note that you need to use the cream immediately or it will set if you make ahead and you won't be able to frost the cake smoothly
- Pour the heavy cream, icing sugar, and the Jello instant pudding mix into a mixing bowl. Start whipping at medium speed until it reaches a firm peak. It should be able to hold its shape. The texture will be smooth and glossy. If you whip too stiff, it will be grainy and not smooth. You know you have gone too far
Decorate the cake:
- You can make 2-layer cake (thicker layer) or 4 layers (thinner layer). In the video, I made 4 layers instead of 2. It's up to you. Slice the cake accordingly. It helps if you have a cake leveler and slicer. Otherwise, just do your best to slice as evenly as possible
- If you bake one large sheet of cake, the cake should be pretty level. cut the cake into two, three or four portions (the shape of the cake (square or rectangle) depends on how many layers you decided to do and how you cut and trim the cake)
- Combine the sugar and water to make a simple syrup. The hot water will dissolve the sugar. Get the fresh fruit or canned fruit you want to use ready. You can also use the syrup from the canned fruit to brush on the cake and you don't need to make the simple syrup separately. Make sure you have enough to cover the surface of the cake and in between layers of the cake. Brush the cakes with simple syrup on all layers. This helps to keep the cake moist
- Lay the first layer of the cake on a plate. Turn the brown side of the cake down so it becomes the bottom of the cake , spread a layer of cream on the surface using an offset spatula as evenly as possible. Arrange the fruit slices on top of the cream. Cover with another layer of cream
- Top with another layer of the cake and continue until you are done with all the layer. Now use the rest of the whipped cream to frost the sides of the cake. I didn't frost it entirely white on the sides, giving it a more semi-naked look. I use the extra whipped cream to pipe some pattern on the edge of the cake. Arrange more fruit on top, covering all the surface
Chill the cake:
- Chill the cake for at least 2-3 hours in the fridge to let the frosting set, before you plan to serve the cake. So plan accordingly when the cake needs to be served


79 comments
Delicious, airy and not too sweet. Baked this for my dad who is a tough critic and he loved it. My son couldn’t get enough of this cake.
Wow!! coming from a tough critic, I can’t be happier to read this 🙂 I’m so you guys enjoyed it 🙂 Thank you for your feedback! It means a lot to me!