This post may contain affiliate links. Please read our disclosure policy.
Soft, pillowy, and packed with a deliciously spicy tuna filling, these Asian bakery-style buns are the perfect combination of savory and mildly spicy flavors.

I loved going to a bakery shop with my dad when I was a kid. He would let us pick what we like. My dad has a sweet tooth and often pick up mini cakes and pastries. I love cakes too, but I would go for savor-filling bread and the spicy tuna bun is one of my favorites and I picked this most of the time. When you walk into bakery shops in Asia, more often than not, you will see tuna buns (spicy or not) !
Spicy Tuna Buns (Asian Bakery Style)
Ingredients
For the dough:
- 340 g bread flour 12.7% protein content plus more for dusting
- ½ tsp salt
- 40 g sugar
- 50 g egg from one large egg
- 160 g whole milk
- 20 g milk powder
- 2 tsp instant yeast
- 65 g unsalted butter softened
For the filling:
- 340 g canned tuna in oil 3 of 5-oz cans
- 2 Tbsp mayonnaise
- 1 Tbsp Ketchup
- 3 Tbsp sriracha chili sauce or your favorite chili sauce, adjust amount to your tolerance
- 2 cups Shredded cheddar cheese or more as needed
Egg wash:
- 1 large egg beaten
- ⅛ tsp salt
Topping:
- Grated Parmesan cheese powder
Instructions
Prepare the dough:
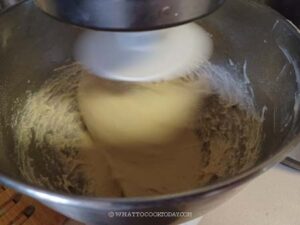
- Add all of the ingredients for the dough, except for the butter, into the mixing bowl of a stand mixer fitted with a dough hook attachment. Start the machine and knead the dough on speed 2 until the dough starts to come together into one sticky mass, about 3 minutes

- Increase the speed to 4 and continue to knead until the dough is relatively smooth. You need to stop and scrape the dough off the hook and the bowl several times during this process
- Gradually add the butter, one pat at a time. It is a REAL sticky mess again because of the butter, just keep kneading and stop halfway and scrape the dough off the hook and bowl again and continue to knead until the butter is absorbed by the dough. Don't add any flour.
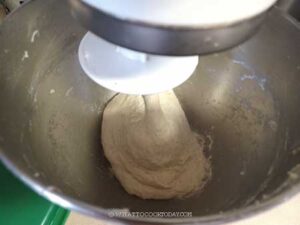
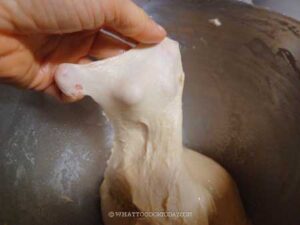
- You will get a shiny smooth dough that is very elastic and sticky. It may take 10-15 minutes of kneading with a machine on speed 4. The dough will clear the sides of the bowl but still stick to the bottom of the bowl and that's ok.
- If you gently stretch a small amount of the dough slowly, it shouldn't break easily. This shows that the dough has good gluten development already and you can stop kneading
First proofing:
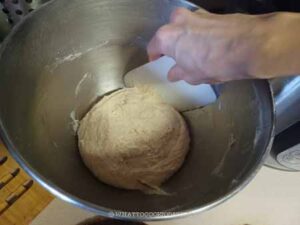
- Oil a bowl and put the dough in there. Cover with a damp towel or cling wrap. Let it proof in a warm place. It may take 1-2 hours or longer for the dough to double in size. This depends on the temperature. The colder it is, the longer it will take to proof
- When you poke your finger into the dough and the indentation stays, the dough is done proofing. If it bounces back almost immediately, it needs to proof longer
Prepare the filling:
- You can drain off excess oil if it's a bit too much. The excess oil can make it difficult to wrap later. Combine tuna, mayo, chili sauce, and ketchup in a bowl and stir to combine while you are waiting for the dough to finish proofing the last 10 minutes or so
Shaping:
- Line one large or two medium-size baking pans with parchment paper. Deflate the dough and knead a few times to push out all the air
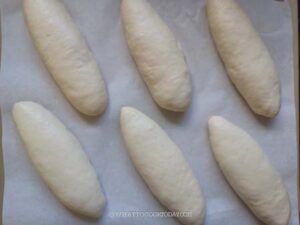
- Divide the dough into 8 equal portions or 10 to 12 smaller portions if you want smaller size buns
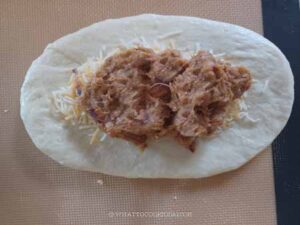
- Fold each dough onto itself to form a round dough ball. Keep them covered to prevent them from drying out. Work with one dough at a time. Flatten one piece of dough into an oblong shape, about 5 inches long. Spread about 1/4 cup of shredded cheese on the dough and then top with 1/8 of the tuna filling on top.
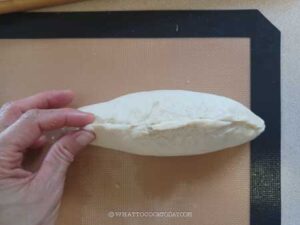
- Fold the edges up and pinch the seams together to seal tightly
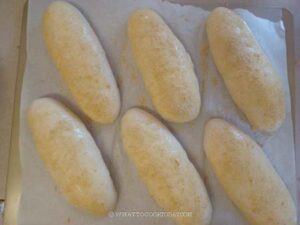
- Place them on a prepared pan, seam side down.
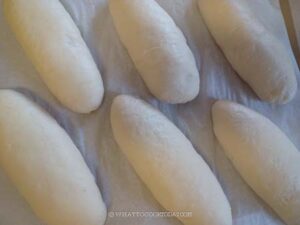
- Let the shaped dough proof again for another 45 minutes to 1 hour or until they puffy and when you gently push on the dough, it bounces back very slowly and leaves some indentation.
- 10 minutes before the end of final proofing, preheat the oven to 375 F (195 C) for conventional oven, 350 F (10 C) for convection oven
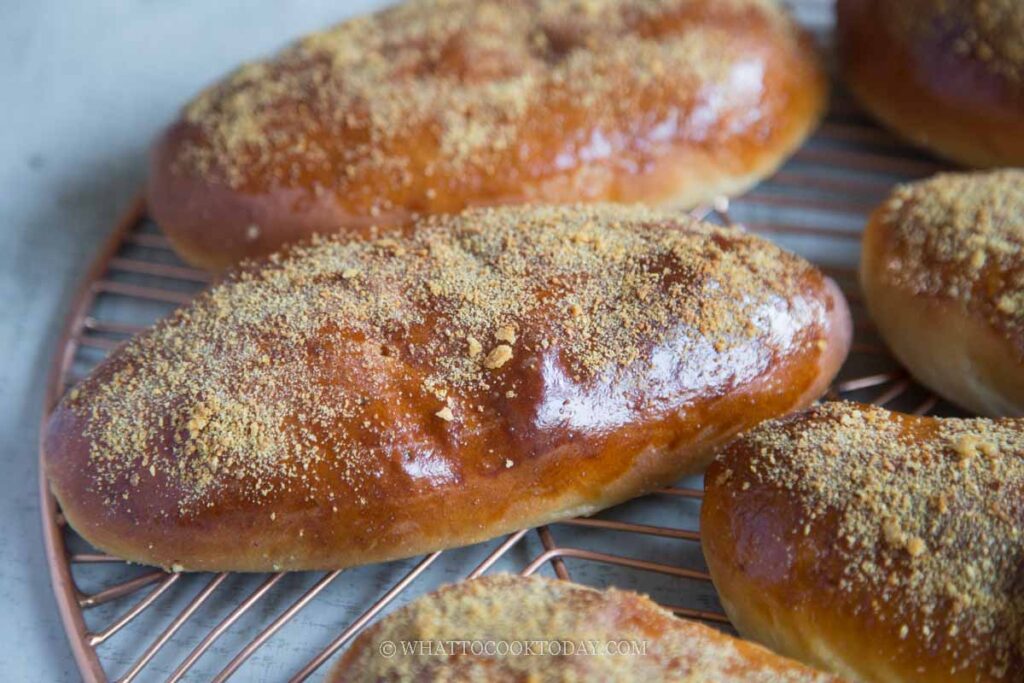
- To prepare the egg wash, whisk the egg and salt. Brush the top of the dough with egg wash. Sprinkle with some grated Parmesan cheese powder
Baking:
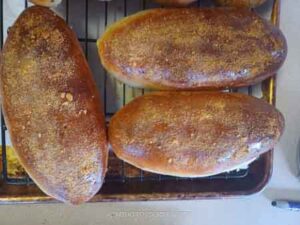
- I recommend baking one pan at a time. Put the baking sheet on the middle rack and bake for 15-18 minutes or until the top is golden brown. If you make smaller buns, it may only take 13-15 minutes
Cool on the rack:
- Immediately transfer the buns to a wire rack to prevent the bottom of the buns from getting soggy. Let them cool down for about 10 minutes. They can be served warm or at room temperature
RECOMMEDED TOOLS


*Nutrition facts are just estimates and calculated using online tools*

Dough Tips
1. Use high-quality bread flour – It gives the buns a light and chewy texture. If using all-purpose flour, knead a bit longer for proper gluten development.
2. Let the dough proof fully – The dough should double in size before shaping. Insufficient proofing can lead to dense buns.
3. Don’t add too much flour – The dough should be slightly sticky but manageable. Too much flour makes dry, tough buns.
Filling Tips
1. Drain the tuna well – Excess oil or liquid can make the buns soggy.
2. Balance the flavors – Adjust the spice level by adding more or less sriracha to taste.
3. Don’t overfill – Too much filling can cause the buns to burst during baking.
4. Seal the edges properly – This prevents the filling from leaking out.
Variations on the filling
If you love the idea of spicy tuna buns but want to experiment with different flavors, here are some fun variations to try!
1. Extra spicy tuna – Add chopped fresh chili peppers, gochujang (Korean red pepper paste), or a dash of cayenne for an even bolder kick.
2. Lemon pepper tuna – Mix in lemon zest and black pepper for a refreshing citrus twist.
3. Garlic butter tuna – Stir in roasted garlic or garlic powder and a little melted butter for a richer, savory flavor.
4. Cheesy tuna melt – Add shredded mozzarella, cheddar, or cream cheese for a gooey, melty center.
5. Herbed tuna – Mix in finely chopped fresh herbs like parsley, chives, or dill for extra depth.
Variations on the topping
1. Cheesy crust – Instead of parmesan, try shredded cheddar, gouda, or asiago on top for a different cheesy flavor.
2. Sesame or furikake topping – Sprinkle black and white sesame seeds or furikake (Japanese seaweed seasoning) on top for a nutty, umami-rich finish.
3. Spicy mayo glaze – Mix a bit of sriracha into mayo and brush on top after baking for extra heat and creaminess.
How to store
1. At Room Temperature: If you plan to eat them within 1-2 days, store the buns in an airtight container or a resealable plastic bag at room temperature. This keeps them soft and prevents them from drying out.
2. Freezing: For long-term storage (up to 3 months), wrap each bun tightly in plastic wrap and place them in a freezer-safe bag. This prevents freezer burn and keeps the bread fresh.
How to reheat
1. Oven or toaster oven (Best Method): Preheat to 300°F (150°C) and warm the buns for 5-7 minutes. If reheating from frozen, bake at 325°F (160°C) for 10-12 minutes. This helps restore the fluffy texture.
2. Microwave (Quick Method): Wrap the bun in a damp paper towel and microwave for 15-20 seconds (room temperature) or 40-50 seconds (frozen). This helps prevent the bun from drying out.
3. Air Fryer: Reheat at 300°F (150°C) for 3-5 minutes. If frozen, increase to 6-8 minutes for even heating.

