This post may contain affiliate links. Please read our disclosure policy.
Two-layer creamy and airy mousse cake inspired by the taste of Southeast Asian popular orh nee dessert that features taro/yam and coconut milk.

Taro has been cultivated in Asia for thousands of years and is deeply rooted in Asian culinary traditions. Its long history of use in Asian cuisine has led to the development of numerous traditional dessert recipes that incorporate taro. In Asia, it is also called yam. The term yam and taro is used interchangeably there. When you mention yam here in the U.S, it is definitely not referring to a taro root.
What is orh nee mousse cake/taro coconut mousse cake?
This mousse cake is taking inspiration from the popular orh nee (or known as sweet yam/taro paste). Orh nee is a traditional Teochew (Chaozhou) Chinese dessert that is popular in Singapore, Malaysia, and other Southeast Asian countries. It is a sweet and creamy dessert made primarily from steamed or boiled yam (taro), enriched with coconut milk, and sweetened with sugar. In this case, I’m trying to mimic the taste of orh nee, but in the form of mousse cake, which is so delicious to say the least!
No-Bake Taro Coconut Mousse Cake (Orh Nee Mousse Cake)
Ingredients
For the crust:
- 100 g graham crackers or biscuits of your choice
- 50 g unsalted butter melted
For taro mousse layer:
- 14 g gelatin powder
- 60 g milk
- 200 g mashed taro
- ⅛ tsp ube extract or few drops of purple food coloring
- 100 g canned coconut milk
- 70 g sugar or more as needed
- 250 g heavy cream
Coconut mousse layer:
- 4 g gelatin powder
- 15 g milk
- 50 g canned coconut milk
- 20 g sugar
- Pinch of salt
- 150 g heavy cream
- ¼ tsp coconut extract optional
Decoration: (optional)
- Shredded coconut (unsweetened) or desiccated coconut
Instructions
- I use an 6-inch pan with a removable base. You can also use a springform pan. Line the bottom with a parchment paper. If you have an acetate sheet/cake collar for baking, you can line the side of the pan with it. It helps to make the cake looks neat and easier to release. Just leave it without lining if you don't have a cake collar
Prepare the crust:
- Place the crackers in a food processor and process into a fine crumbs. You can also put them in a plastic zipper bag, push all the air out and seal. Use a rolling pin to roll over to crush crackers into very fine crumbs. Add the melted butter and stir to combine into consistency of wet sands
- Press this mixture onto the base of the pan. Use the flat base of a glass to help you press it down evenly
- Chill the crust in the fridge for 30 minutes while you prepare other things
Prepare taro mousse layer:
- You will need at least 300 grams of taro after peeling off the skin. Cut into medium-size cubes. Put on a plate and steam over medium heat until they can be easily pierced with a fork, about 25-30 minutes. Mash with a fork while they are still warm or you can use a potato ricer or masher. I added ube extract to make the purple color deeper
- Bloom the gelatin with milk in a small bowl and let it stand for 5 minutes. Then you can microwave on high for about 25-30 seconds or so or until it melts
- You can also place the bowl of bloomed gelatin in a pot of boiling hot water to melt the gelatin. Make sure the gelatin really melts. It should turn clear when it melts and not cloudy
- Get the amount of mashed taro you need for this recipe and keep the rest for other use in the fridge once it has cooled down completely. Put the mashed taro, sugar, and coconut milk in a food processor or a blender and process into a smooth consistency
- Add the melted gelatin to the taro mixture. Set aside
- In another mixing bowl, add cold heavy cream and start whipping at a low-medium speed until just thickened, it won't hold any shape. Add the taro mixture into the cream and continue to whip over medium-low speed until just soft peak. Don't whip until stiff because the mousse will be hard if you do
- Pour this mixture over the crust (which should have nicely hardened by now). Smooth the top with a spatula if needed. Put in the freezer for 30 minutes to firm the mousse up while you prepare the coconut mousse layer
Prepare coconut mousse layer:
- The steps are pretty much the same. We want to bloom and melt the gelatin first
- Bloom the gelatin with milk in a small bowl and let it stand for 5 minutes
- Combine coconut milk, sugar, and salt in a small saucepan and stir over low heat until the sugar melts. Add the bloom gelatin and stir until it melts
- In another mixing bowl, add cold heavy cream and start whipping at a low-medium speed until just thickened, it won't hold any shape. Add the coconut milk mixture and continue to whip over medium-low speed until just soft peak. Don't whip until stiff because the mousse will be hard if you do
- Pour this layer over the taro mousse layer, which should be "firm" to touch by now
Chill the cake:
- Chill the assembled mousse cake in the fridge for at least 4-6 hours or overnight before serving
Serving:
- If you don't use a cake collar, use a warm towel to wrap around the cake pan for 2-3 minutes or so, and then gently release the ring and serve the cake. Decorate with some desiccated coconut on top if you wish
RECOMMEDED TOOLS


*Nutrition facts are just estimates and calculated using online tools*

How to make no-bake taro coconut mousse cake
1. I use an 6-inch pan with a removable base. You can also use a springform pan. Line the bottom with a parchment paper. If you have an acetate sheet/cake collar for baking, you can line the side of the pan with it. It helps to make the cake looks neat and easier to release. Just leave it without lining if you don’t have a cake collar
2. Place the crackers in a food processor and process into a fine crumbs. You can also put them in a plastic zipper bag, push all the air out and seal. Use a rolling pin to roll over to crush crackers into very fine crumbs. Add the melted butter and stir to combine into consistency of wet sands. Press this mixture onto the base of the pan. Use the flat base of a glass to help you press it down evenly. Chill the crust in the fridge for 30 minutes while you prepare other things
3. You will need at least 300 grams of taro after peeling off the skin. Cut into medium-size cubes. Put on a plate and steam over medium heat until they can be easily pierced with a fork, about 25-30 minutes. Mash with a fork while they are still warm or you can use a potato ricer or masher. I have added ube extract in the photo to make the purple color deeper
4. Prepare taro mousse layer: Bloom the gelatin with milk in a small bowl and let it stand for 5 minutes. Then you can microwave on high for about 25-30 seconds or so or until it melts. You can also place the bowl of bloomed gelatin in a pot of boiling hot water to melt the gelatin. Make sure the gelatin really melts. It should turn clear when it melts and not cloudy
5. Get the amount of mashed taro you need for this recipe and keep the rest for other use in the fridge once it has cooled down completely. Put the mashed taro, sugar, and coconut milk in a food processor or a blender and process into a smooth consistency. Add the melted gelatin to the taro mixture and mix to combie. Set aside
6. In another mixing bowl, add cold heavy cream and start whipping at a low-medium speed until just thickened, it won’t hold any shape. 
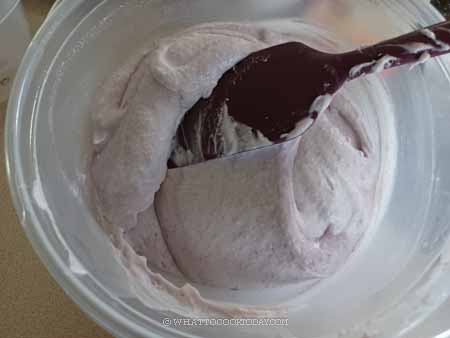
7. Add the taro mixture into the cream and continue to whip over medium-low speed until just soft peak. Don’t whip until stiff because the mousse will be hard if you do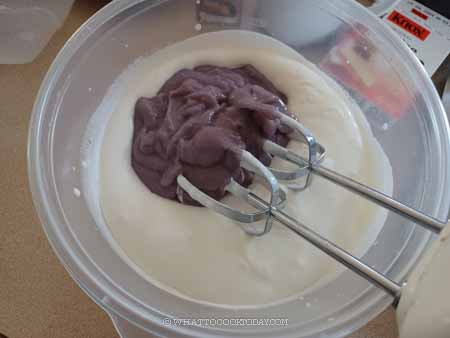
8. Pour this mixture over the crust (which should have nicely hardened by now). Smooth the top with a spatula if needed. Put in the freezer for 30 minutes to firm the mousse up while you prepare the coconut mousse layer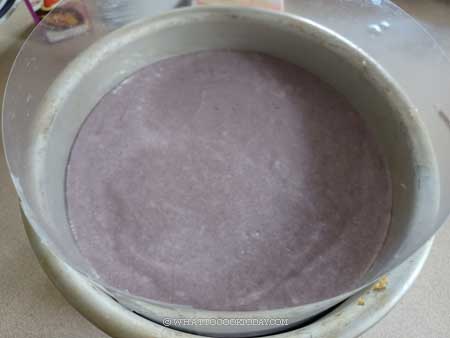
9. Prepare coconut mousse layer: The steps are pretty much the same. We want to bloom and melt the gelatin first. Bloom the gelatin with milk in a small bowl and let it stand for 5 minutes
10. Bloom the gelatin with milk in a small bowl and let it stand for 5 minutes. Combine coconut milk, sugar, and salt in a small saucepan and stir over low heat until the sugar melts. Add the bloom gelatin and stir until it melts
11. In another mixing bowl, add cold heavy cream and start whipping at a low-medium speed until just thickened, it won’t hold any shape. Add the coconut milk mixture and continue to whip over medium-low speed until just soft peak. Don’t whip until stiff because the mousse will be hard if you do
12. Pour this layer over the taro mousse layer, which should be “firm” to touch by now. Chill the assembled mousse cake in the fridge for at least 4-6 hours or overnight before serving

13. If you don’t use a cake collar, use a warm towel to wrap around the cake pan for 2-3 minutes or so, and then gently release the ring and serve the cake. Decorate with some desiccated coconut on top if you wish

Did you make this no-bake taro coconut mousse cake recipe?
I love it when you guys snap a photo and tag it to show me what you’ve made. Simply tag me @WhatToCookToday #WhatToCookToday on Instagram and I’ll be sure to stop by and take a peek for real!


5 comments
What type of sugar is recommended for this? White caster?
Hi Jennifer, you can use caster sugar or regular granulated sugar. I usually just use granulated sugar.
This cake needs a bit more sugar otherwise it is very nice.
I used 1.5 recipes for an 8 inch pan.
I would love to make this,Taro mousse cake, how long does it keep in the fridge. Would you be able to tell me how much agar agar I could use instead of gelatin.
Thanks
Hi Tania, it can be kept for 4-5 days in the fridge. I haven’t tried this particular recipe with agar agar, so I’m not so sure too. Perhaps you can try with half the amount of the gelatin ? This may require some experiment on your end to figure out the correct mousse consistency that you like using agar agar.
It also needs a different instructions as we have to bring agar agar to boil to activate it. You can heat the agar agar together with the coconut milk, sugar, and salt.