This post may contain affiliate links. Please read our disclosure policy.
This exquisite dessert merges the crisp and delicate texture of Pavlova with the rich, velvety flavors of chocolate whipped cream and the refreshing zing of mint.

My kids beg me to make Pavlova almost every week. In fact, they have decided that for as long as possible, their birthday cakes are going to be Pavlova LOL (We’ll see how long they will keep up with that!). But, I can certainly see why one would love Pavlova so much. I mean, what not to love about crisp meringue on the outside with marshmallowy gooey inside of Pavlova? And to top it off with light, creamy, and lightly sweetened chocolate whipped cream and chocolate mint chips? My kids said “Everything we want in a Pavlova mom!”
A while ago I made this Chocolate Banoffee Pavlova with Salted Caramel and it was a huge hit in this house! In case you haven’t checked it out, I strongly suggest you to do so! It’s one of our favorites!

How to bake chocolate mint Pavlova
1. ROOM TEMPERATURE EGGS. Separate the eggs while they are still cold. It’s easier. Separate the yolks from the whites. Keep the yolks in the fridge for other use. Let the whites come to room temperature before using
2. Line a large baking sheet with parchment paper. You can trace a 6 or 7 inches circle on the parchment to help guiding you with shaping the pavlova later
3. PREHEAT OVEN. Preheat the oven to 300 F (150 C) for a conventional oven and 280 F (138 C) for a convection oven. Position the rack in the middle of the oven.
4. USE FINE SUGAR. If you don’t have a fine sugar, put regular granulated sugar in a food processor and pulse it a few times until it’s finer in texture. Whisk fine sugar with cornstarch and salt to combine. Set aside
5. PREPARE MERINGUE. Beat the egg whites until they are foamy and white using a mixer (a stand mixer is best if you have one) I beat on speed 4 on KA. Gradually add the sugar mixture 2-3 tablespoons at a time and wait for about 20-30 seconds in between before adding the next. Once all the sugar is in, increase the speed to 6 and continue to beat until the meringue is glossy, thick and sugar has dissolved. You may need to stop halfway to scrape the sides of the bowl because some sugar sticks to the side of the bowl. This can take 10-15 minutes or even longer. Don’t rush the process. Use your clean fingers to feel the meringue. If you feel some grittiness, that means the sugar hasn’t completely dissolved yet. Continue beating. Add vinegar, peppermint extract, gel food color if using. Continue whipping for another minute or so. The meringue should be thick and glossy and can hold its shape and some sharp lines and very firm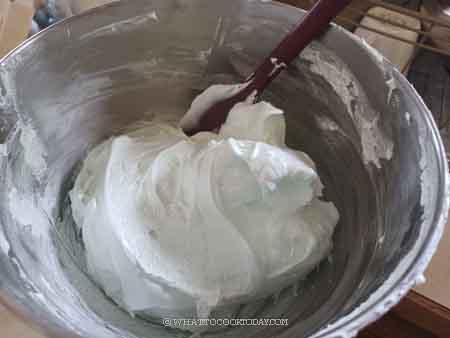
6. Place half of the meringue on the baking sheet. Use a spatula to try to make it roundish, about 6 inches in diameter. It won’t be perfectly round and that’s okay too! 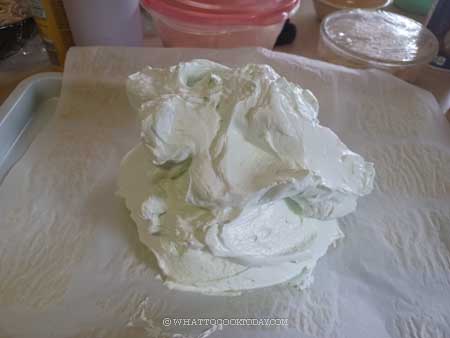
7. Then gently pile another half on top and use a spatula to smooth the side so it’s more like a “dome”. Smooth the surface a bit and flatten the center slightly to give you some room to pile on cream and topping later. 
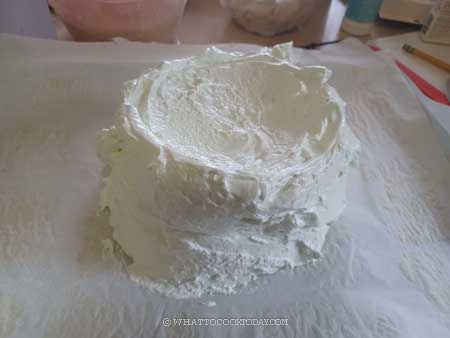
8. I use an offset spatula to create a bit of pattern on the side. This is totally optional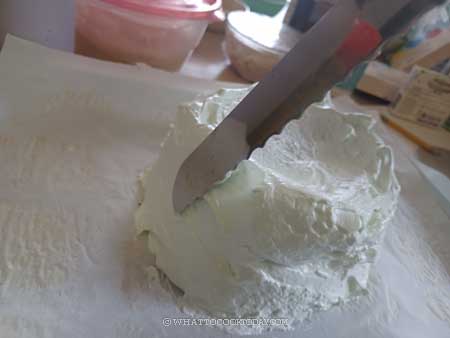

9. Lower the temperature to 200 F (93 C) for conventional oven, 180 F (82 C) for a convection oven. Place the baking sheet on the middle rack. Set the timer to 2 hours 30 minutes. DO NOT open the oven door during baking. When the time is up, turn off the oven but DO NOT open the oven door. Let the Pavlova cool down in the oven for at least 8 hours or overnight is fine too. Sometimes the meringue may crack a little, but it may not too. If it cracks a bit, I won’t worry too much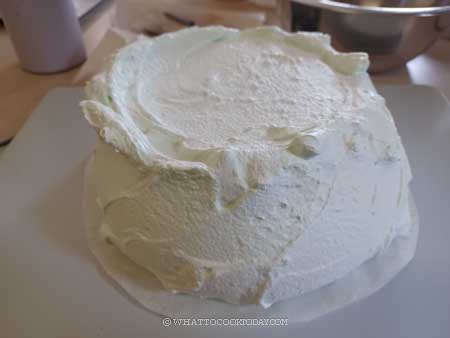
10. PREPARED WHIPPED CREAM. Put the very cold heavy cream, powdered sugar, cocoa powder, peppermint extract, and a pinch of salt in a mixing bowl. Use a whisk to manually whisk or use a handmixer to whip until the mixture thickens and has a medium-firm peak. Don’t over whisk until the cream turns too stiff and grainy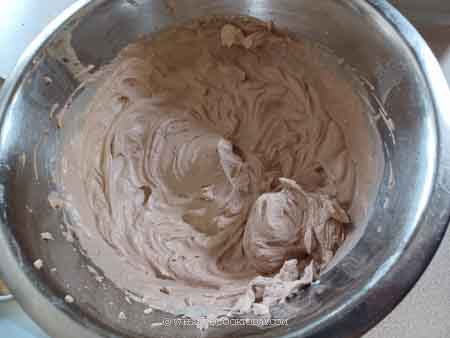
11. Put the meringue base on a serving platter. Gently pile the whipped cream on top of the base.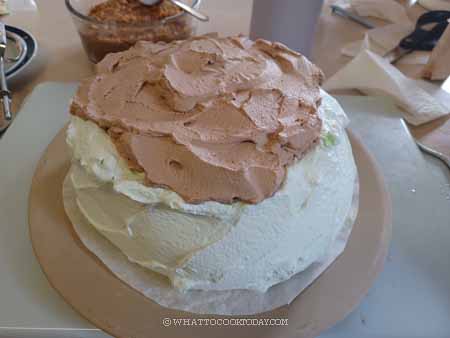
12. Decorate with some chocolate mint chips and drizzle some melted chocolate in a decorative manner. Pavlova is ready to be served. Remember that pavlova is at its best when it’s freshly made, so try to consume it as soon as possible for the optimal experience. Proper storage can help maintain its texture and prevent it from becoming soggy or losing its delicate crispness.

Tips for success
Pavlova can be a bit challenging to make, but it’s not impossible, and with some practice, you can master it. The difficulty mainly lies in achieving the right texture for the meringue base, which should be crisp on the outside and soft on the inside. Here are some factors to consider:
1. Egg Whites: Achieving stiff peaks with the egg whites is crucial. Make sure your egg whites are at room temperature and free of any yolks or fats, as even a small amount of fat can hinder the whipping process.
2. Sugar: Gradually adding the sugar while beating the egg whites is essential to ensure it fully dissolves and creates a glossy meringue.
3. Baking Temperature and Time: Pavlova should be baked at a low temperature for a longer time. This slow baking process helps create the desired texture. Overbaking can result in a dry pavlova, while underbaking can lead to a collapsed center.
4. Cooling: Allowing the pavlova to cool completely in the oven with the door slightly ajar helps prevent cracks and ensures the right texture.
5. Humidity: Making pavlova on a humid day can be more challenging, as humidity can affect the meringue’s stability and make it less crisp. It’s often best to make pavlova on a dry day.
How to store Pavlova
1. Pavlova without toppings (recommended)
Store the cooled-down Pavlova in an air-tight container and not a humid place for about 1 day. Do not store Pavlova in the fridge. The humidity in the fridge can make its crisp outer shell turn soggy.
I have made extra Pavlova bases and freeze them. They freeze well. Once it cools down completely, wrap it with a cling wrap and then very gently with another layer of foil and put in air-tight container and keep in the freezer for up to one month. Simply take it out on the day you are ready to assemble the cake. It will thaw as you assemble it
2. Pavlova with toppings
I have stored leftover pavlova with toppings in the freezer without any adverse effects. Put it in a freezer-friendly container and keep it in the fridge for up to one month. Simply thaw in the fridge before serving

Chocolate Mint Pavlova
Ingredients
Pavlova base:
- 200 g fine sugar
- 11 g cornstarch
- 112 g egg whites room temperature, from 4 large-size eggs
- ½ tsp cream of tartar
- ½ tsp white vinegar
- 1 tsp peppermint extract
- Tiny drops of green gel food color optional
Chocolate whipped cream:
- 200 g heavy cream about 36% fat
- 10 g cocoa powder
- 15 g powdered sugar more or less to your taste
- ½ tsp peppermint extract
- Pinch of salt
Toppings:
- Mint chocolate chips
- 50 g dark chocolate chips melted
Instructions
- Separate the eggs while they are still cold. It's easier. Separate the yolks from the whites. Keep the yolks in the fridge for other use. Let the whites come to room temperature before using
- Line a large baking sheet with parchment paper. You can trace a 6 or 7 inches circle on the parchment to help guiding you with shaping the pavlova later
Prepare meringue:
- Preheat the oven to 300 F (150 C) for a conventional oven and 280 F (138 C) for a convection oven. Position the rack in the middle of the oven.
- If you don't have a fine sugar, put regular granulated sugar in a food processor and pulse it a few times until it's finer in texture. Whisk fine sugar with cornstarch and salt to combine. Set aside
- Beat the egg whites until they are foamy and white using a mixer (a stand mixer is best if you have one) I beat on speed 4 on KA. Gradually add the sugar mixture 2-3 tablespoons at a time and wait for about 20-30 seconds in between before adding the next. Once all the sugar is in, increase the speed to 6 and continue to beat until the meringue is glossy, thick and sugar has dissolved. You may need to stop halfway to scrape the sides of the bowl because some sugar sticks to the side of the bowl. This can take 10-15 minutes or even longer. Don't rush the process. Use your clean fingers to feel the meringue. If you feel some grittiness, that means the sugar hasn't completely dissolved yet. Continue beating
- Add vinegar, peppermint extract, gel food color if using. Continue whipping for another minute or so
- The meringue should be thick and glossy and can hold its shape and some sharp lines and very firm
Shaping:
- Place half of the meringue on the baking sheet. Use a spatula to try to make it roundish, about 6 inches in diameter. It won't be perfectly round and that's okay too! Then gently pile another half on top and use a spatula to smooth the side so it's more like a "dome". Smooth the surface a bit and flatten the center slightly to give you some room to pile on cream and topping later. I use an offset spatula to create a bit of pattern on the side. This is totally optional
Baking:
- Lower the temperature to 200 F (93 C) for conventional oven, 180 F (82 C) for a convection oven. Place the baking sheet on the middle rack. Set the timer to 2 hours 30 minutes. DO NOT open the oven door during baking. When the time is up, turn off the oven but DO NOT open the oven door. Let the Pavlova cool down in the oven for at least 8 hours or overnight is fine too
- Sometimes the meringue may crack a little, but it may not too. If it cracks a bit, I won't worry too much
Store the Pavlova until ready to be assembled:
- Store the cooled-down Pavlova in an air-tight container and not a humid place for about 1 day. Do not store Pavlova in the fridge. The humidity in the fridge can make its crisp outer shell turns soggy
- I have made extra Pavlovas base and freeze them. They freeze well. Once it cools down completely, wrap with a cling wrap and then very gently with another layer of foil and put in air-tight container and keep in the freezer for up to one month. Simply take it out on the day you are ready to assemble the cake. It will thaw as you assemble it
Prepared the whipped cream:
- Put the very cold heavy cream, cocoa powder, powdered sugar, peppermint extract, and a pinch of salt in a mixing bowl. Use a whisk to manually whisk or use a handmixer to whip until the mixture thickens and has a medium-firm peak. Don't over whisk until the cream turns too stiff and grainy
Assembly:
- Put the meringue base on a serving platter. Gently pile the whipped cream on top of the base.
- Decorate with some chocolate mint chips and drizzle some melted chocolate in a decorative manner. Pavlova is ready to be served
- Remember that pavlova is at its best when it's freshly made, so try to consume it as soon as possible for the optimal experience. Proper storage can help maintain its texture and prevent it from becoming soggy or losing its delicate crispness.
Storage:
- I have stored leftover pavlova with toppings in the freezer without any adverse effect. Simply thaw in the fridge before serving


