This post may contain affiliate links. Please read our disclosure policy.
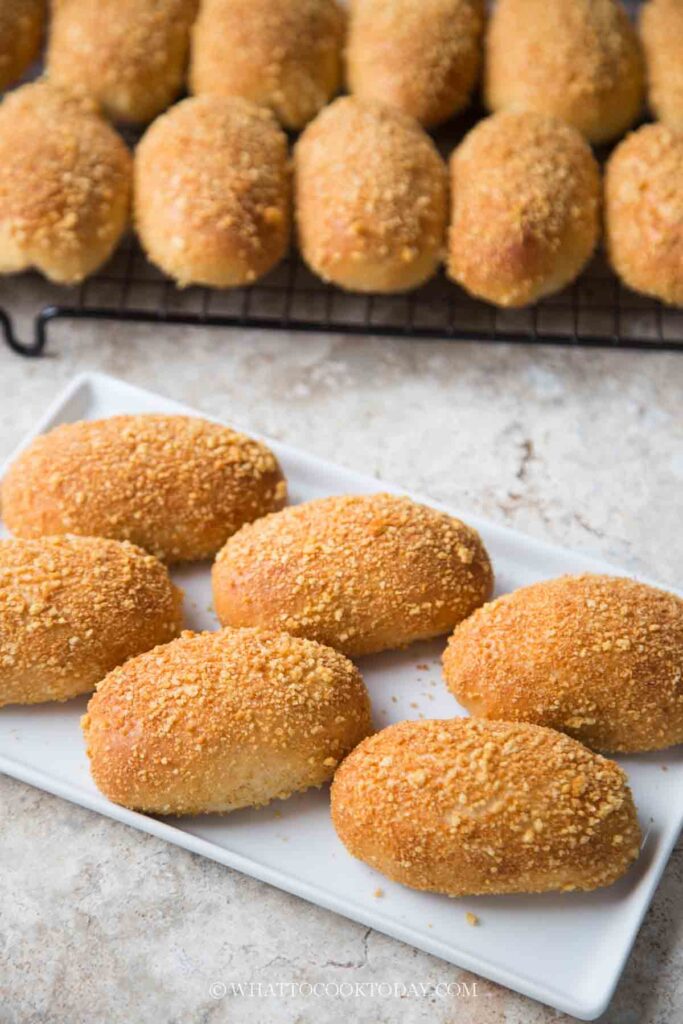
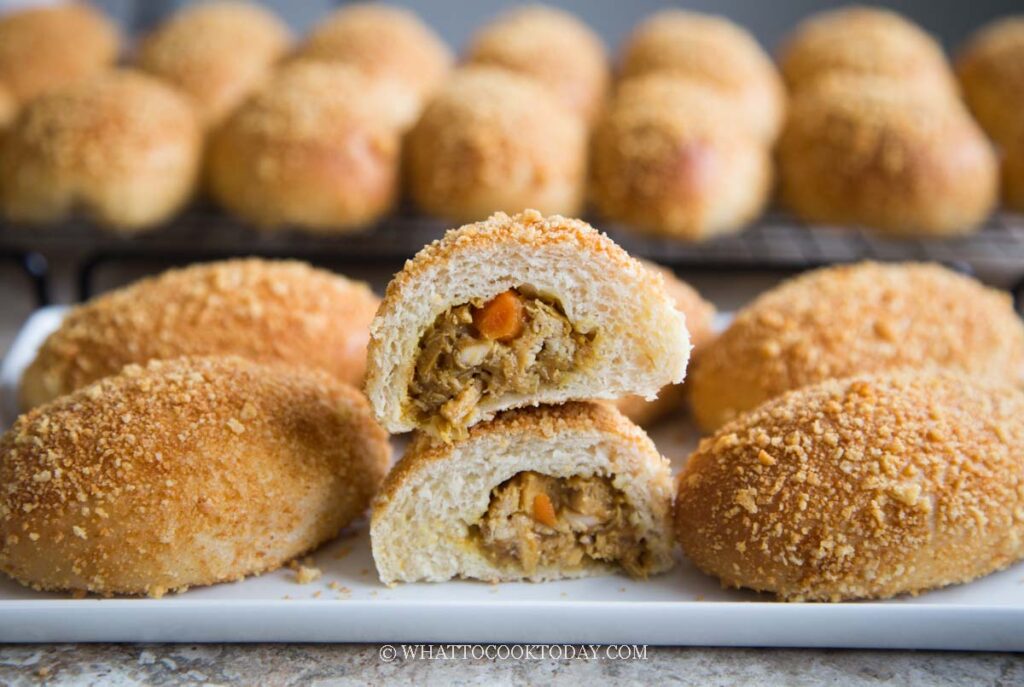
Soft and fluffy baked kare pan filled with savory Japanese chicken curry and coated in crispy panko breadcrumbs. This no-fry Japanese curry bread is lighter but just as satisfying.
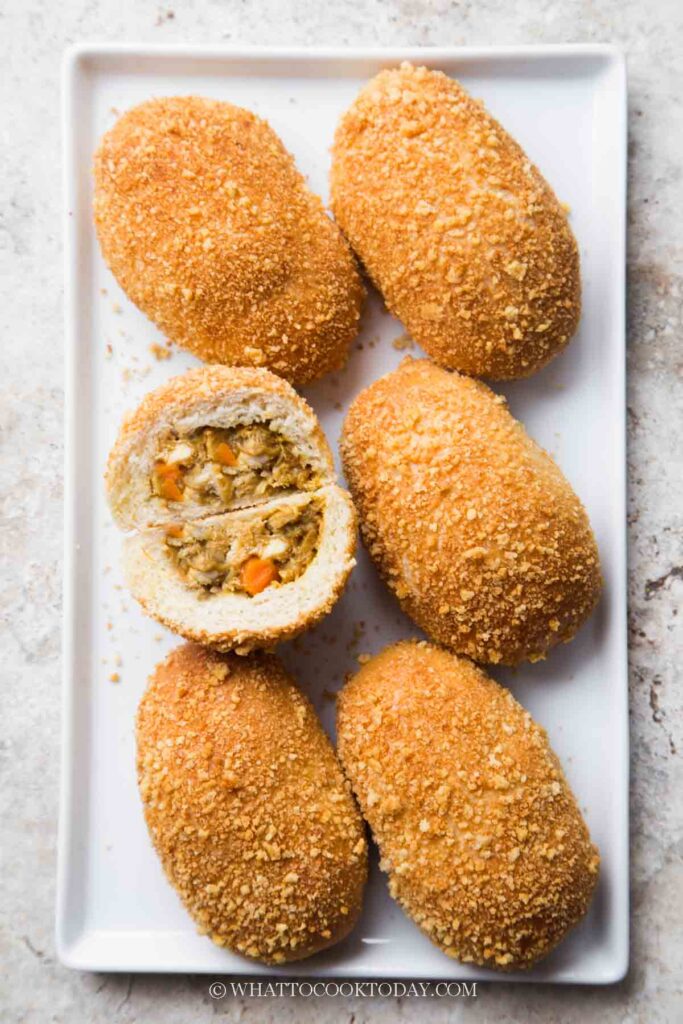
These baked kare pan are proof that you don’t need deep-frying to make an incredibly satisfying Japanese curry bread at home. The bread is fluffy, airy, and slightly chewy thanks to the combination of tangzhong and bread flour. Instead of the traditional beef curry filling, I used chicken for a lighter and simpler version that still delivers all the comforting savory flavor you expect from kare pan.
The crispy panko coating gives that signature crunchy exterior while baking keeps things much less messy than frying. These are perfect for lunch, snack time, or even meal prep because they reheat beautifully.
What Is Kare Pan?
Kare pan (カレーパン) is Japanese curry bread. It’s a popular bakery item in Japan made with soft bread dough wrapped around thick Japanese curry filling, coated in panko breadcrumbs, and usually deep-fried until crispy and golden.
The filling is typically made with Japanese curry roux, which has a mildly sweet and savory flavor compared to Indian or Thai curries. Traditional kare pan often uses beef, but chicken, pork, or vegetable versions are also common.
This baked version gives you the same delicious contrast between fluffy bread, crunchy coating, and rich curry filling without the need for deep-frying.
Why You’ll Like This Recipe
- The baked version is lighter but still crispy and satisfying
- Tangzhong keeps the bread incredibly soft and fluffy
- Bread flour gives the dough a pleasant chewy texture
- The chicken curry filling is simple but packed with flavor
- These freeze and reheat really well
- No deep-frying means less mess and easier cleanup
- Perfect for make-ahead meals and lunchboxes
Ingredients and Substitutions
- Bread flour – I used bread flour with 12.7% protein content because it gives the bread a fluffy yet pleasantly chewy texture. You can substitute with all-purpose flour, but the bread will be softer and less chewy.
- Whole milk – Adds richness and keeps the bread soft. You can use 2% milk if needed, though whole milk gives the best texture. Non-dairy milk, like unsweetened soy milk, also works.
- Instant yeast – Helps the dough rise quickly and efficiently. If using active dry yeast, bloom it in warm milk first before mixing with the dough.
- Milk powder – Gives the bread extra flavor and softness. If you don’t have milk powder, you can omit it, though the bread may not be quite as rich.
- Egg – Adds tenderness, structure, and richness to the dough.
- Salt – Balances the sweetness and enhances the overall flavor of the bread.
- Sugar – Adds a light sweetness and helps the bread brown beautifully during baking.
- Unsalted butter – Makes the dough soft and rich. You can substitute with salted butter and reduce the added salt slightly.
- Oil – Used for cooking the filling and helping the panko crisp up during baking. Any neutral oil works well.
- Boneless skinless chicken thigh – Gives the filling great flavor and stays juicy after cooking. Chicken breast can be used, but thighs tend to stay more tender.
- Carrots – Add natural sweetness and texture to the curry filling.
- Onion – Essential for building savory flavor in the filling.
- Japanese curry paste or curry roux – The main flavor component for the filling. Popular brands like Vermont Curry or Golden Curry work great. You can use mild, medium, or hot depending on your preference.
- Water – Helps dissolve the curry paste and create a thick filling consistency.
- Panko breadcrumbs – Create the signature crispy coating. I don’t recommend using regular breadcrumbs because they don’t give the same crispiness
- Egg wash – Helps the breadcrumbs stick to the dough and gives the baked buns a beautiful golden color.
Tips for Success
1. Make the tangzhong ahead of time
I highly recommend preparing the tangzhong the day before. Chilling it overnight improves the dough texture and makes the bread softer.
2. Don’t add extra flour
The dough is supposed to be sticky, especially after adding the butter. Resist the urge to add more flour or the bread may turn out dense.
3. Let the filling cool completely
Warm filling makes the dough difficult to seal and can cause leaks during proofing or baking.
4. Keep the filling thick
The curry filling should be quite thick, almost paste-like. If it’s too wet, the buns can burst open.
5. Seal the dough tightly
Avoid getting filling on the edges of the dough because oil and moisture make it difficult to seal properly.
6. Don’t skip toasting the bread crumbs
Pre-toasting the panko crumbs helps the crumbs turn beautifully golden and crispy in the oven.
7. Proof until very puffy
Underproofed buns tend to split in the oven. The dough should feel airy and noticeably puffed before baking.
Variations
1. Beef Kare Pan
Use ground beef or finely chopped beef instead of chicken for a more traditional filling.
2. Cheese Curry Bread
Add cubes of mozzarella or cheddar cheese to the filling to get that cheesy, gooey filling
3. Vegetarian Version
Use potatoes, mushrooms, peas, and carrots instead of meat.
4. Spicy Kare Pan
Add chili flakes or spicy Japanese curry roux for extra heat.
5. Air Fryer Version
Bake them in the air fryer at 350 F until golden and crispy. Because every air fryer differs slightly, check after 15 minutes. The bread shouldn’t be doughy anymore and if you have a digital thermometer, the dough should be at least 190 F
Common Problems and Solutions
- The dough is too sticky
This is normal. Continue kneading and avoid adding too much flour. - The filling leaks out
The dough probably wasn’t sealed tightly enough or the filling was too wet. - The buns are dense
The dough may have been under-kneaded or underproofed.
What to Serve This With
- Japanese potato salad
- Simple cabbage salad with sesame dressing
- Miso soup
- Pickled vegetables
- Matcha latte or milk tea
- Japanese egg salad
- Corn soup
Storage & Reheating
- Let the buns cool completely before storing
- Store in an airtight container in the fridge for up to 3 days
- Freeze for up to 1 month by wrapping individually
- Reheat in an air fryer at 320 F for about 5 minutes
- Reheat in the oven at 350 F for about 5 minutes
- Frozen buns can be thawed overnight in the fridge or at room temperature before reheating
Frequently Asked Questions
- Can I deep-fry these instead of baking?
Yes. Fry at 350 F until golden brown and cooked through. - Can I make the filling ahead of time?
Yes. The filling can be prepared up to 3 days ahead and stored in the fridge. - Can I freeze the unbaked buns?
Yes. Freeze after shaping and coating. Thaw and proof before baking. - Why use bread flour instead of all-purpose flour?
Bread flour gives the buns a chewier and fluffier texture that works really well for kare pan. - Can I use store-bought curry sauce?
You can, but make sure it’s very thick. Thin curry sauce will leak during baking. If the sauce is thin, cook it to evaporate most of the liquid - Can I make smaller snack-size buns?
Absolutely. Divide into smaller portions and reduce the baking time slightly.
These baked kare pan are one of those recipes that feel extra rewarding to make at home. The contrast between the crispy panko crust and the fluffy tangzhong bread is so good, especially with the savory curry filling inside. Even though this version is baked instead of fried, it still delivers that comforting bakery-style experience.
If you love Japanese bakery breads, this recipe is definitely worth trying. The buns are freezer-friendly, great for meal prep, and honestly just as delicious reheated the next day.
Baked Kare Pan (Japanese Curry Bread)
Ingredients
For tangzhong:
- 30 g bread flour 12.7% protein content
- 150 g whole milk
For the dough:
- 300 g bread flour 12.7% protein content, plus more for dusting
- 5 g instant yeast
- 28 g milk powder
- 100 g whole milk or more as needed
- 50 g egg
- 7 g salt
- 40 g sugar
- 40 g unsalted butter softened
For the filling:
- 1 Tbsp oil
- 250 g boneless skinless chicken thigh
- 100 g carrots diced
- 1 small onion diced
- 75 g Japanese curry paste cut into small pieces
- ½ cup water plus more as needed
For egg wash:
- 1 egg
- 1 tsp water
For coating:
- 3 cups panko bread crumbs
- oil
Instructions
Prepare tangzhong:
- Place milk and the bread flour in a small saucepan. Whisk until there is no more lumps. Cook this mixture over low-medium heat until it reaches 65 C (149 F) if you have an instant-read digital thermometer. Otherwise, it's about 1 1/2-2 minutes.
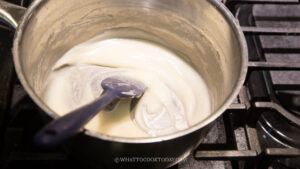
- Remove from the heat and cover with a plastic wrap, touching the tangzhong so the skin won't form. I highly suggest using this the next day instead of using it on the same day. Store this in the fridge
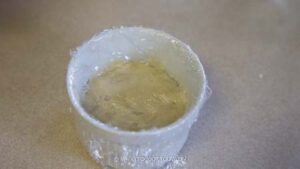
- If you decide to use it on the same day, let it cool down to lukewarm before mixing with the rest of the ingredients
Make the dough:
- Add the rest of the ingredients for the dough, except for the butter, into the mixing bowl of a stand mixer fitted with a dough hook attachment. Make a well in the center and pour in the wet ingredients and the tangzhong. Start the machine and knead the dough on speed 2 until the dough starts to come together into one sticky mass, about 3 minutes
- Increase the speed to 4 and continue to knead until the dough is relatively smooth. You need to stop and scrape the dough off the hook and the bowl several times during this process
- Gradually add the butter, one pat at a time. It is a REAL sticky mess again because of the butter, just keep kneading and stop halfway and scrape the dough off the hook and bowl again and continue to knead until the butter is absorbed by the dough. Don't add any flour. You will get a shiny smooth dough that is very elastic and sticky. It may take 10-15 minutes of kneading with a machine on speed 4.
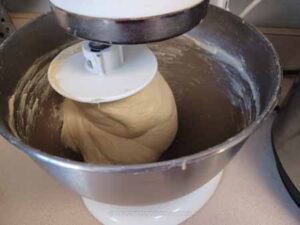
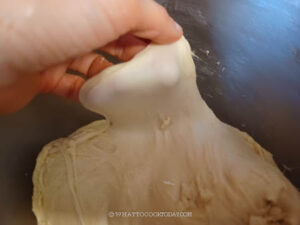
- The dough will clear the sides of the bowl but still stick to the bottom of the bowl and that's ok. If you gently stretch a small amount of the dough slowly, it shouldn't break easily. This shows that the dough has good gluten development already and you can stop kneading
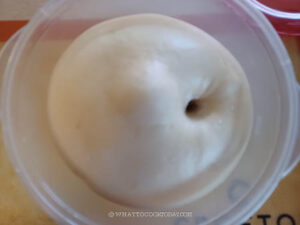
First proofing:
- Place this dough in a lightly oiled large bowl, cover it with a clean and damp tea cloth or plastic wrap and let it rise at a warm place for about 1 hour. The dough will puff up and double in volume.
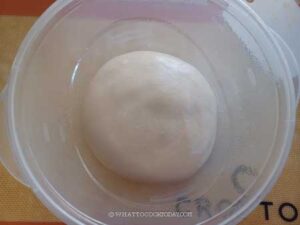
- When you poke your finger into the dough, the indentation stays and the dough won't deflate
Prepare the filling while waiting: (this can be done a few days before too)
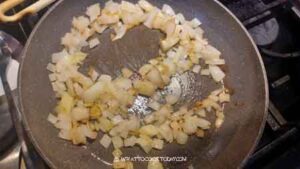
- Preheat a large pan over medium heat. Add oil and saute onion until golden brown, about 3 minutes.
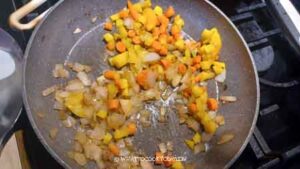
- Add carrots and saute for another minute. Add the chicken and cook until they just start to turn color.
- Add the Japanese curry paste and water and keep stirring to break the paste apart and turn into a smooth paste.
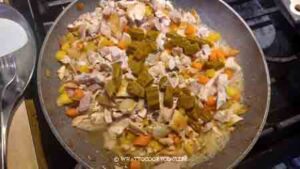
- The mixture starts to thicken. The mixture is thick and it is meant to be that way because we use it as a filling
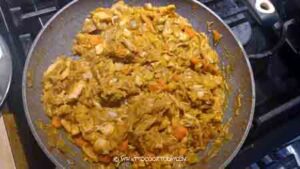
- Have a taste and season with more salt and pepper to your taste. Set aside to let it cool down completely before using
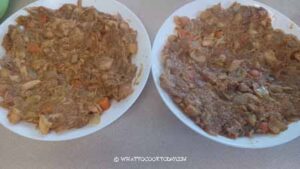
- Portion the filling into 15 portions
Pre-toasting the bread crumbs
- Put the bread crumbs on a dry nonstick pan over medium low heat and stir it around to toast it until they are lightly golden brown. Doing this will ensure your breadcrumbs have nice golden brown and also really crispy. Let it cool down completely before using.
Shaping:
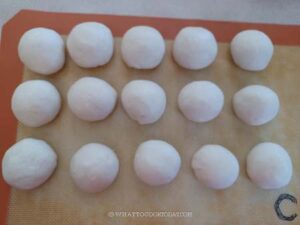
- Line two baking pan with parchment paper. Deflate the dough and knead a few times to push out all air. Divide the dough into 15 equal portions. Roll into a dough ball. Cover them with damp towel and rest for about 5 minutes
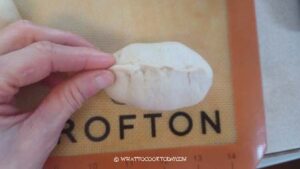
- Flatten the dough with your palm and roll into about 4 inches round. Scoop 1 portion of the filling onto the center of the dough. Don't try to fill too much.
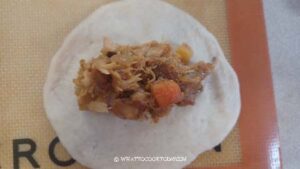
- Gather the two sides to meet and pinch to seal. Be careful not to let the edges of the dough touch the filling. You will have difficulty sealing the dough because of the moisture and grease from the filling make the dough "slippery"
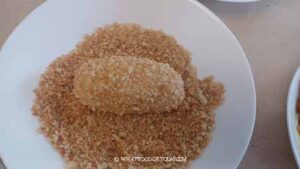
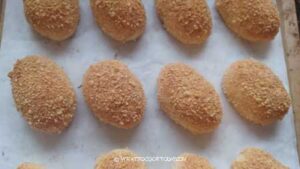
- Brush dough with egg wash and press it into the bread crumbs to coat evenly
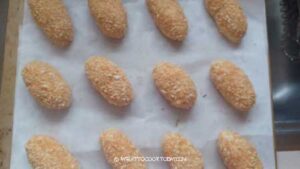
- Place the shaped bun seam-side down on the prepared baking pan, about 3 inches apart.
Final proofing:
- Let the shaped dough proof again for another 45 minutes to 1 hour or until they are really puffy
- Preheat the oven to 375 F (185 C) 15 minutes before the end of the proofing time. Position the oven rack, 3rd from the top and 3rd from the bottom
Baking:
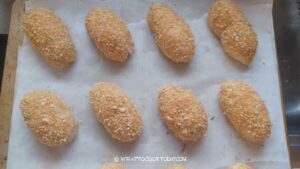
- Mist the top of the dough with oil. If you don't have a sprayer, use a brush to brush some oil on top of the bread crumbs. This helps to crisp the crumbs up during baking
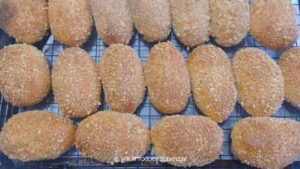
- Bake for 20-25 minutes or until the top has deep golden brown
To serve:
- Transfer to wire rack to let them cool down a bit. Serve warm or at room temperature
Storage:
- Let the bread cool down completely. Keep them in an air-tight container for 3 days in the fridge. They can be kept frozen for up to 1 month. Wrap each one tightly with cling wrap and put inside a freezer bag. Simply thaw at room temperature or overnight in the fridge
How to reheat:
- If they are cold from the fridge, reheat in an air fryer at 320 F for 5 minutes, in an oven at 350 F for 5 minutes


