This post may contain affiliate links. Please read our disclosure policy.
Crispy on the outside, chewy on the inside, these Brazilian cheese breads are easy, gluten-free, freezer-friendly, and completely irresistible. All-the step-by-step instructions to make sure you can replicate this at home successfully.

I made this Brazilian cheese bread four times in a row last week. My kids gobbled them up faster than I could make them. I honestly couldn’t keep up with production! Thankfully, these little cheese puffs are incredibly easy to make, which is probably a good thing because once you start eating them, it’s almost impossible to stop.
If you’ve never had Brazilian cheese bread before, imagine a bread that’s crisp on the outside, yet chewy, moist, and stretchy on the inside. The texture reminds me a lot of mochi cheese bread and Korean mochi bread, which also rely on starch rather than wheat flour for their signature chewiness. Every bite is cheesy, savory, and wonderfully addictive.
The best part? This recipe is naturally gluten-free thanks to tapioca starch (also known as tapioca flour).
What Is Brazilian Cheese Bread or Cheese Puffs?
Brazilian cheese bread, or Pão de Queijo, is a popular snack from Brazil made primarily with tapioca starch, eggs, milk, oil, and cheese. Unlike traditional bread, there’s no yeast involved. The unique texture comes from tapioca starch, which creates a delightfully chewy interior while allowing the bread to puff dramatically in the oven. These little cheese puffs are often enjoyed for breakfast, as a snack, or alongside coffee.
Tapioca Flour vs. Tapioca Starch
You may notice that I use the terms tapioca flour and tapioca starch interchangeably throughout this post. In the United States, the product is usually labeled as tapioca flour. In many Asian countries, it is commonly sold as tapioca starch. They are the same ingredient—the pure starch extracted from cassava root—and both work perfectly in this recipe.
I’ve successfully made this recipe with Bob’s Red Mill tapioca flour as well as several Asian brands. As long as the package contains 100% tapioca starch, you’re good to go.
Why You’ll Love This Recipe
- Naturally gluten-free
- No yeast required
- Crisp exterior and chewy interior
- Easy to make ahead and freezer-friendly
- The cheese breads stay puffed even after they have cooled down completely
- Kid-approved and highly addictive
Ingredients
You only need a handful of simple ingredients to make these wonderfully chewy Brazilian cheese breads.
- Tapioca flour (tapioca starch) – This is the key ingredient that gives the bread its signature chewy, stretchy texture. In the U.S., it is commonly labeled as tapioca flour, while in many Asian countries it is sold as tapioca starch. They are the same product and can be used interchangeably. Do not substitute with cassava flour, which behaves very differently in baking.
- Whole milk – The milk is heated with the oil and helps hydrate and partially cook the tapioca starch, creating the unique texture of the dough.
- Neutral-tasting oil – I usually use avocado oil, canola oil, vegetable oil, or grapeseed oil. The oil helps create a tender interior and contributes to the crisp exterior.
- Eggs – Eggs provide structure, richness, and help the cheese breads puff beautifully in the oven.
- Parmesan cheese – Freshly and finely grated Parmesan works best. I highly recommend grating your own cheese if possible. Finely grated cheese incorporates more evenly into the dough, helping the cheese breads puff higher and stay puffy longer. While pre-shredded cheese works too, the texture may not be quite as light and airy.
- Salt – Just enough to enhance the cheesy flavor and balance the richness of the bread.
Substitutions and Variations
- Use different cheeses
Any semi-hard to hard cheeses are suitable for this recipe. Parmesan is the classic choice, but you can also use Pecorino Romano, aged white cheddar, Asiago, Edam, Gouda, or a combination of cheeses. Keep in mind that cheeses with higher moisture content may slightly affect the dough consistency and final texture. Avoid using cheeses with high moisture content (usually melts easily) like Havarti, part-skim or fresh mozzarella, American cheese. - Substitute the milk
Whole milk gives the best flavor and texture, but 2% milk can be used in a pinch. I don’t recommend non-fat milk because the bread won’t be as rich. - Replace the oil with butter
You can substitute the oil with an equal amount of melted unsalted butter. The flavor will be slightly richer, though I find oil gives a lighter texture. - Add seasonings
Feel free to add garlic powder, freshly cracked black pepper, dried herbs, rosemary, or everything bagel seasoning for extra flavor. - Make larger cheese breads
Simply pipe or scoop larger portions and increase the baking time by a few minutes. - Do not substitute with cassava flour
Even though both come from cassava root, cassava flour and tapioca flour are not interchangeable. Cassava flour will produce a denser bread that won’t achieve the characteristic puff and chewy texture of traditional Brazilian cheese bread.
Tips for Extra Puffy Cheese Bread
After making several batches back-to-back, I noticed a few things that consistently helped the bread puff higher and stay puffy longer.
1. Start With A Hot Oven
A properly preheated oven is essential. The initial blast of heat quickly creates steam, helping the cheese bread expand and puff dramatically.
2. Bake Long Enough
Underbaked cheese bread may look done on the outside but can collapse as it cools. Bake until the tops are lightly golden and the structure is fully set. At the same time, avoid overbaking, which can make them drier than necessary.
3. Use Finely Grated or shredded Cheese
This is probably my favorite tip. I’ve tested both finely grated Parmesan and coarsely shredded cheese. While both work, the finely grated or shredded cheese produces a smoother batter that puffs higher and stays inflated longer after baking. If possible, grate your own cheese using the fine side of a grater.
4. Check The Dough Consistency
The batter should be very thick and hold its shape. If it spreads when you shape it, add a little more tapioca flour, one tablespoon at a time, until the consistency is correct.

Make Ahead Instructions
- You can prepare the dough up to 24 hours in advance and store it covered in the refrigerator.
- For longer storage, pipe the dough onto baking sheets and freeze until solid. Transfer the frozen dough balls to freezer bags and store for up to 2 months.
- Bake directly from frozen, adding 1-2 extra minutes to the baking time if needed.
Storage and Reheating
- Room Temperature
Once cooled completely, store in an airtight container at room temperature for 1-2 days. - Freezer
These freeze beautifully. Place cooled cheese breads in a freezer-safe bag, remove as much air as possible, and freeze for up to 1 month. - Reheating
Reheat in an oven or air fryer at 320°F (160°C) for about 5 minutes, or until heated through. They crisp right back up and taste almost as good as freshly baked.
Frequently Asked Questions
- Can I use cassava flour instead of tapioca flour?
No. Cassava flour and tapioca flour are not interchangeable in this recipe. Tapioca flour is pure starch and is responsible for the characteristic chewy texture and dramatic puffing. Cassava flour is made from the whole cassava root and will produce a denser, heavier result that won’t puff properly. - Can I use another type of cheese?
Yes. Parmesan provides a classic flavor, but you can experiment with other hard cheeses such as Pecorino Romano or aged cheddar. Keep in mind that different cheeses contain different amounts of moisture, which may slightly affect the texture. - Why did my cheese bread collapse?
Common reasons include: Oven not fully preheated, batter is too wet, underbaking, opening the oven door too early during baking - Can I make them larger?
Absolutely. Increase the size of the dough portions and add a few extra minutes to the baking time (depending on how large you make them)
If you’re looking for an easy gluten-free snack that disappears almost as quickly as you can bake it, Brazilian cheese bread is hard to beat. Crispy, chewy, cheesy, and irresistibly poppable, these little puffs have become a regular request in my house. Just be warned: one batch is rarely enough!

Brazilian Cheese Bread/Puffs (Pão de Queijo)
Ingredients
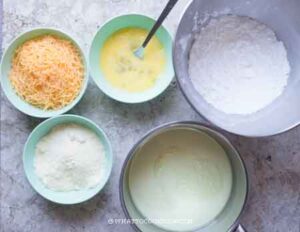
- 226 g tapioca flour plus more as needed
- ¾ tsp salt
- 240 g whole milk
- 120 g oil any neutral-tasting oil
- 100 g eggs beaten
- 113 g Parmesan cheese finely grated, see notes
- 113 g extra-sharp cheddar finely shredded, see notes
Instructions
- Just know that I use the terms tapioca flour and tapioca starch interchangeably. In the U.S. it is known as tapioca flour. In Asia, it is known as tapioca starch. It is the starch extracted from cassava root and it is gluten-free. They are the same thing. You can read more of the details in my post above
- You can use any brand you like. I've used Bob's red Mills before and I've also used Asian brand before and they both work as long as it is made of pure tapioca starch
- Preheat the oven to 425 F ( 220 C) for conventional oven. For a convection oven, lower the temperature by 20 F / 15 C. Position the oven racks on upper third and lower third
- Line 2 large pans with parchment paper. If you are using mini muffin tin, make sure to brush with some oil.
Prepare the dough:
- Combine tapioca flour and salt in a mixing bowl fitted with a paddle attachment. I highly recommend using a stand mixer with a paddle attachment. If you don't have one, you can do this manually too, but it requires more elbow grease

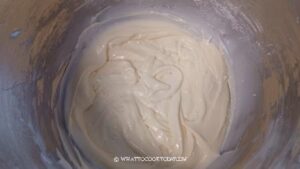
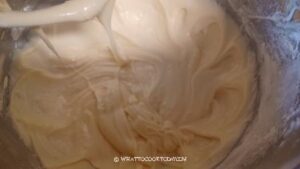
- Place milk and oil in a saucepan and once it starts to boil, reduce the heat slightly and let it boil for another 10-15 seconds. You want it to be hot enough to "scald" the starch. Remove from the heat immediately and pour this into the mixing bowl. Start the mixer on the lowest for about 2-3 minutes to avoid and splattering of oil.
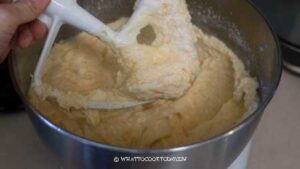
- Then increase the speed up one notch and beat until it forms a sticky batter, about 5 minutes more. You may want to scrape the side of the bowl using a bench scraper halfway through mixing. It may seems greasy and oily but the starch will gradually absorb the oil as the beating continues.

- You want to beat until it's no longer hot, but just warm to the touch. Slowly drizzle in 1/3 of the beaten egg and wait for about 10 seconds before you add the next one. The batter will separate at first but as you add and beat it, it will come together into a semi-thick batter.
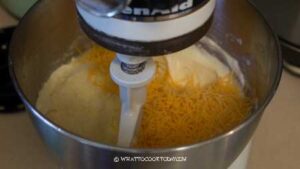
- Add all of the cheese and beat until combined.
- You will get a very thick and stiff batter
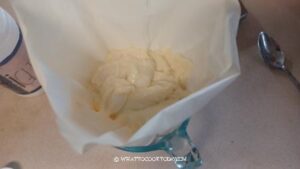
Test the dough consistency:
- You should get a very thick batter that when you scoop it and turn it upside down, it won't even drop and hold its shape. If your dough doesn't hold its shape or runny, you may need to add a bit more tapioca flour, 1 Tbsp at a time and beat the batter again to combine and test again. Different brand of tapioca flour may absorb liquid slightly differently
Shaping: (using piping bag)
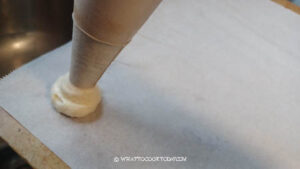
- I personally find it easier to transfer into a large piping bag or a large sturdy plastic bag and cut about 1/2-inch opening. It gives a uniform size and it does make my life a bit easier.
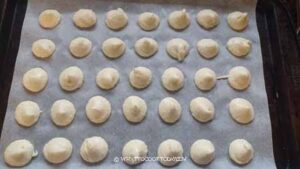
- Steadily pipe the batter to about 1 Tbsp-size ball. Leave about 1 inch in between the dough. Wet your finger tips and flatten any pointy tops
- I got about 60 mini balls
Shaping using small cookie dough scoop or spoon
- You can also use two spoons to help you scoop and scrape into the pan. Scoop about 1 Tbsp-sized balls onto the prepared baking pan. It won't be "neat" but it evens out during baking. If you have a small cookie scoop, this works very well too
- Continue until you finish with all the batter
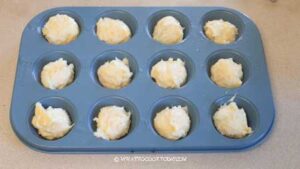
Shaping using mini muffin tins:
- This recipe can make about 48 pieces or more using standard mini muffin tins. Simply scoop about 2 Tbsp-size balls into a greased mini muffin tins.
Baking:
- Place the pans in the positioned racks. Close the oven door and reduce the temperature to 375 F (190 C) for conventional oven and 350 F (180 C) for a convection oven. Bake for 18-20 minutes for mini and mini muffin size. They will puff up and have golden tinge here and there because of the cheese. For larger bread, you may need 23-25 minutes

Serve immediately:
- Remove the pans from the oven and let them cool down for about 2-3 minutes and then serve when they are still warm. This is the best texture as they are crisp on the outside, but chewy and soft on the inside

How to store leftovers:
- Let them cool down completely. They can be kept at room temperature for 1-2 day, but they will need to be reheated before serving. They also freeze very well. I transfer the baked bread into freezer bag, push all the air out and seal the bag. They can be kept frozen for up to one month.
- Simply reheat in the oven or air fryer at 320 F for 5 minutes or so or until heated through. They will crisp back up like new again and serve immediately
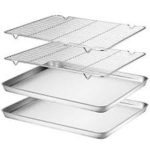
RECOMMEDED TOOLS


Marv’s Recipe Notes
- Any semi-hard to hard cheeses are suitable for this recipe. Parmesan is the classic choice, but you can also use Pecorino Romano, aged white cheddar, Asiago, Edam, aged Gouda, or a combination of cheeses. Keep in mind that cheeses with higher moisture content may slightly affect the dough consistency and final texture. Avoid using cheeses with high moisture content (usually melts easily) for example: Havarti, part-skim or fresh mozzarella, American cheese.
