This post may contain affiliate links. Please read our disclosure policy.
Learn how to make these classic French Madeleines (Petite Madeleines) with black sesame flavor. This madeleine recipe is the easiest and fastest and still tastes so good. The batter doesn’t require any resting period and with nice signature hump (belly) of Madeleines.

My kids LOVE this Petite Madeleines. Each time we went to Costco and we saw a huge container of Madeleines (calling our names..), I had almost so tempted to bring them home LOL. But I was strong enough. Then, after making several batches of Madeleines at home, I couldn’t stop making them.
What is Madeleine?
Well, you certainly don’t need a huge intro from me, but basically it’s a small French cake, sponge cake to be exact, baked in shell-shape mold pan with end result of the cakes having huge hump in the middle. The cake batter is pretty much a genoise cake batter.
Why I call this the easiest, fastest, and the best Madeleine recipe
1. Easiest because the recipe requires no creaming of butter, sugar, or eggs like you would when you make a genoise. You don’t need an electric mixer
2. Fastest because you can prepare the batter and bake it right away without resting the batter at all
3. The best because the Madeleine still come out light and spongey inside with slightly crisp shell and that signature hump is just beautiful
Why I didn’t rest the batter
I have tried many different recipes, mostly require resting the batter for at least 1 hour, some even 2 hours or overnight before baking. The theory behind it is that the chilled batter that encounters the hot oven is “shocked” and creates that burst that push the cake batter into creating that hump, but there is also baking powder added to the batter, so that also helps with the rise and the hump.
Then I’ve also tried this recipe by a Korean Pastry Chef, that does not require any resting period and ribboning the eggs and sugar with excellent result. The madeleines taste so light, airy, and with beautiful humps. I can’t tell the difference between the one that I’ve made by resting the batter and the one that did not. So, I will go with the one without resting. It is very important that you follow the recipe exactly as it is what makes it possible not to rest the batter and still with great result.

What’s the right texture for Madeleine?
A well-baked Madeleine are slightly firm/crisp on the shell side, but soft, airy, and moist on the inside and the hump side. The hump on Madeleine is a sign that the cake is very well-baked. They are best served while still warm as they still retain that crisp shell but soft and spongey on the inside.
Why do Madeleines have dry texture?
You have most likely overbaked them. Try to bake 1-2 minute less next round and see. This is something you have to experiment with your oven and the size of the Madeleine pan you use, they are pretty standard usually, unless you use a deep one like I did with this recipe, then it may require slightly longer baking time.
How to make perfect easiest Madeleines without resting the batter
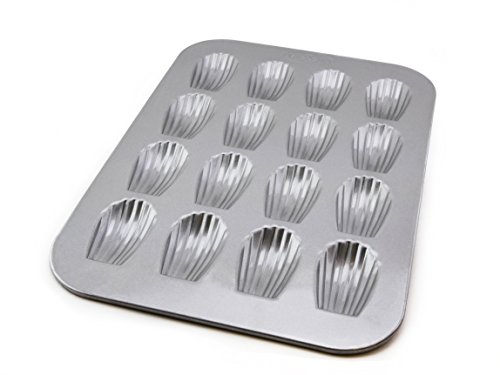
1. Grease your madeleine pan very well, even if it’s non-stick. I melt some butter and then brush on the well of the pan, dust with some flour. Tap off any excess. Then chill the pan in the freezer while you prepare the batter
2. Preheat the oven to 425 F (220 C) for conventional oven for at least 10 minutes. For convection oven, lower the temperature by 20 F (15 C).
3. Melt the butter and set aside. Mix cake flour, sesame powder, salt, and baking powder. Whisk to combine. Crack one room temperature egg in a bowl and whisk to combine.

3. Measure out 40 grams of egg into a mixing bowl

4. Add milk, honey, sugar, in a mixing bowl and whisk vigorously for a minute or two until just the sugar melts, that’s all

5. Sift in cake flour mixture and whisk until just combined, meaning, as soon as you don’t see any more pockets of flour, stop mixing. Take care not to overmixing at this point


6. Add the warm melted butter. It is best if the temperature of the butter is between 40-50 C / 104 -122 F

7. Whisk until the batter is homogenous, smooth and shiny. The batter may thicken as the butter cools down, that’s normal


8. Transfer the batter to a piping bag or you can use a plastic bag and snip off the tip. Pipe into the Madeleine pan. Otherwise, you can also use a spoon to spoon the batter into the prepared molds, filling each about 3/4 full only, which is about one tablespoon. You don’t need to even out the batter. It will even out itself as the butter melts in the oven. It is important not to overfill the mold. This can prevent the bump/hump from rising

9. Place the pan in the oven middle rack and bake for 5 minutes. Then without opening the oven’s door, reduce the temperature to 375 F (190 C) for conventional oven. For convection oven, lower the temperature by 20 F/15 C and bake for another 5-6 minutes or until golden brown with a nice hump. When you lightly press on the cake, it springs up lightly and no longer feels wet if you stick a toothpick into the hump to test for doneness

10. Turn each madeleine on its side to cool immediately. This way the hot steam is not trapped, which prevent the cake from becoming soggy at the bottom. If you put them straight on the cooling rack, the madeleines are still soft and the grid of the cooling rack may be imprinted on the cake (more of a cosmetic issue, doesn’t ruin the taste or anything)
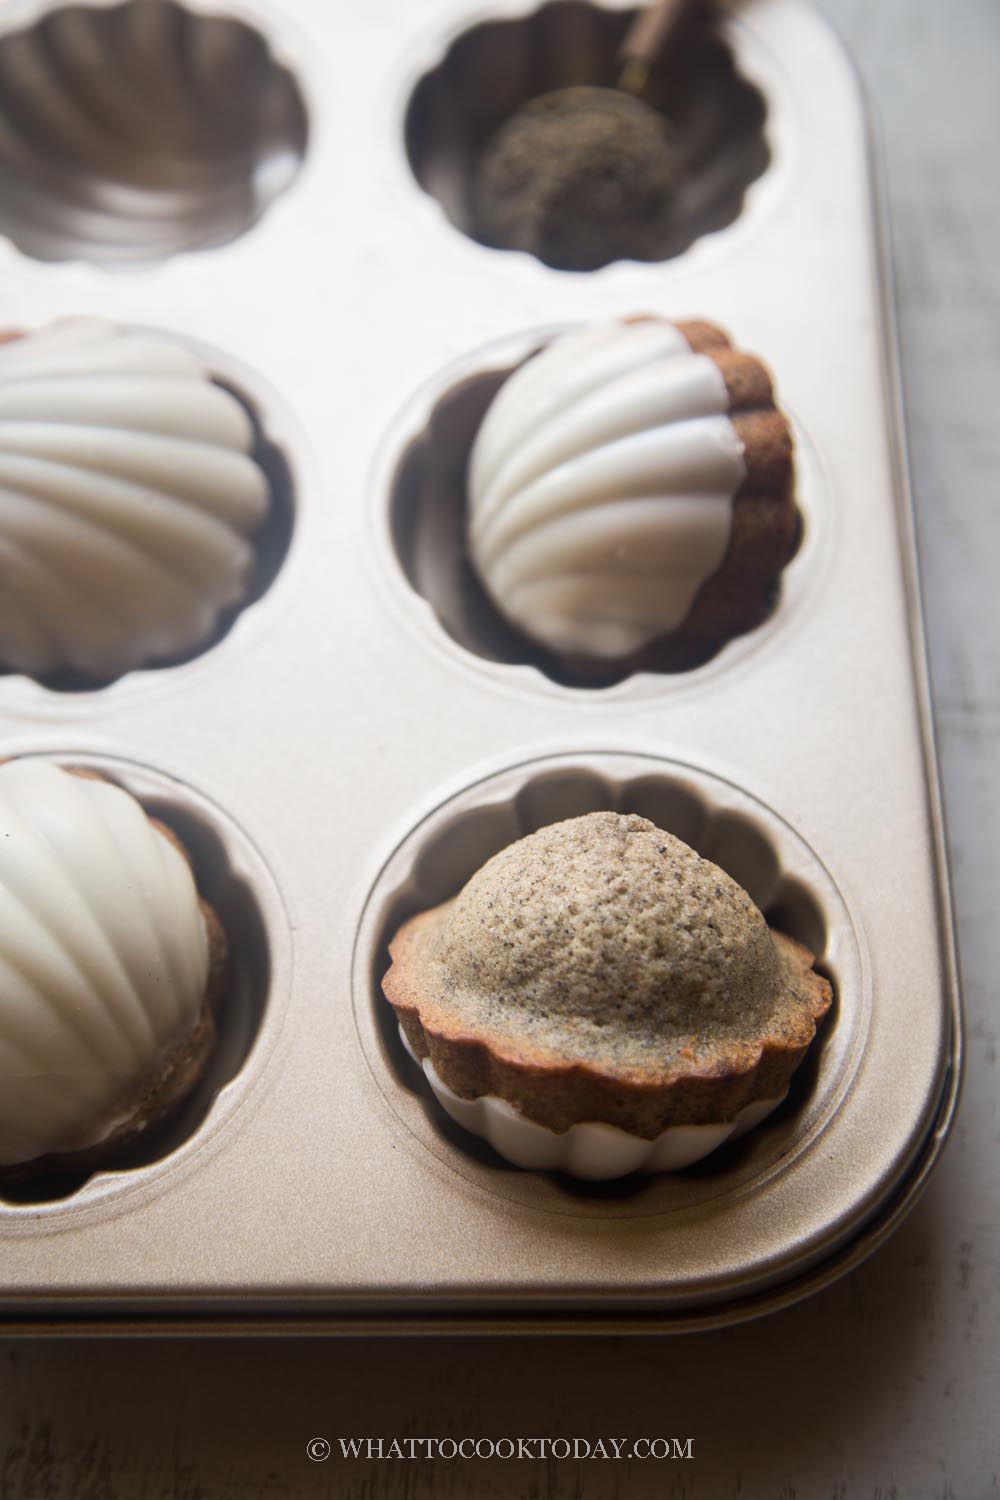
11. Melt white chocolate over bain-marie or use a microwave to melt chocolate for few seconds


12. Pipe or spoon this chocolate into the madeleine pan. You only need to fill about 1/4 full

13. Carefully place the cooled-down Madeleine on top and gently press and move it around a little bit to make sure the chocolate coats the bottom of the Madeleine and leave the Madeleine on top of the chocolate

14. Place the whole pan in the freezer for 30 minutes. The chocolate will harden and you can easily remove the chocolate coated Madeleine from the pan. Easy as that! If the Madeleine won’t release, try freezing a bit longer.
How to store Madeleines
Madeleines are best served on the same day they are made, best yet, when they are just right out of the oven. But, if you have leftovers, here’s what you can do:
1. Keep them in an air-tight container for 2-3 days
2. For longer storage, wrap them in a cling wrap and then put in a freezer bag. Don’t dust any sugar on them until you are ready to serve them. Simply thaw at room temperature and then dust with powdered sugar or dip in chocolate before serving

The Easiest Black Sesame Madeleines (No Resting, No Ribboning)
Ingredients
Wet ingredients:
- 50 gr butter unsalted
- 40 gr egg (room temperature)
- 5 gr milk (room temperature)
- 5 gr honey
- 35 gr sugar
Dry ingredients:
- 40 gr cake flour
- ⅛ tsp salt
- 10 gr black sesame powder
- ¼ tsp baking powder
For coating (optional):
- 60 gr couverture white chocolate
Instructions
- It is very important that you follow the recipe exactly as it is what makes it possible not to rest the batter and still with great result. I provide Cup/Tbsp measurement, but highly recommend using weighing scale for accuracy
- This recipe can make 6 large madeleines or 8 standard size madeleines
- Preheat the oven to 425 F (220 C) for conventional oven for at least 10 minutes. For convection oven, lower the temperature by 20 F (15 C).
- Grease your madeleine pan very well, even if it’s non-stick. I melt some butter and then brush on the well of the pan, dust with some flour. Tap off any excess. Then chill the pan in the freezer while you prepare the batter
Prepare the cake batter:
- Melt the butter and set aside
- Mix cake flour, sesame powder, salt, and baking powder. Whisk to combine
- Crack one room temperature egg in a bowl and whisk to combine. Measure out 40 grams of egg into a mixing bowl. Add milk, honey, sugar, in a mixing bowl and whisk vigorously for a minute or two until just the sugar melts, that's all. Sift in cake flour mixture and whisk until just combined, meaning, as soon as you don't see any more pockets of flour, stop mixing. take care not to overmixing at this point
- Add the warm melted butter. It is best if the temperature of the butter is between 40-50 C / 104 -122 F. Whisk until the batter is homogenous, smooth and shiny. The batter may thicken as the butter cools down, that's normal
- Pro tips: If you wish to chill the batter and bake it the next day because you don't have the time to do it now, you can do so too. Just cover it and put it in the fridge. Otherwise, this batter requires no chilling and can be baked straightaway. After chilling, just use a spoon to spoon the batter into the pan, don't use a piping bag as it will be too thick for piping bag
Pipe the batter:
- I prefer to transfer the batter into a piping bag. It's easier to dispense the batter neatly that way. You can also use a large ziplock bag and cut one of the corners.
- Otherwise, you can also use a spoon to spoon the batter into the prepared molds, filling each about 3/4 full only, which is about one tablespoon. You don't need to even out the batter. It will even out itself as the butter melts in the oven. It is important not to overfill the mold. This can prevent the bump/hump from rising
Baking:
- Place the pan in the oven middle rack and bake for 5 minutes. Then without opening the oven's door, reduce the temperature to 375 F (190 C) for conventional oven. For convection oven, lower the temperature by 20 F/15 C and bake for another 5-6 minutes or until golden brown with a nice hump. When you lightly press on the cake, it springs up lightly and no longer feels wet if you stick a toothpick into the hump to test for doneness
Cooling:
- Drop the pan on the counter to release hot air and gently transfer to a cooling rack, the hump facing up preferably so they won't get "squished"
- They can be served warm without coating with chocolate if that's what you choose to do
Coat with white chocolate (optional):
- Melt white chocolate over bain-marie or use a microwave to melt chocolate for few seconds
- Option 1: You can dip the Madeleine in the melted chocolate and place on cooling rack to harden
- Option 2: Pipe or spoon about 1 Tbsp of this chocolate into the madeleine pan. About 1/2 Tbsp for shallower pan. Carefully place the cooled-down Madeleine on top and gently press and move it around a little bit to make sure the chocolate coats the bottom of the Madeleine and leave the Madeleine on top of the chocolate
- Place the whole pan in the freezer for 30 minutes. The chocolate will harden and you can easily remove the chocolate coated Madeleine from the pan. Easy as that!


6 comments
Hi, these look delish! Where is your madeleine pan from? I’ve been looking for one like that for awhile. Thanks!
Hi Sabrina, I got mine from Amazon. They are scallop shape https://amzn.to/3EjN7xV
Dear,
Are there any tell tale signs so that we do not over mix when we sift in the flour into the egg,sugar,honey & milk mixture for this madeleine recipe? Pls advise. Appreciate your reply. Thanks!
I usually stop mixing as soon as I no longer see any more pockets of flour. The overmixed batter usually looks dense and kinda gummy because gluten has formed.
This looks delicious! I want to make them this weekend. Do I need to toast the sesame seeds before I made them into a powder?
Hello, yes I highly recommend toasting the seeds, let them cool down before grinding into a powder or they may turn into sesame paste. Toasting them give an extra flavor you will enjoy for sure!