This post may contain affiliate links. Please read our disclosure policy.
This soft and fluffy avocado milk bread made with yeast is perfect as a toast or as a sandwich bread. The bread is healthy and made with no butter and made with avocado oil.

I love eating avocado on a daily basis. I eat them as is. I put them on a toast, on salad, in smoothies and then I thought, why not incorporating it into a yeast bread? There are many avocado bread recipes out there but they are more like quick breads made without yeast and eaten more like a dessert. I want a good healthy, soft and fluffy avocado bread made with yeast that I can use as a toast in the morning or as a sandwich bread. It also gives the bread a natural light green hue.
Ingredients and substitutions
1. Bread flour
I don’t recommend using all-purpose flour for this bread. I recommend using bread flour with high protein content. I usually use King Arthur bread flour, which has about 12.7% protein content. You can use whatever high-protein flour you like
2. Instant yeast
I recommend using good-quality instant yeast that has high tolerant to sugar and fat. Even though this bread doesn’t use a lot of sugar and fat, because avocado contains good fat and is also fibrous, the dough takes a really long time to rise when I use lower-quality instant yeast
3. Ripe avocado
You want to use soft and fully ripened avocado for this recipe
4. Sugar
I don’t use a whole lot of sugar in the recipe. You are welcome to reduce or increase the amount of sugar if you prefer. You can also use a sugar substitute like erythritol if you like
5. Salt
I use fine sea salt. You don’t want to omit salt entirely as salt gives some flavor and taste to the bread
6. Milk
You can use whole milk, low-fat, fat-free, or non-dairy milk in this recipe
7. Avocado oil
I use avocado oil just because I like the idea that it matches the avocado “theme”. Feel free to use any oil you like
Soft Fluffy Avocado Milk Bread (Yeasted Avocado Bread)
Ingredients
Dough:
- 350 g bread flour (12.7% protein content)
- 5 g fine sea salt
- 7 g SAF Gold instant yeast I recommend strong good quality instant yeast
- 100 g mashed ripe avocado
- 20 g avocado oil plus more for brushing, or use any oil of your choice
- 30 g sugar you can adjust amount to your preference
- 120 g milk start with this amount, or more as needed
Egg wash:
- 1 egg beaten
- ½ tsp milk
Instructions
- I use this Pullman loaf pan that measures 8.3x 4.8 x 4.5 inch on the exterior and the interior measures 7.5 x 4 x 4.4 inch. It's a tall loaf pan. You can also use a standard regular 8.5 x 4.5 x 2.75 inch loaf pan
- For other pan size adjustment, please see the details in my post below
Prepare the dough:
- I use a bit more yeast than I usually would for a bread because this is a "heavier/denser" bread (in a good way) because of the avocado.
- Make sure you use a ripe soft avocado and just roughly mash with a fork and don't have to be entirely smooth. The avocado will get all mixed and mashed up during the kneading process by the machine
- Combine all the ingredients for the dough in a mixing bowl of a standmixer. Stir the mixture with the dough hook to combine roughly so the dry ingredients won't start flying when you turn on the machine. Start mixing at speed 2 for about 1 minute and then increase to speed 2 and continue to knead for 7-10 minutes (the timing depends on your mixer too) to get a soft dough is smooth and elastic, slightly sticky to the touch. The dough should reach a windowpane stage. When you gently stretch the dough thinly, it shouldn't tear easily. If it does, knead a bit longer.
- If the dough feels dry and/or stiff, add more milk, one teaspoon at a time. You want to make sure the dough feels soft and hydrated, this is one of the important tips to get a soft bread. So don't be afraid to add more liquid if you feels like the dough needs it
First proofing:
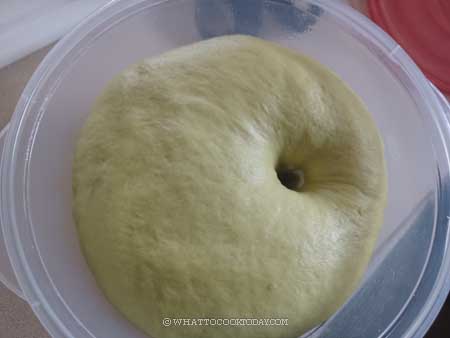
- Place the dough in a lightly oiled bowl. This is optional but I like to put it in a round container, about 1 quart-size so I can monitor when it doubles in volume. Gently press the dough down so it's flat and fill up the container. I will mark the side of the container with masking tape where the dough would double in volume. This may take about 30-45 minutes at around 79-82 F (26-28 C). It may be faster or take longer, depending on the temperature
Shaping:
- Once the dough has doubled, transfer it to a work surface. Deflate the air by pressing and folding the dough a few times
- Round the dough up into a dough ball and keep it covered and let it rest for 5 minutes to relax the gluten
- Brush your loaf pan with some oil all over. Roll the dough out into a rectangle, about 12 x 8 inches roughly, trying to deflate as much air bubbles as possible at the same time so there won’t be holes inside your bread later.
- Fold both sides of the long side to the center. It should be about the same width as the length of your loaf pan.
- Roll it down tightly from the top, trying to push out as much air as you can as you are rolling down the dough, so you won’t have large “holes” inside your bread later. You should have one log that is about the same length as the length of your loaf pan. Place this inside the loaf pan. Gently press the dough down to fit the pan
Final proofing:
- This loaf is not a tall riser. Cover the loaf pan with a plastic wrap and let it ferment until it recahes the rim of the pan, about 30 minutes at 79-82 F (26-28 C). It may be faster or take longer, depending on the temperature
- 15 minutes before the end of the proofing, preheat oven to 350 F (180 C) for convection oven, 330 F (165 C) for convection oven
Baking:
- Combine the egg with milk using a whisk. Strain them if necessary so the white won't be in one blob. Brush this thinly on top of the dough
- Place the loaf pan in the middle of the oven and bake for 30-35 minutes. The time is just for reference. You may need to tent loosely with aluminum foil halfway through baking if the top gets browned too quickly. I always check the internal temperature by poking a digital thermometer at 30-35 minute-mark, right into the center of the loaf, usually it has reached 190 F (88 C). If it hasn't, bake 3-5 minutes longer and check again until it reaches that internal temperature.
Cooling:
- Remove from the oven and drop the pan on the counter once or twice. Brush with some avocado oil on top if you like and then gently unmould the bread and let it cool down completely on a cooling rack
- Do not cut into freshly baked bread for at least 2 hours. The bread may collapse and worse, turns gummy


*Nutrition facts are just estimates and calculated using online tools*
How to adjust the recipe for different pan sizes
If this is your first time making this recipe with Pullman loaf pan, I suggest baking without the lid first to figure out how the dough fills the pan after baking. The type of flour you use and hydration affect how much the dough rises too. I haven’t personally tried this on the pan I mentioned below because I don’t own all of the pan below. I theoretically calculate the volume of the pan and adjust from there.
1. For 8.5 x 4.5 x 2.75 inches loaf pan, follow the recipe as is, the loaf will be wider
2. For 9 x 5 x 2.75 inches loaf pan, you can 1.1 x the recipe
3. For small Pullman loaf pan 9 x 4 x 4 inches loaf pan from USA Pan, you can 1.2 x the recipe
4. For large Pullman loaf pan 13 x 4 x 4 inches loaf pan from USA Pan, you can 1.6 x the recipe

How to bake soft and fluffy avocado bread with yeast
1. Make sure you use a ripe soft avocado and just roughly mash with a fork and don’t have to be entirely smooth. The avocado will get all mixed and mashed up during the kneading process by the machine
2. Combine all the ingredients for the dough in a mixing bowl of a standmixer. Stir the mixture with the dough hook to combine roughly so the dry ingredients won’t start flying when you turn on the machine.
3. Start mixing at speed 2 for about 1 minute and then increase to speed 2 and continue to knead for 7-10 minutes (the timing depends on your mixer too) to get a soft dough is smooth and elastic, slightly sticky to the touch.
4. The dough should reach a windowpane stage. When you gently stretch the dough thinly, it shouldn’t tear easily. If it does, knead a bit longer. If the dough feels dry and/or stiff, add more milk, one teaspoon at a time. You want to make sure the dough feels soft and hydrated, this is one of the important tips to get a soft bread. So don’t be afraid to add more liquid if you feels like the dough needs it

5. Place the dough in a lightly oiled bowl. This is optional but I like to put it in a round container, about 1 quart-size so I can monitor when it doubles in volume. Gently press the dough down so it’s flat and fill up the container. I will mark the side of the container with masking tape where the dough would double in volume. This may take about 30-45 minutes at around 79-82 F (26-28 C). It may be faster or take longer, depending on the temperature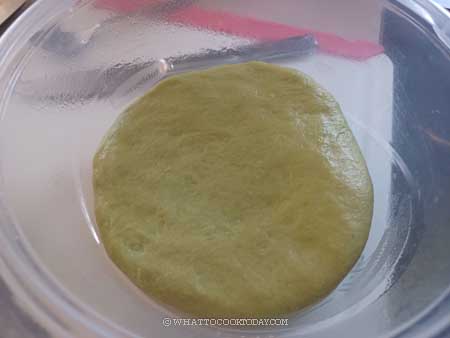
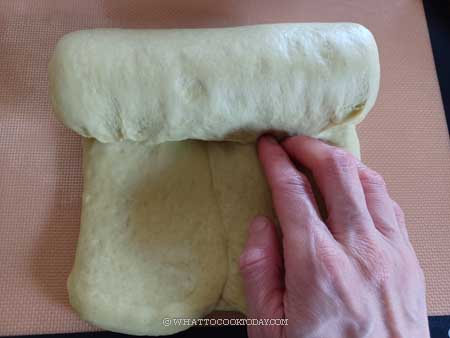
6. Once the dough has doubled, transfer it to a work surface. Deflate the air by pressing and folding the dough a few times. Round the dough up into a dough ball and keep it covered and let it rest for 5 minutes to relax the gluten. Roll the dough out into a rectangle, about 12 x 8 inches roughly, trying to deflate as much air bubbles as possible at the same time so there won’t be holes inside your bread later. 
7. Fold both sides of the long side to the center. It should be about the same width as the length of your loaf pan. 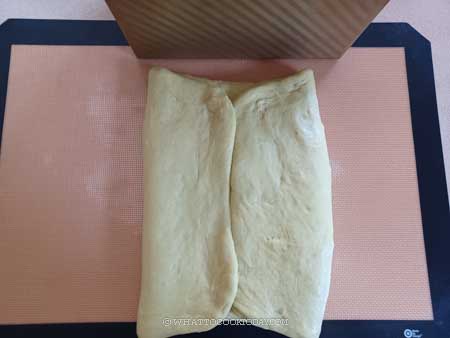
8. Roll it down tightly from the top, trying to push out as much air as you can as you are rolling down the dough, so you won’t have large “holes” inside your bread later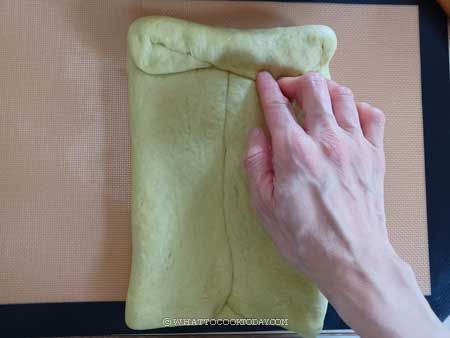
9. You should have one log that is about the same length as the length of your loaf pan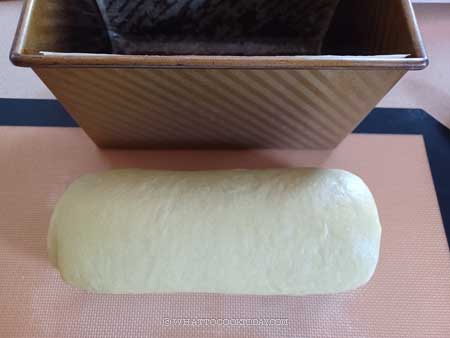
10. Place this inside the loaf pan. Gently press the dough down to fit the pan
11. This loaf is not a tall riser. Cover the loaf pan with a plastic wrap and let it ferment until it recahes the rim of the pan, about 30 minutes at 79-82 F (26-28 C). It may be faster or take longer, depending on the temperature. 15 minutes before the end of the proofing, preheat oven to 350 F (180 C) for convection oven, 330 F (165 C) for convection oven
12. Combine the egg with water using a whisk. Strain them if necessary so the white won’t be in one blob. Brush this thinly on top of the dough. Place the loaf pan in the middle of the oven and bake for 30-35 minutes. The time is just for reference. You may need to tent loosely with aluminum foil halfway through baking if the top gets browned too quickly. I always check the internal temperature by poking a digital thermometer at 30-35 minute-mark, right into the center of the loaf, usually it has reached 190 F (88 C). If it hasn’t, bake 3-5 minutes longer and check again until it reaches that internal temperature.
13. Remove from the oven and drop the pan on the counter once or twice. Brush with some avocado oil on top if you like and then gently unmould the bread and let it cool down completely on a cooling rack. Do not cut into freshly baked bread for at least 2 hours. The bread may collapse and worse, turns gummy

Did you make this Soft Fluffy Avocado Milk Bread (Yeasted Avocado Bread) recipe?
I love it when you guys snap a photo and tag it to show me what you’ve made Simply tag me @WhatToCookToday #WhatToCookToday on Instagram and I’ll be sure to stop by and take a peek for real!

