This post may contain affiliate links. Please read our disclosure policy.
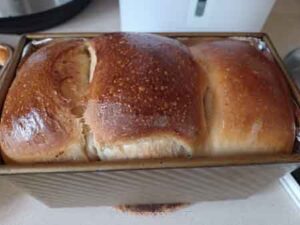
This homemade honey yogurt shokupan has a wonderful balance of softness, subtle sweetness, and richness. Whether enjoyed fresh or toasted, it’s a delightful addition to any breakfast or afternoon tea. I even use it to make sandwiches. It’s in our bread rotation pretty heavily.

Why use yogurt and honey?
Yogurt plays a dual role in this bread. Its acidity helps relax the gluten, making the dough easier to handle, while its dairy content contributes to a softer texture. Honey, meanwhile, not only sweetens the bread but also retains moisture, ensuring the loaf stays fresh longer.
Ingredients and substitutions
1. Bread flour – Provides the right protein content for structure and elasticity.
2. Honey – Adds a gentle sweetness and helps with moisture retention.
3. Salt – Enhances the overall flavor.
4. Whole milk yogurt – Creates a tender crumb and enhances the bread’s softness. You can use low-fat too, but just know that the bread won’t be as “rich” and soft
5. Butter – Enriches the dough while maintaining a light texture.
6. Whole milk – Contributes to the bread’s signature soft and fluffy interior. You can also use low-fat milk, but I won’t do skim milk if I were you
7. Milk powder – I use non-fat dry milk powder. It helps to enrich the dough and leads to a softer, more tender crumb.
8. Instant yeast – You can use active dry yeast but make sure to dissolve it using some of the milk in the recipe before preparing the dough

Honey Yogurt Shokupan
Ingredients
For the dough:
- 330 g bread flour (12.7% protein content) or more as needed
- 5 g salt
- 20 g milk powder
- 5 g instant yeast
- 30 g honey
- 100 g whole-milk yogurt
- 120 g whole milk or more as needed
- 20 g unsalted butter softened
Egg wash:
- 1 egg beaten
Instructions
- I use a 7 1/2 x 4 1/2 x 4 1/2 small but tall loaf pan. You can also use 8 1/2 x 4 1/2 loaf pan, the loaf will come out shorter but wider.
- Lightly grease your loaf pan on all sides. You can line the long side with a parchment paper overhanging a bit for easier removal
Prepare the dough:
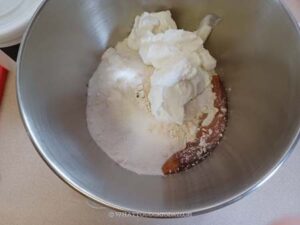
- Place all ingredients in a mixing bowl of a stand mixer fitted with a dough hook attachment. Use the hook to stir everything around a bit so when you turn the machine on, the flour won't fly around and wet ingredients won't splash

- Start with the lowest speed to mix things up and then increase to speed 2 and knead for about 5 minutes or until it forms a dough. If the dough is too dry to come together, you can add a bit of milk one teaspoon at a time.
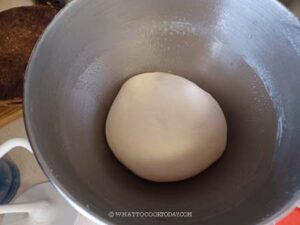
- Continue to knead at speed 4 for about 5-6 minutes or until the dough is smooth and elastic. If you slowly stretch a small amount of dough, it will not break and light can pass through, like a window pane. Proceed to first proofing
First proofing:
- Transfer to a lightly oiled bowl, cover, and proof at a warm place for about 1 hour or until it doubles in volume. When you poke a finger into the dough, the indentation stays and the dough does not collapse. It is done proofing for the first round

Shaping:
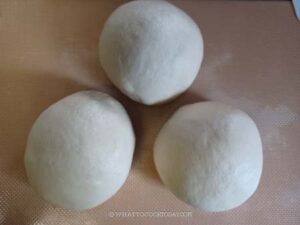
- Punch the dough down and give it a knead for a few times. Divide into 3 equal-weight doughs. Round up each dough to roughly form a ball. Cover and let them rest for 5 minutes to relax the gluten
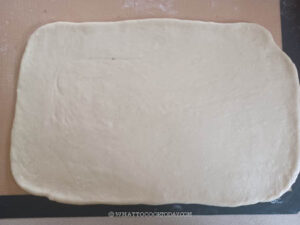
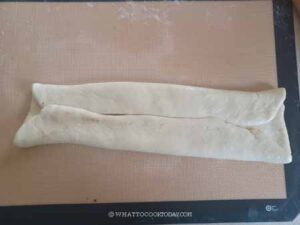
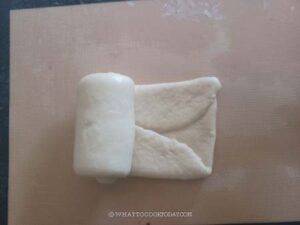
- Roll each ball out into a rectangle shape (don’t have to be exact). Fold the two long sides up and then roll it from the bottom to top. Place the seam side down in the loaf pan and repeat with the other 2 doughs.
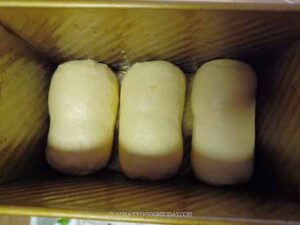
- Place the shaped dough into the pan. Repeat with the other dough. Place all the shaped dough side by side inside the loaf pan. Slightly flatten the three doughs with your palm so they are about the same height
Final proofing:
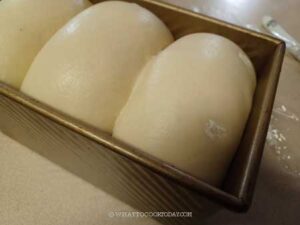
- Let the dough proof again for another 45 minutes to one hour (or longer depending on the temperature and the yeast you use) or until they fill up the loaf pan, about 90%. Brush the top of the dough with egg wash
- 15 minutes before the end of proofing, preheat oven to 375 F (190 C) for conventional oven. If you use a convection oven, lower the temperature by 20 F or 15 C.
Baking:
- Put the pan on the middle rack and let it bake for the next 25-30 minutes depending on the oven, mine took about 25 minutes. The internal temperature on the center of the bread is at least 190 F (88 C). I highly recommend a digital thermometer to take out the guess work!
Cool down:
- Remove from the oven and remove the bread from the pan and cool down completely on the cooling rack. Enjoy and once it's cooled down completely, wrap it up with plastic wrap and it's good for about 3 days or so at room temperature
RECOMMEDED TOOLS


*Nutrition facts are just estimates and calculated using online tools*

How to enjoy honey yogurt shokupan
1. Toasted with butter and a drizzle of extra honey
2. As a base for sandwiches, for example: Japanese-style sandwiches (fruit sando or tamago sando)
3. Served with jam, cream cheese, or condensed milk for a sweet treat
4. Used in French toast or bread pudding
How to store
1. Short-term (1-3 days)
Room Temperature: Store the bread in an airtight container, bread box, or a resealable bag at room temperature.
Wrap Well: Use plastic wrap or beeswax wrap to prevent drying out.
Avoid the Fridge: Refrigeration can dry out bread faster, making it stale.
2. For long-term storage: If you plan to keep the bread for more than 3 days, consider freezing instead of refrigerating.
Slice Before Freezing: This makes it easier to take out portions as needed.
Double Wrap: First, wrap slices or whole loaves tightly in plastic wrap, then place them in a freezer-safe bag or airtight container.
Label with Date: To keep track of freshness. They can be kept frozen for up to one month for the best result
How to reheat
If the bread is frozen, let the bread sit out for 30–60 minutes to thaw naturally. Then toast or warm in an oven at 300°F (150°C) for 5–10 minutes for a fresh-baked texture.

