This post may contain affiliate links. Please read our disclosure policy.
A unique combination of soft, fluffy bread and sweet, fragrant, and creamy kaya offers a delightful sensory experience that you will absolutely enjoy whether as a comforting breakfast or a satisfying afternoon snack.

Kaya brings lots of childhood memory for me. I grew up watching my mom and my aunt made kaya jam often. They made it the traditional way by stirring hours and hours. We waited and waited for it patiently. That first spoonful of kaya jam that my mom scooped for me to taste simply brought so much joy to my life. I can pretty much slab this good stuff pretty much on anything. I decided to make pandan kaya milk buns this time. What else could be better than that? Well, eating them that is!
What is pandan kaya milk bun?
Kaya, a delectable spread made from coconut milk, eggs, sugar, and pandan leaves, serves as the filling in this delightful soft and fluffy milk buns . Pandan leaves lend their unique fragrance and distinctive green hue to the kaya, enhancing its flavor and visual appeal.
Super Soft Pandan Kaya Milk Buns
Ingredients
If using commercial yeast:
- 135 g whole milk plus more as needed
- 10 blades pandan leaves
- 250 g bread flour
- 50 g all-purpose flour
- 10 g milk powder
- 4 g fine sea salt
- 50 g sugar
- 4 g instant yeast
- 30 g egg save the rest for egg wash
- 30 g butter softened, unsalted
For sourdough version: prepare sweet stiff starter
- 55 g active starter (100% hydration)
- 165 g bread flour (12.7% protein content)
- 65 g whole milk
- 30 g sugar
For the main dough:
- 58 g bread flour (12.7% protein content)
- 50 g all-purpose flour
- 20 g milk powder
- 4 g fine sea salt
- 50 g sugar
- 30 g whole milk or more as needed
- 1 tsp pandan essence see notes
- 30 g egg
- 30 g butter softened, unsalted
Filling: (the amount is just an estimate)
- 240 g Easy Authentic 10-minute Kaya Jam or use store-bought kaya jam
Egg wash:
- Leftover egg from the recipe above
Instructions
- I use a 9 x 9 inch square pan. Line them with a parchment paper for easy removal.
To make pandan milk:
- Cut the pandan leaves into small pieces. Put the milk in and blend until the pandan leaves are reduced to pulps. Strain the mixture and squeeze out extra liquid from the pulps.
If using sourdough starter:
- This recipe will give you sourdough bread that doesn't taste sour. Why? Because we use a Sweet Stiff Levain, which is built from regular 100% hydration sourdough starter. I don't maintain stiff starter. I build it whenever I need it. I love baking enriched bread/buns and steamed buns using sweet stiff starter.
- I recommend using a starter that is at least two months old and consistently doubles or triples in 4-6 hours when you feed it at 1:1:1 ratio. Young starter will not give the best result
- Mix all ingredients for sweet stiff starter. Cover loosely with a plastic wrap or a lid. It takes about 10-12 hours to double. Since we are using milk instead of water, the stiff starter may not triple and only double, that's normal
Prepare the dough:
- Add all ingredients for the dough except for the butter. Tear the sweet stiff starter into pieces and add into the dough and add pandan essence for sourdough version. Use the dough hook to stir the mixture a bit so the flour won't fly around when you start the mixer. Knead on the lowest speed for 2-3 minutes and then increase to speed 2 and knead for 3 minutes and then speed 4 for another 3 minutes or until it forms a dough that clears the side of the bowl, but not smooth yet
- Add the softened butter and knead on speed 2 for about 2-3 minutes and then increase speed to 4 and knead for 5 minutes or until the dough is soft, smooth, elastic, and slightly sticky to the touch. If you stretch a small portion of the dough thinly and gently, it shouldn't break. This is a windowpane stage
- It is important that the dough is soft, meaning, enough hydration. This will ensure you get a soft fluffy bread texture for more than 24 hours. If the dough feels firm, don't be afraid to add a bit more milk, one teaspoon at a time and knead until you get a soft smooth dough.
First proofing:
- Lightly oil the bowl, cover with a kitchen towel or loosely with plastic wrap, and let rise in a warm place for about 45 minutes to 1 hour, or until double in volume. if it's colder, it may take longer to proof the dough
- For sourdough version, proof for 2 hours at 82 F (28 C). The dough will not double and that's okay
Shaping:
- Knock out all the gas by giving it some kneading. Divide the dough 9 equal portions. Round them up into balls. Cover and let them rest for 5 minutes to relax the gluten
- Refer to the photos above for visual if necessary. Work with one dough at a time. Take one piece of dough and roll it out into roughly a rectangle, about 6 inches long and about 4 inches wide. Put about one tablespoon of kaya filling near the top, then fold the top part over to enclose the kaya filling. Fold the two sides in. Pinch slightly to seal. Use a pizza cutter or a bench scraper to cut the rest of the dough into strips. Roll the dough down to form an-oval shaped bun.
- Place it diagonally on a prepared pan. You can place it however you want. Repeat with the rest of the dough and the kaya filling
Final proofing:
- Cover and let it proof at a warm place until they are really puffy. This may take about 45 minutes to 1 hour. If it is colder where you are, it may take longer
- For sourdough version, it may take 3-31/2 hours or longer for the dough to puff up to about 50%.
- When you gently push on the dough, it should bounce back very slowly and leave some indentation. The dough is done proofing
- 10 minutes before the end of proofing, preheat your oven to 375 F (190 C) for a conventional oven. For a convection oven, lower the temperature by 20 F or 15 C
Baking:
- Apply some egg wash on the surface of the dough. Place the pan in the middle of the oven and bake for 15 minutes or until the buns are nicely golden brown on top and a thermometer should register around 190 F (88 C) at the center of the bread
Cooling:
- Remove the buns from the pan onto a cooling rack. Let the bread cool down to warm or room temperature before serving
Storing:
- Let the bread cool down completely. They can be kept in an air-tight container at room temperature for 2-3 days. The bread stays soft for 3 days in my case when stored properly
- For longer storage, transfer them to a freezer bag, push all the air out and seal the bag. Keep them in the freezer for no more than one month for the best result. Simply thaw at room temperature until soft again. You can reheat in the oven at 350 F (180 C) for 5 minute or until they are warm.
RECOMMEDED TOOLS
Marv’s Recipe Notes
*Nutrition facts are just estimates and calculated using online tools*
How to make pandan kaya milk buns
1. Prepare kaya jam using this recipe or you can use store-bought kaya jam
2.Prepare sweet stiff starter for sourdough version. Mix all ingredients for sweet stiff starter. Cover loosely with a plastic wrap or a lid. It takes about 10-12 hours to double. Since we are using milk instead of water, the stiff starter may not triple.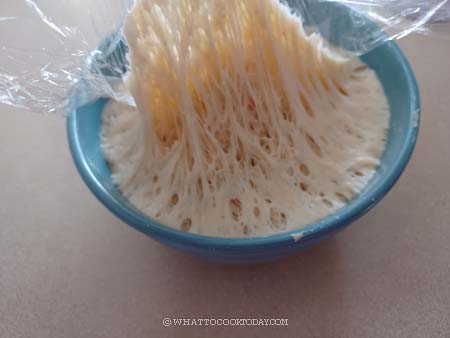
3. I use a 9 x 9 inch square pan. I baked 9 buns in there and 3 in a mini loaf pan. You can use large baking pan to fit them all. Line them with a parchment paper for easy removal. Tear the sweet stiff starter into pieces and add pandan essence into the dough for sourdough version. Add all ingredients for the dough except for the butter. Use the dough hook to stir the mixture a bit so the flour won’t fly around when you start the mixer. Knead on the lowest speed for 2-3 minutes and then increase to speed 2 and knead for 3 minutes and then speed 4 for another 3 minutes or until it forms a dough that clears the side of the bowl, but not smooth yet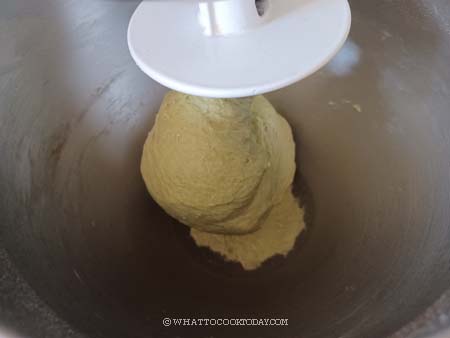
4. Add the softened butter and knead on speed 2 for about 2-3 minutes and then increase speed to 4 and knead for 5 minutes or until the dough is soft, smooth, elastic, and slightly sticky to the touch. If you stretch a small portion of the dough thinly and gently, it shouldn’t break. This is a windowpane stage. It is important that the dough is soft, meaning, enough hydration. This will ensure you get a soft fluffy bread texture that last for few days. If the dough feels firm, don’t be afraid to add a bit more milk, one teaspoon at a time and knead until you get a soft smooth dough.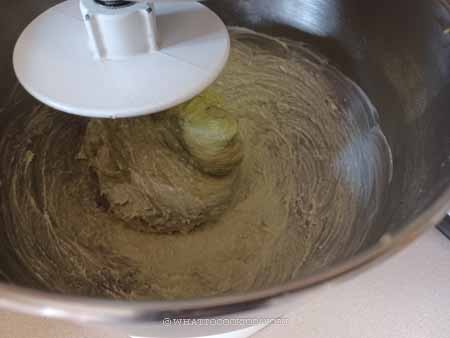
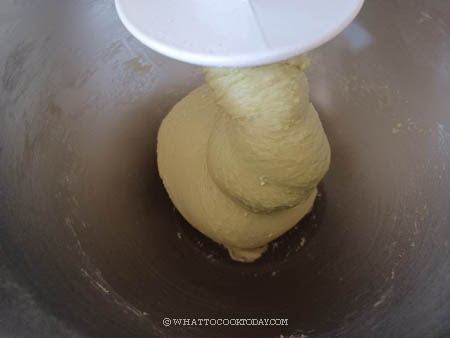
5. Lightly oil the bowl, cover with a kitchen towel or loosely with plastic wrap, and let rise in a warm place for about 45 minutes to 1 hour, or until double in volume. if it’s colder, it may take longer to proof the dough. For sourdough version, proof for 2 hours at 82 F (28 C). The dough will not double and that’s okay
6. Knock out all the gas by giving it some kneading. Divide the dough into 12 equal portions. Round them up into balls. Cover and let them rest for 5 minutes to relax the gluten
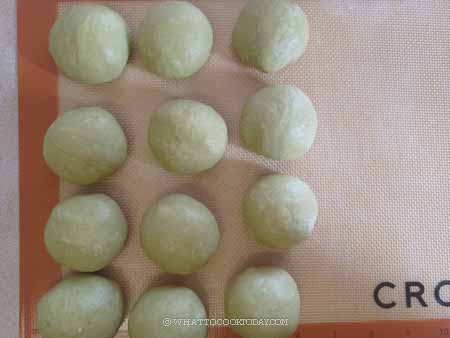
7. Work with one dough at a time. Take one piece of dough and roll it out into roughly a rectangle, about 6 inches long and about 4 inches wide. Put about one tablespoon of kaya filling near the top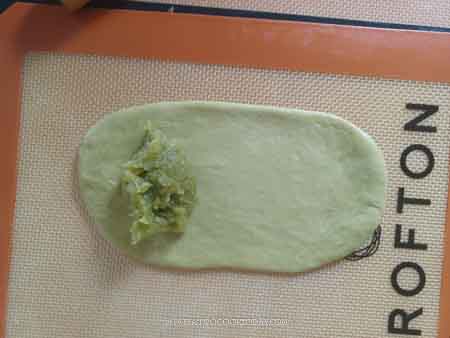
8. Fold the top part over to enclose the kaya filling. Fold the two sides in. Pinch slightly to seal. Use a pizza cutter or a bench scraper to cut the rest of the dough into strips. 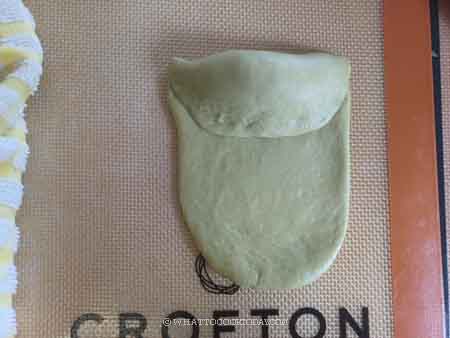
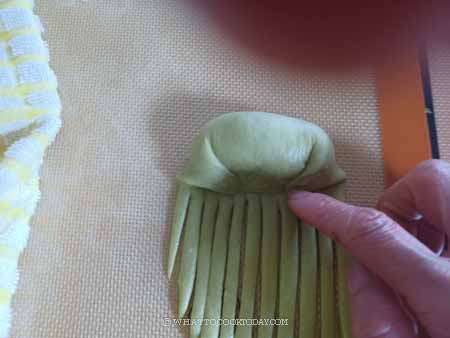
9. Roll the dough down to form an-oval shaped bun.
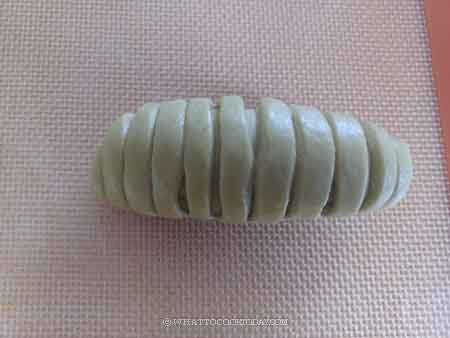
10. Place it diagonally on a prepared pan. You can place it however you want. Repeat with the rest of the dough and the kaya filling
11. Cover and let it proof at a warm place until they are really puffy. For sourdough version, it may take 3-31/2 hours or longer for the dough to puff up to about 50%. This may take about 45 minutes to 1 hour. If it is colder where you are, it may take longer. When you gently push on the dough, it should bounce back very slowly and leave some indentation. The dough is done proofing
12. 10 minutes before the end of proofing, preheat your oven to 375 F (190 C) for a conventional oven. For a convection oven, lower the temperature by 20 F or 15 C. Apply some egg wash on the surface of the dough. Place the pan in the middle of the oven and bake for 15 minutes or until the buns are nicely golden brown on top and a thermometer should register around 190 F (88 C) at the center of the bread
13. Remove the buns from the pan onto a cooling rack. Let the bread cool down to warm or room temperature before serving

Did you make this pandan kaya milk buns recipe?
I love it when you guys snap a photo and tag it to show me what you’ve made. Simply tag me @WhatToCookToday #WhatToCookToday on Instagram and I’ll be sure to stop by and take a peek for real!


2 comments
Where do you buy Pandan essence? Do you recommend a particular bran
I get pandan essence from the Asian store. I use the “butterfly” brand. It is not the best IMHO, but the best I could get where I am. I’ve seen some natural one sold at Amazon https://amzn.to/3Nnxw21 (affiliate link), but it costs a fortune!!!