This post may contain affiliate links. Please read our disclosure policy.
Mochi-like snow skin mooncake is filled with sweet purple sweet potato filling. No artificial coloring is used. The recipe is dairy-free and can be gluten-free.
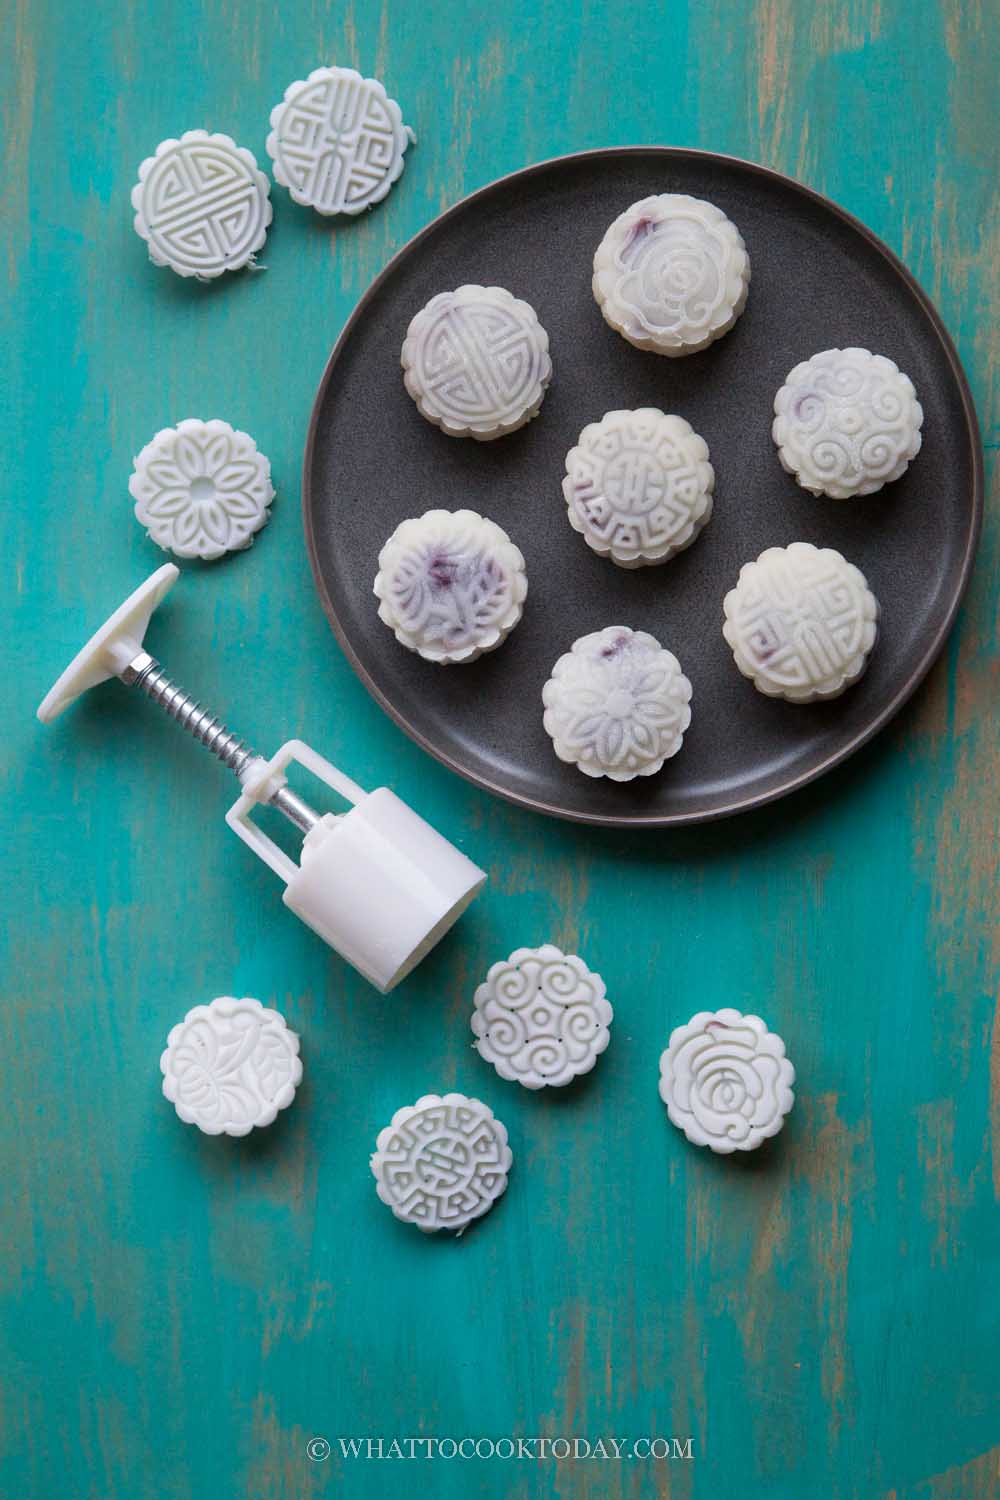
I love making snow skin mooncakes for mid-autumn festival. It is so much easier than making the traditional Chinese mooncakes. My kids like the snow skin mooncakes more than the traditional mooncakes. Snow skin mooncakes are also known as snowy mooncakes, crystal mooncakes, ice skin mooncakes because these are no-bake mooncake and they are chilled in the fridge and hence the name.

How to make snow skin mooncake with purple sweet potato paste filling
1. Place 30 gr of glutinous rice flour on a dry non-stick pan over medium heat. Stir fry for about 15 minutes or until the flour started to smell slightly nutty/toasted. Let it cool down completely. Store in an air-tight container at room temperature and they can be kept for weeks or even months

2. Peel and cut the sweet potatoes into cubes and steam for about 10 minutes or until fork tender. Put this into a blender along with the rest of the ingredients for the paste and blend until smooth

3. Transfer to a non-stick pan or saucepan and cook over medium-low heat and keep stirring until the mixture is no longer sticky, absorbs the oil and leave the sides of the pan
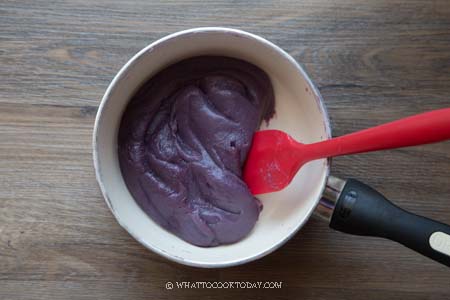
4. Transfer to a clean bowl. Cover with a plastic wrap touching the paste surface to prevent a skin from forming and chill in the fridge for at least 2 hours

5. After at least 2 hours, the paste should be firm and portion out into 25 grams and roll into round balls. Cover and keep them chill in the fridge again until when you are ready to use them

6. Combine all the ingredients in a heat-proof mixing bowl. Strain the dough if necessary to get rid of any lumps. Place this batter in the steamer and steam over high heat for 15 minutes

7. The batter solidifies. Use a spoon to stir the steamed mochi while it’s still hot to form a large mass of dough

8. When it’s cool enough to handle, oil your palm lightly and knead the dough a few times to form a smooth non-sticky dough

9. Since I used 50-gram mould, I portioned the dough into a 25-gram piece. Keep them covered and work with one dough at a time.

10. Flatten the dough and roll out into about 4 inches round. Place the filling in the middle and wrap around it


10. Dust the dough with cooked glutinous flour you prepared earlier. Dust off excess flour. Place this into the mould cavity and press to imprint the pattern on the dough. Repeat with the rest of the dough and filling


11. Transfer to an air-tight container and keep chill in the refrigerator for up to one week. They are best consumed within 3-4 days. The longer you keep, the drier the skin will get

Variations
If you want to make the skin purple in color, you can boil the sweet potatoes instead of steaming and replace the water amount in the recipe with the purple liquid from boiling the sweet potatoes. Make sure the sweet potatoes are not wet or have any excess water when you puree them

Did you make this snow skin mooncake with purple sweet potato filling recipe?
I love it when you guys snap a photo and tag to show me what you’ve made 🙂 Simply tag me @WhatToCookToday #WhatToCookToday on Instagram and I’ll be sure to stop by and take a peek for real!

Purple Sweet Potato Snow Skin Mooncake
Ingredients
Snow skin dough:
- 50 gr glutinous rice flour sweet rice flour/mochiko flour
- 40 gr rice flour
- 20 gr wheat starch not wheat flour,or sub with cornstarch
- 40 gr icing sugar
- 180 ml water
- 20 gr cooking oil
For dusting the dough:
- 30 gr glutinous rice flour sweet rice flour/mochiko flour
Purple sweet potato paste filling:
- 150 gr mashed purple sweet potato
- 70 gr water
- 50 gr condensed milk
- 20 gr coconut oil
- 55 gr coconut cream
- 20 gr cornstarch
- ⅛ tsp salt
Instructions
- Place 30 gr of glutinous rice flour on a dry non-stick pan over medium heat. Stir fry for about 15 minutes or until the flour started to smell slightly nutty/toasted. Let it cool down completely. Store in an air-tight container at room temperature and they can be kept for weeks or even months
Prepare the filling (can be done few days before):
- Peel and cut the sweet potatoes into cubes and steam for about 10 minutes or until fork tender. Put this into a blender along with the rest of the ingredients for the paste and blend until smooth
- Transfer to a non-stick pan or saucepan and cook over medium-low heat and keep stirring until the mixture is no longer sticky, absorbs the oil and leave the sides of the pan
- Transfer to a clean bowl. Cover with a plastic wrap touching the paste surface to prevent a skin from forming and chill in the fridge for at least 2 hours
- After at least 2 hours, the paste should be firm and portion out into 25 grams and roll into round balls. Cover and keep them chill in the fridge again until when you are ready to use them
Prepare the dough:
- Combine all the ingredients in a heat-proof mixing bowl. Strain the dough if necessary to get rid of any lumps. Place this batter in the steamer and steam over high heat for 15 minutes
- Place this batter in the steamer and steam over high heat for 15 minutes. Wrap the lid of the steamer with a cloth to prevent condensation drips onto the dough. If you stick a knife in the middle of the dough, it will come out clean, though the top of the dough may appear a bit watery at first. Use a spoon to stir the steamed mochi while it’s still hot to form a large mass of dough
- Cover with a cloth for about 10-15 minutes so it's not too hot for your hands to knead. Don't use a plastic wrap as condensation will form and drip into the dough, making it wet
- When it's cool enough to handle, oil your palm lightly and knead the dough a few times to form a smooth non-sticky dough. The dough is very elastic and stretchy
- You can also use your standmixer with a dough hook attachment to knead the dough until it's smooth and elastic
Shaping and moulding:
- Since I used 50-gram mould, I portioned the dough into a 25-gram piece. Keep them covered and work with one dough at a time. Flatten the dough and roll out into about 4 inches round. Place the filling in the middle and wrap around it
- Dust the dough with cooked glutinous flour you prepared earlier. Dust off excess flour. Place this into the mould cavity and press to imprint the pattern on the dough. Repeat with the rest of the dough and filling
How to store snow skin mooncakes:
- Transfer to an air-tight container and keep chill in the refrigerator for 3-4 days
- For longer storage, freeze them. Snow skin mooncake freezes well. I put them on a baking tray lined with wax of parchment paper, not touching each other and then put it in the freezer for about one hour. They won't harden completely, but won't stick to each other. Transfer to a freezer bag or container. They can be kept this way for up to 2 months. When ready to serve, thaw at room temperature and they are ready to be served


4 comments
My dough was too sticky.
Did you steam the batter over high heat and then knead it until it’s smooth and elastic ?
Used hand to knead I will try again but next time, might steam a bit longer and will use my mixer to knead 🙂 It still turned out good, just need to keep and eat it cold.
Hi Cathleen, I use my hand to knead too. You don’t need a machine to knead and it shouldn’t take that long to knead it anyway. Sometimes different brand of flour/starch absorbs liquid differently. Maybe you can try to cut down on the water a little bit and see if that helps next time.