This post may contain affiliate links. Please read our disclosure policy.
This super delicious sweet focaccia bread with cinnamon sugar topping is so easy to make and requires no kneading. The bread can be baked on the same day or the next day.

Oh, Focaccia!! Where have you been all my life? I have only started to bake focaccia after I started with sourdough baking more than a year ago! (shame on me!). It’s not that you have to do sourdough to make focaccia really! I think my appreciation for bread baking started after I embarked on the sourdough journey, which was one of the best decisions I’ve made in my life! I have baked countless of focaccia bread since then, but this is my first time publishing it in this blog LOL! (call me lazy!). I’m sorry for the delay! But, I promise you will love how easy and tasty this recipe is!
What is sweet focaccia?
Sweet focaccia is a variation of the traditional savory Italian focaccia bread, but it is made with ingredients that give it a sweet and dessert-like quality. While traditional focaccia is typically seasoned with olive oil, salt, and savory herbs, sweet focaccia incorporates sugar, and various sweet toppings and fillings. We like to have sweet focaccia for breakfast.
Why is focaccia so tasty?
Seriously! Not a single soul living in our house does not enjoy focaccia. My kids beg me to bake focaccia every week. I, of course, don’t mind that either because it’s so easy and tasty! So, yes, why focaccia is so good ? It’s the flavor and the texture if you ask me, and my kids and hubby! The flavor is amazing if you allow the dough to do a long cold fermentation. The crumb is soft, airy, yet chewy/spongy and the top and bottom crust are slightly crisp. The whole combination is just so perfect yet amazing at the same time!
Easy No-Knead Sweet Focaccia Bread with Cinnamon Sugar
Ingredients
- 380 g bread flour (12.7% protein content)
- 297 g water
- 5 g salt
- 2 g instant yeast if you choose longer fermentation
- 7 g instant yeast if you choose same-day bake
- 30 g sugar
- 60 g raisins
For drizzling and to coat pan:
- Olive oil
Cinnamon-sugar topping:
- 2 tsp ground cinnamon
- 50 g brown sugar
- Small pinch of salt
Instructions
Prepare the dough:
- Mix everything for the dough in a large mixing bowl. You will get a shaggy, sticky, and wet dough. Cover the bowl with a cling wrap and let it rest for 30 minutes
Four sets of stretchs and folds:
- After 30 minutes, uncover the plastic wrap and lightly oil your hands and pull the edge of the dough up, sort of wiggling and stretching it up as you pull and fold it towards the center. Repeat this motion until you have gone all around. You probably get about 4 stretches and folds total. Flip the dough to the smooth side. Cover with a wrap again and rest for another 30 minutes
- Repeat with the second, third, and fourth set of stretches and folds every 30 minutes
- After that, I like to transfer the dough to a clean container and oil the container so the dough won't stick. Coat the dough with a bit of oil to prevent it from drying out. Let the dough ferment until almost double in volume.
If not baking on the same day (long fermentation):
- Put the container inside the fridge and let it continue to rise in the fridge for 12-24 hours. This long cold fermentation is when it develops that amazing flavor and great texture
To bake on the same day:
- Cover the dough and let it continue fermenting until it is double or close to double in volume. The temperature of the place I put the dough in was about 82 F (28 C). It takes about 1-2 hours if using yeast. The time highly depends on the temperature
- After that, proceed to the shaping and final proofing
Shaping and Final proofing:
- Oil 9 x 9 pan. This size of pan gives you a thick focaccia. If you prefer a thinner, you can use larger size pan like half-sheet pan (18x 13 inches). Line a parchment paper. Oil the parchment paper on all sides. Scoop the dough into the pan. Use your hands to stretch the dough to fit the pan. Drizzle with a bit of oil and rub the surface with some oil to prevent it from drying out. Cover and let it rest and proof at a warm place until the dough is really puffy and jiggly (full of air). This may take 1-2 hours or longer depending on the temperature
- If you do cold fermentation, this last proofing will take much longer because the dough is cold. It may take 2-3 hours or longer
Preheat oven:
- 15 minutes before the end of final proofing, preheat the oven to 430 F (220 C) for conventional oven, 410 F (210 C) for convection oven
Prepare topping and dimple the dough:
- Mix ground cinnamon, salt, and brown sugar in a bowl
- Sprinkle the cinnamon sugar mixture over the surface of the dough as evenly as you can. Lightly oil your fingers. Use all of your fingers and gently push straight down (not at an angle) into the dough, all the way down to create deep dimples. Lift all of your fingers up and then move to a different spot and create more dimples again. Once you have created dimples, it is best to bake the focaccia right away to maintain those "bubbly" air pockets you created through the dimpling process
Bake:
- Put the pan on the lowest rack and bake for 25-30 minutes if using 9 x 9 inches pan, and about 18-20 minute if using half-sheet pan, or bake until internal temperature is at least 190 F. Since there is sugar topping on top, you want to tent the surface loosely with aluminum foil (shiny side up) after 15 minutes into baking to prevent it from browning too much before the bread is cooked through
Transfer to cooling rack immediately: (to prevent soggy bottom)
- Once the bread is out of the oven, lift the parchment paper up and put it on top of the cooling rack. Carefully peel the parchment paper from the sides and gently slide the bread directly onto the cooling rack. This is to preserve the "crispness" of the bottom part of the bread. If you let it cool down wrapped in the parchment paper, the bottom gets soggy and wet
To serve:
- Let the bread cool down for at least 10 minutes and then serve. They are best served on the same day
Storage:
- Even though focaccia is best on the same day, but from my experience, it keeps well for about 2 days when stored in an air-tight container at room temperature. It may lose it crispness, but this can be easily revived by reheating it
- They also freeze very well. Let them cool completely. Cut into serving slices. Wrap them in plastic wrap and then another layer of aluminum foil won't hurt too. I then put inside a freezer bag, push all the air out and seal. They can be kept in the freezer for one month
To reheat focaccia:
- You don't need to thaw if it's frozen. Spray with a bit of water, loosely wrap in aluminum foil and then reheat in the oven at 375 F (190 C) for 10-15 minutes if frozen, about 5 minutes if not frozen. For the crispy top, you can expose the top and reheat for another 2-3 minutes and serve immediately
RECOMMEDED TOOLS
*Nutrition facts are just estimates and calculated using online tools*
Same-day bake focaccia VS longer fermentation
Both same-day and long-fermentation focaccia can be delicious, but they offer slightly different characteristics, and which one is “better” depends on your preferences and the time you have available. Here’s a comparison of the two:
1. Same-Day Focaccia:
Quick: As the name suggests, same-day focaccia is faster to make. It typically involves shorter rising times, making it a good choice when you want fresh focaccia in a shorter timeframe.
Milder Flavor: Same-day focaccia may have a milder flavor compared to its long-fermented counterpart. The shorter fermentation time means there’s less time for the dough to develop complex flavors.
2. Long Fermentation Focaccia:
Complex Flavor: Focaccia that undergoes a long fermentation period (usually overnight in the refrigerator) has more time for the yeast to work and develop deeper, more complex flavors. This results in a richer and more aromatic bread.
Improved Texture: Longer fermentation also allows for better gluten development, which can result in a more airy and tender crumb. The texture can be more appealing.
Ultimately, the choice between same-day and long-fermentation focaccia depends on your preferences and schedule. If you’re looking for a quick bread to enjoy on the same day, a same-day recipe is ideal. However, if you have the time and patience, long-fermented focaccia often results in a more flavorful and textured bread. Many bread enthusiasts prefer the latter for the depth of flavor and texture it offers. I personally also prefer the long fermentation, but I have also done same-day bake on many occasions and no one in this household has ever complained so far! You might also consider trying both methods to see which one you personally prefer. It can be a fun experiment and a delicious way to explore the nuances of focaccia baking.

How to bake no-knead sweet focaccia bread with cinnamon sugar
1. Mix everything for the dough in a large mixing bowl. You will get a shaggy, sticky, and wet dough. Cover the bowl with a cling wrap and let it rest for 30 minutes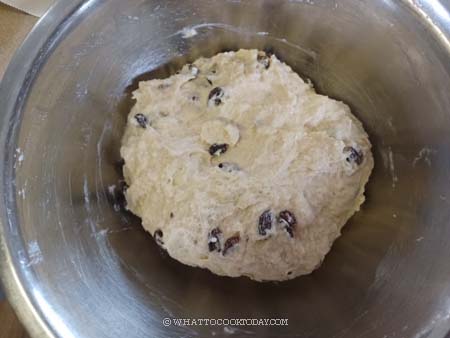
2. After 30 minutes, uncover the plastic wrap and lightly oil your hands and pull the edge of the dough up, sort of wiggling and stretching it up as you pull and fold it towards the center. 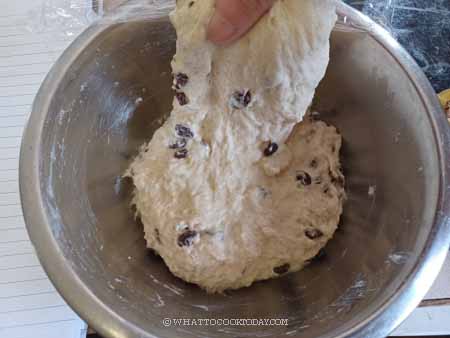
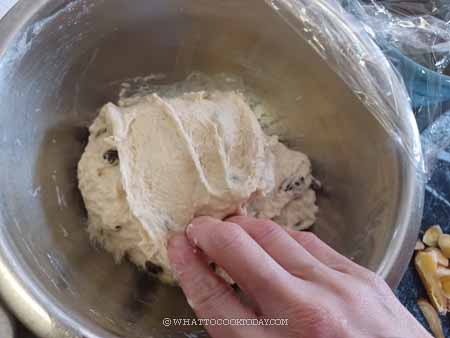
3. Repeat this motion until you have gone all around. You probably get about 4 stretches and folds total. Flip the dough to the smooth side. Cover with a wrap again and rest for another 30 minutes. Repeat with the second, third, and fourth set of stretches and folds every 30 minutes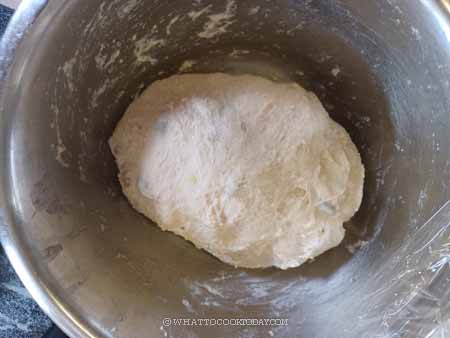
4. After that, I like to transfer the dough to a clean container and oil the container so the dough won’t stick. Coat the dough with a bit of oil to prevent it from drying out. Let the dough ferment until it is almost double in volume. If not baking on the same day: Put the container inside the fridge and let it continue to rise in the fridge for 12-24 hours. This long cold fermentation is when it develops that amazing flavor and great texture. 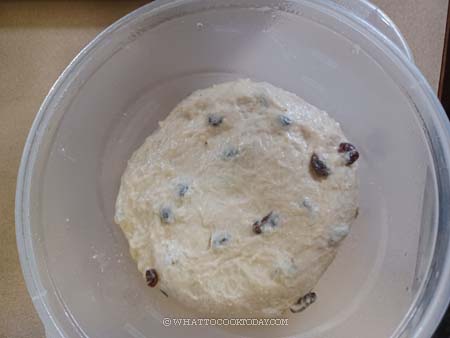
5. If baking on the same day, let the dough rest to proof until double in size at a warm place. This may take 1-2 hours depending on how warm your place is. After that, proceed to the shaping and final proofing.
6. Shape and final proofing. Oil 9 x 9 pan. Line a parchment paper. Oil the parchment paper on all sides. Scoop the dough into the pan. Use your hands to stretch the dough to fit the pan. Drizzle with a bit of oil and rub the surface with some oil to prevent it from drying out. 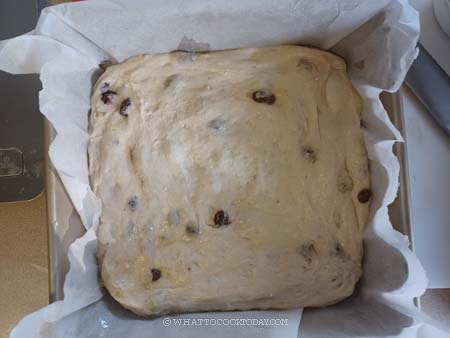
7. Cover and let it rest and proof at a warm place until the dough is really puffy and jiggly (full of air). This may take 1-2 hours or longer depending on the temperature. If you do cold fermentation, this last proofing will take much longer because the dough is cold. It may take 2-3 hours or longer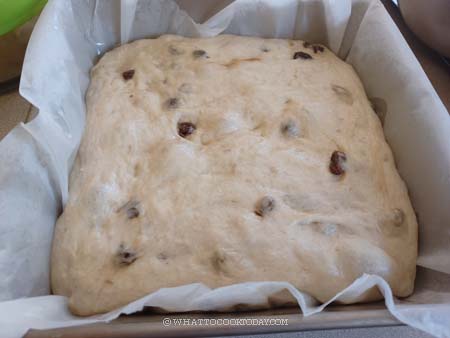
8. 15 minutes before the end of final proofing, preheat the oven to 430 F (220 C) for conventional oven, 410 F (210 C) for convection oven. Prepare the topping by mixing ground cinnamon, salt, and brown sugar in a bowl
9. Sprinkle the cinnamon sugar mixture over the surface of the dough as evenly as you can. Lightly oil your fingers. Use all of your fingers and gently push straight down (not at an angle) into the dough, all the way down to create deep dimples. 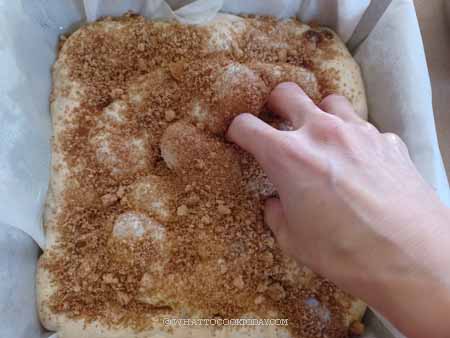
9. Lift all of your fingers up and then move to a different spot and create more dimples again. Once you have created dimples, it is best to bake the focaccia right away to maintain those “bubbly” air pockets you created through the dimpling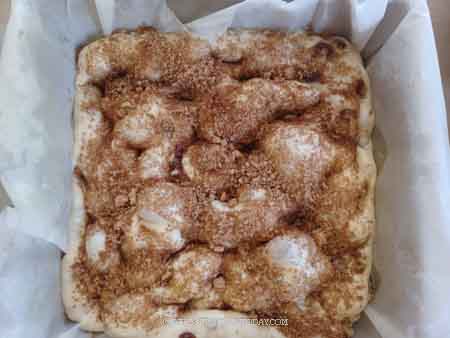
10. Put the pan on the lowest rack and bake for 25-30 minutes or until internal temperature is at least 190 F. Since there is sugar topping on top, you want to tent the surface loosely with aluminum foil (shiny side up) after 15 minutes into baking to prevent it from browning too much before the bread is cooked through
11. Once the bread is out of the oven, lift the parchment paper up and put it on top of the cooling rack. 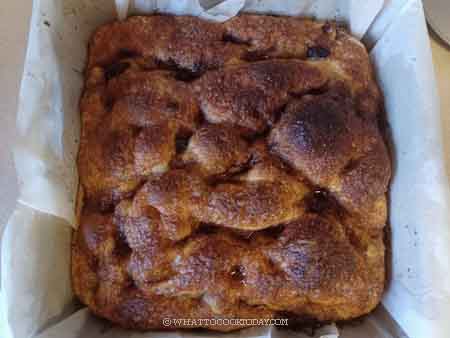
12. Carefully peel the parchment paper from the sides and gently slide the bread directly onto the cooling rack. This is to preserve the “crispness” of the bottom part of the bread. If you let it cool down wrapped in the parchment paper, the bottom gets soggy and wet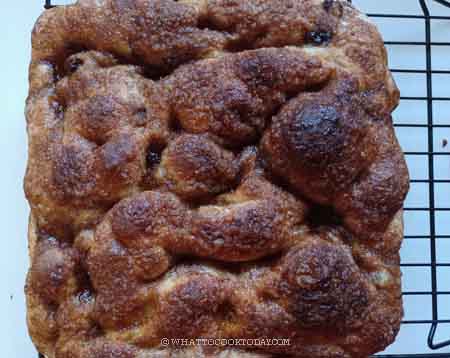
13. Let the bread cool down for at least 10 minutes and then serve. They are best served on the same day

Did you make this recipe?
I love it when you guys snap a photo and tag it to show me what you’ve made. Simply tag me @WhatToCookToday #WhatToCookToday on Instagram and I’ll be sure to stop by and take a peek for real!



2 comments
Can you use active Sourdough starter for this? And if so how much?
Hi Syndi, I haven’t tried it with active sourdough starter, but you can use 100 grams starter (100% hydration) and adjust the amount of flour and liquid based on that.