This post may contain affiliate links. Please read our disclosure policy.
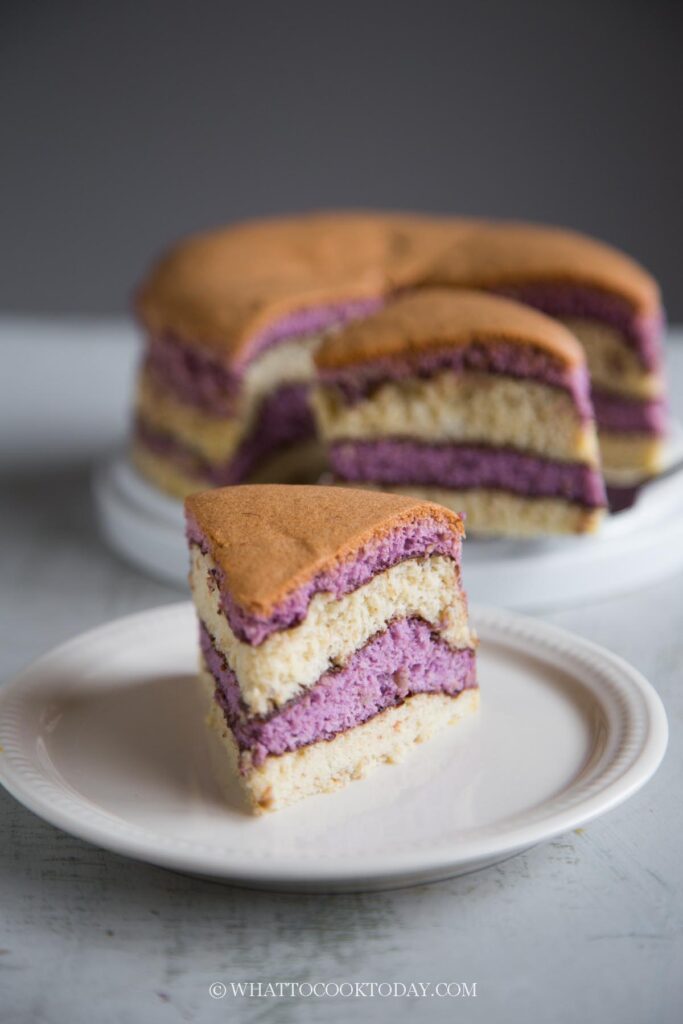
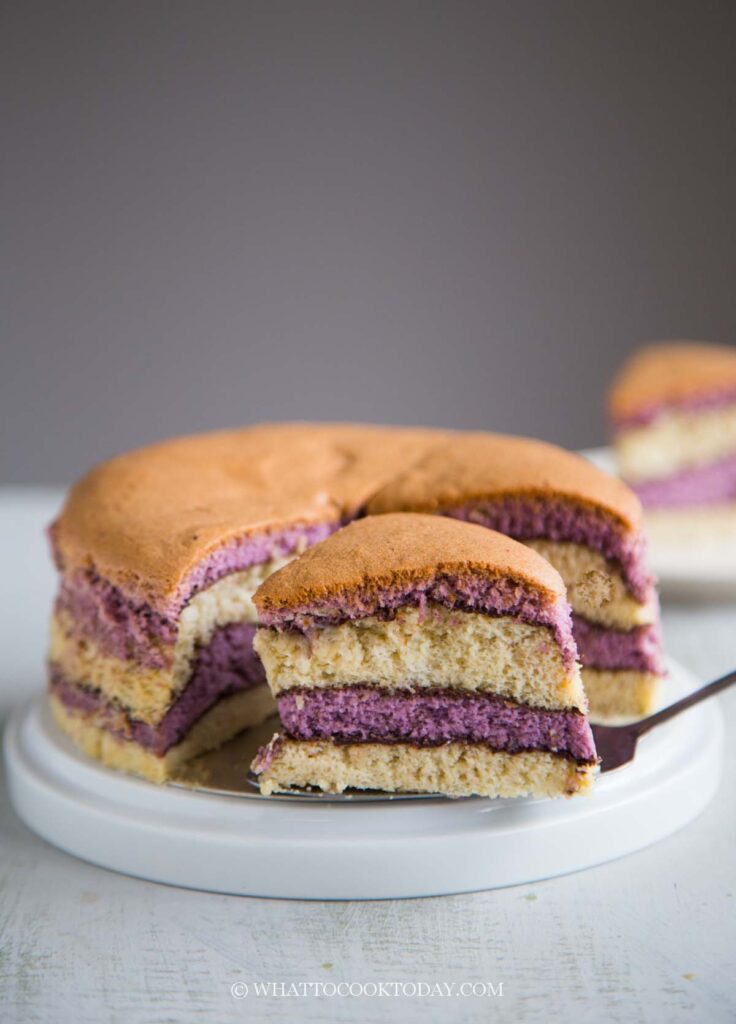
Extremely soft and fluffy Taiwanese-style castella cake infused with banana flavor with a design resembling a topographic (topo) map.
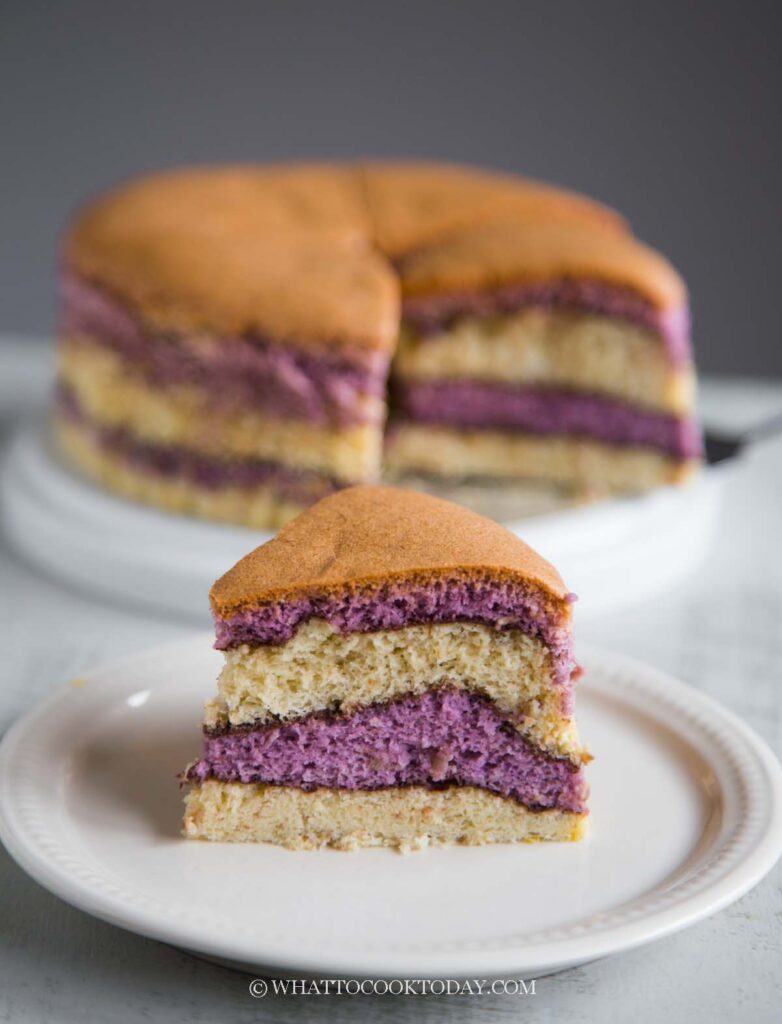
I remember the first time I baked my first Taiwanese castella cake was this Pandan flavor Taiwan castella cake. It was so fluffy that I got hooked immediately and have been baking Taiwanese castella cake quite a bit since then. I had overripen bananas the other day and I thought, it should be put to good use. Overripen bananas may look ugly and nasty (that’s what my kids said), but they are awesome for baking cakes and making desserts that don’t require you to show the bananas. Then I was intrigued to try the topo map design on a cake.
What is topo map cake ?
Topo is short for topography. It is a butter layer cake with a layer design that resembles the topography map. It is a popular cake in Malaysia, also known as kek alunan kasih or waves of love cake, because of the wavy lines. I didn’t make a butter cake. I just use the idea of a topography map on this Taiwan banana castella cake.
Taiwan Banana Castella Cake (Topo Map design)
Ingredients
For 6-inch round cake:
Cake batter:
- 45 g unsalted butter
- 25 g whole milk
- 54 g egg yolks (room temperature) from 3 large eggs
- 55 g all-purpose flour
- 80 g very ripe mashed bananas
Meringue:
- 90 g egg whites (room temperature) from 3 large eggs
- ⅛ tsp fine sea salt
- ½ tsp lemon juice or vinegar
- 40 g sugar
For 8-inch round cake:
- 80 g unsalted butter
- 45 g whole milk
- 5 egg yolks from 5 large eggs
- 99 g all-purpose flour
Meringue:
- 5 egg whites
- ¼ tsp salt
- 1 tsp lemon juice or vinegar
- 70 g sugar
For topo design: (for both 6 and 8-inch cakes)
- A few drops of food coloring I use purple
- Cocoa powder for dusting
Instructions
Things to prepare before you get started:
- Preheat oven to 300 F (150 C) for conventional oven. If you use convection oven, lower the temperature by 20 degrees. Get the eggs out from the fridge for about 15 minutes, to let them come to room temperature
- We will bake the cake in a water bath. Get another larger pan and fill it up with water, about 1 inch full and put inside the oven, on the middle rack. So the water will heat up together with the oven
- I use 6-inch round cake pan, about 3 inches in height, with a loose-bottom/removable bottom piece. You can use 7-inch round cake pan too, but the cake will be shorter. Line your cake pan with parchment paper on the bottom and the sides. Line the sides and the bottom with parchment paper. If you use a loose-bottom pan, put the pan inside another pan. I found that water still manages to sip in when I just double wrapping with aluminum foil
Prepare the cake batter:
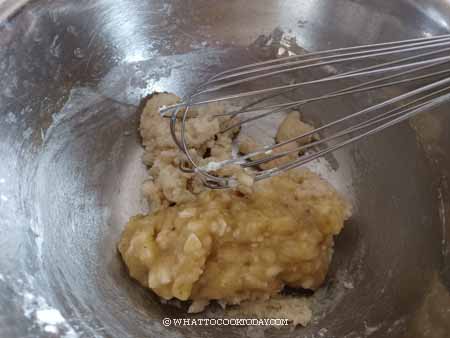
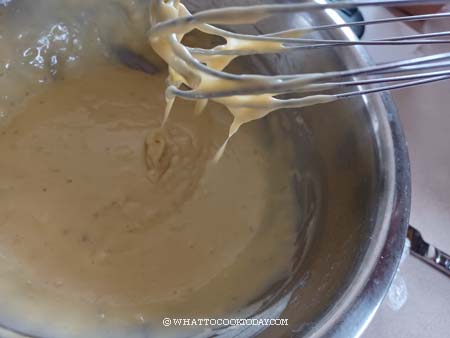
- Put the butter in a small saucepan over medium-low heat and heat up until the butter melts, don't bring it to boil or simmer. Add the flour and stir. It will be thick at first. Add the milk, egg yolks, mashed banana and whisk to combine. The batter will be medium thick at this point
Prepare the meringue:
- Beat egg whites with salt on low speed until foamy, then add vinegar/lemon juice and continue beating for another minute and then increase the speed to medium (speed 6 on KA) and add sugar in 3-4 batches and continue to beat until you get a medium-soft peak. When you lift the meringue up with a whisk, the tail will bent. Do not overwhip the meringue
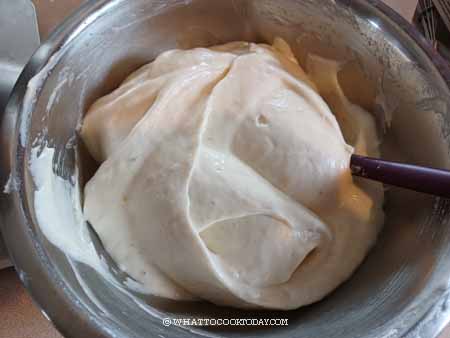
Fold the meringue into the cake batter:
- Add 1/3 of the meringue into the cake batter. Use a whisk to fold over to combine and when you get to the last 1/3 of meringue, switch to a spatula and swipe down and fold over to combine to make sure you scrape the bottom of the bowl to make sure the batter is folded with the meringue evenly. Work gently but fast
To create topo design:
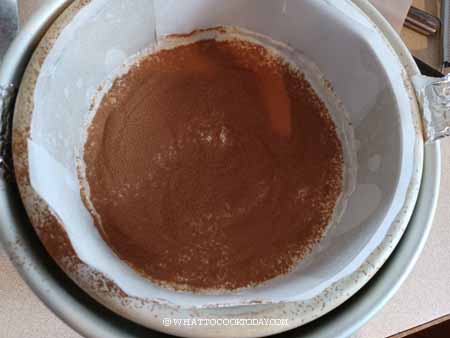
- Remove half of the cake batter into another bowl and add a few drops of purple food coloring (or ube extract). If you don't want purple, you can do other color. Or if you choose not to do any color, you can skip this step. Your cake will be the same color throughout, with visible " topo lines" thanks to the cocoa powder
If your topo design has two colors:
- Pour half of the no-color batter into the pan. Shake the pan a bit to distribute the batter evenly or use a rubber spatula to help you spread. Use a fine-mesh sieve to dust the cocoa powder evenly on top of the batter. Then gently pour 1/2 of the purple batter on top, trying not to "disturb" the layer at the bottom as much as you can. Use a rubber spatula to gently help you spread the batter evenly. Dust with more cocoa powder evenly on top of the batter. Pour the last no-color batter into the pan. Dust with cocoa powder. Finish up with the purple color batter. Spread evenly with a rubber spatula
If your topo design only has one color:
- Pour 1/4 of the batter into the pan. Shake the pan a bit to distribute the batter evenly or use a rubber spatula to help you spread. Use a fine-mesh sieve to dust the cocoa powder evenly on top of the batter. Then gently pour the next 1/4 of the batter on top, trying not to "disturb" the layer at the bottom as much as you can. Use a rubber spatula to gently help you spread the batter evenly. Dust with more cocoa powder evenly on top of the batter. Pour the next 1/4 of the batter into the pan. Dust with cocoa powder. Finally, finish up with the rest of the batter. Use a rubber spatula to smooth the surface of the batter
Bake the cake:
- Very carefully transfer the cake pan and put it inside the larger pan with water that you prepared earlier. Bake for the next 1 hour to 1 hour 30 minutes for 6-inch round cake. You can start checking on the cake at about 1 hour mark. For 8-inch round cake, bake for about 1 hour 50 minutes, start checking at about 1 hour 30 minute mark. The cake should bounce back when you gently touch it. It should be dry to touch. A cake tester should come out clean with maybe a few crumbs but it shouldn't be wet. If it's still noticeably wet, bake for another 5 minutes and check again
Cooling down:
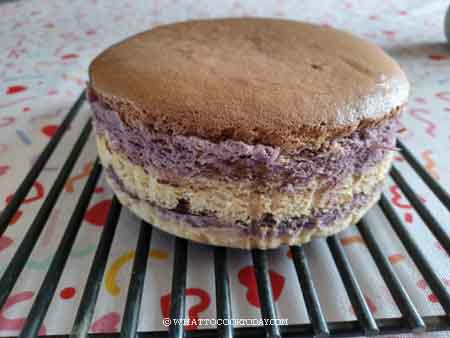
- Remove from the oven and immediately and bang on the countertop a few times to minimize shrinkage. Then immediately push the cake out from the cake pan and peel off the parchment paper on the side
- Place on a cooling rack and let it cool down completely this way before cutting. The cake will jiggle when you pat on it. It will stop jiggling once the cake has cooled down completely
To serve:
- Use a serrated knife to cut the cake so you won't squish down the cotton soft cake. The castella cake can be kept at room temperature for 3 days in an air-tight container. If you are patient enough, serve it the next day and the flavor gets even better
RECOMMEDED TOOLS


*Nutrition facts are just estimates and calculated using online tools*
How to bake Taiwan banana castella cake (with topo map design)
1. Preheat oven to 300 F (150 C) for a conventional oven. If you use a convection oven, lower the temperature by 20 degrees. Get the eggs out from the fridge for about 15 minutes, to let them come to room temperature
2. We will bake the cake in a water bath. Get another larger pan and fill it up with water, about 1 inch full, and put it inside the oven, on the middle rack. So the water will heat up together with the oven
3. I use a 6-inch round cake pan with a loose-bottom/removable bottom piece. Line your cake pan with parchment paper on the bottom and the sides. Line the sides and the bottom with parchment paper. If you use a loose-bottom pan, put the pan inside another pan. I found that water still manages to sip in when I just double-wrap wrapping with aluminum foil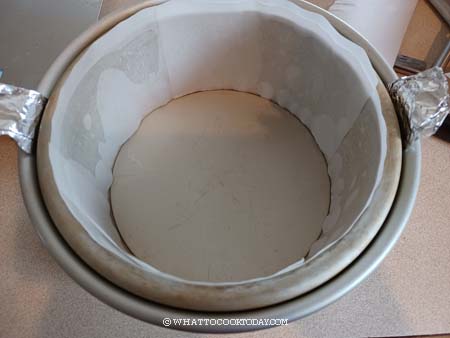
4. Put the butter in a small saucepan over medium-low heat and heat up until the butter melts, don’t bring it to boil or simmer. Add the flour and stir. It will be thick at first. Add the milk, egg yolks, mashed banana and whisk to combine. The batter will be medium thick at this point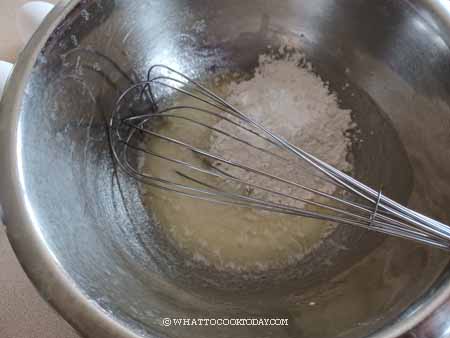

5. Beat egg whites with salt on low speed until foamy, then add vinegar/lemon juice and continue beating for another minute and then increase the speed to medium (speed 6 on KA) and add sugar in 3-4 batches and continue to beat until you get a medium-soft peak. When you lift the meringue up with a whisk, the tail will bent. Do not overwhip the meringue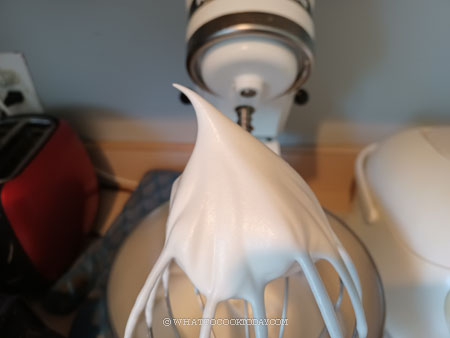
6. Add 1/3 of the meringue into the cake batter. Use a whisk to fold over to combine and when you get to the last 1/3 of meringue, switch to a spatula and swipe down and fold over to combine to make sure you scrape the bottom of the bowl to make sure the batter is folded with the meringue evenly. Work gently but fast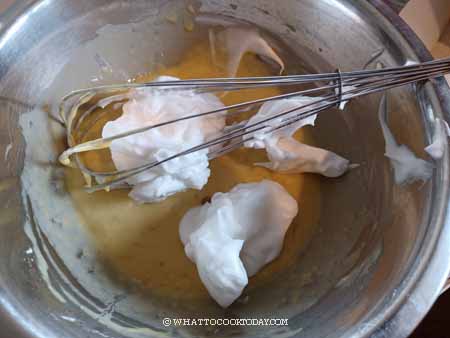
7. Remove half of the cake batter into another bowl and add a few drops of purple food coloring (or ube extract). If you don’t want purple, you can do other color. Or if you choose not to do any color, you can skip this step. Your cake will be the same color throughout, with visible ” topo lines” thanks to the cocoa powder
8. Pour half of the no-color batter into the pan. Shake the pan a bit to distribute the batter evenly or use a rubber spatula to help you spread. Use a fine-mesh sieve to dust the cocoa powder evenly on top of the batter. 
9. Then gently pour 1/2 of the purple batter on top, trying not to “disturb” the layer at the bottom as much as you can. Use a rubber spatula to gently help you spread the batter evenly. Dust with more cocoa powder evenly on top of the batter. 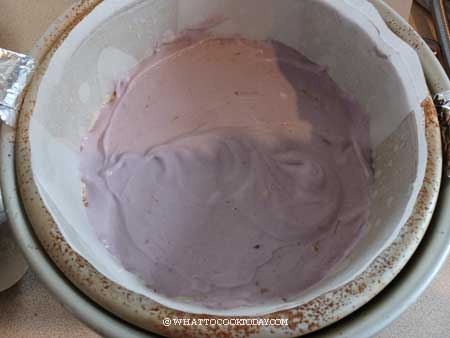
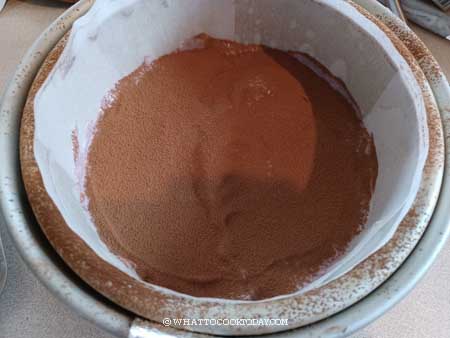
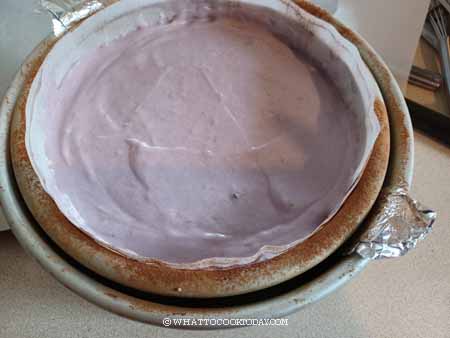
10. Pour the last no-color batter into the pan. Dust with cocoa powder. Finish up with the purple color batter. Spread evenly with a rubber spatula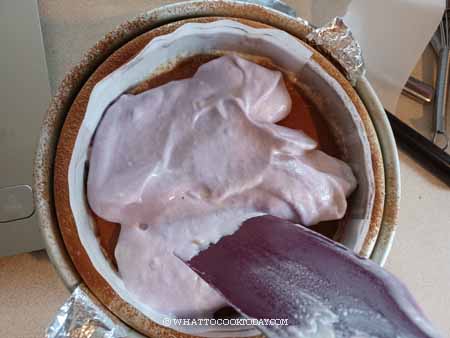
11. Very carefully transfer the cake pan and put it inside the larger pan with water that you prepared earlier. Bake for the next 1 hour to 1 hour 30 minutes for 6-inch round cake. You can start checking on the cake at about 1 hour mark. For 8-inch round cake, bake for about 1 hour 50 minutes, start checking at about 1 hour 30 minute mark. The cake should bounce back when you gently touch it. It should be dry to touch. A cake tester should come out clean with maybe a few crumbs but it shouldn’t be wet. If it’s still noticeably wet, bake for another 5 minutes and check again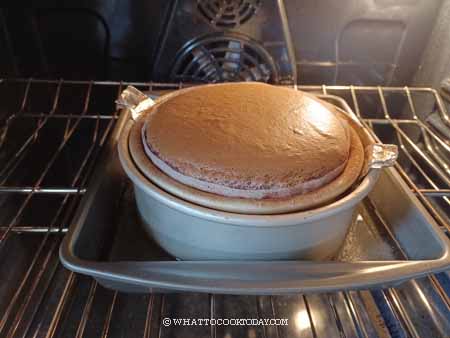
12. Remove from the oven and immediately and bang on the countertop a few times to minimize shrinkage. 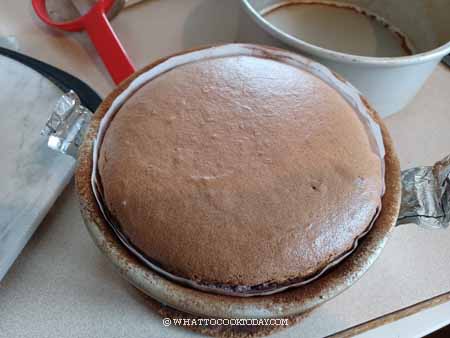
13. Then immediately push the cake out from the cake pan and peel off the parchment paper on the side. Place on a cooling rack and let it cool down completely this way before cutting. The cake will jiggle when you pat on it. It will stop jiggling once the cake has cooled down completely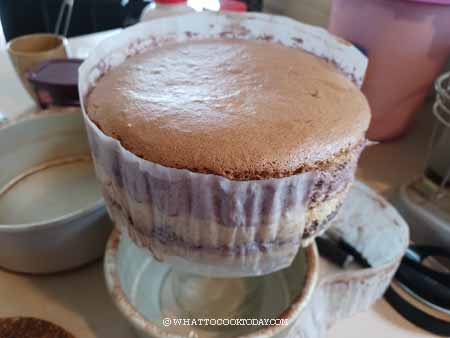
14. Use a serrated knife to cut the cake so you won’t squish down the cotton soft cake. The castella cake can be kept at room temperature for 3 days in an air-tight container. If you are patient enough, serve it the next day and the flavor gets even better
Did you make this Taiwan banana castella cake with topo map design recipe?
I love it when you guys snap a photo and tag it to show me what you’ve made. Simply tag me @WhatToCookToday #WhatToCookToday on Instagram and I’ll be sure to stop by and take a peek for real!

