This post may contain affiliate links. Please read our disclosure policy.
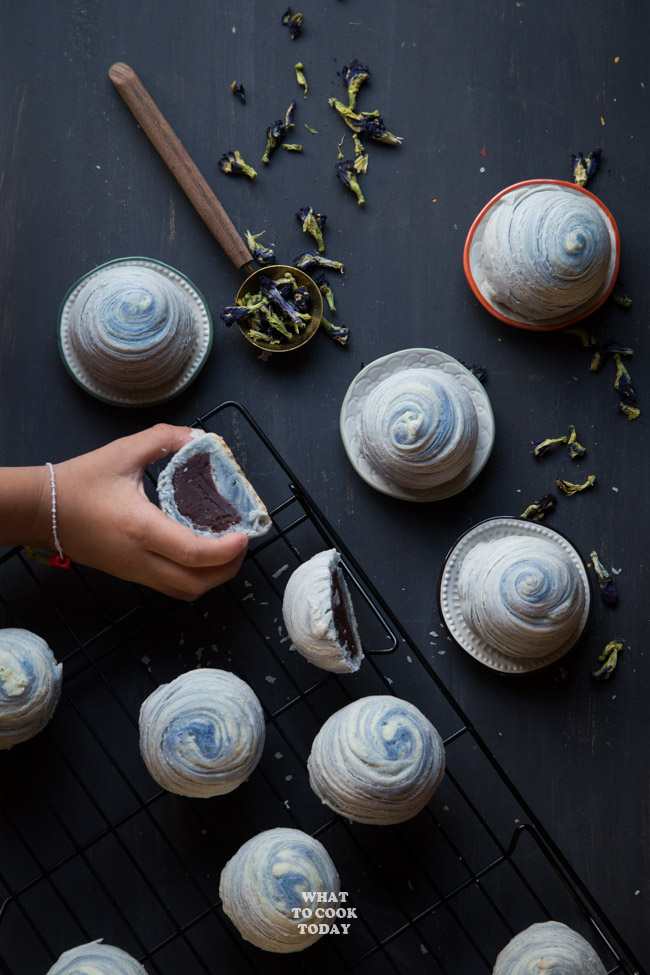
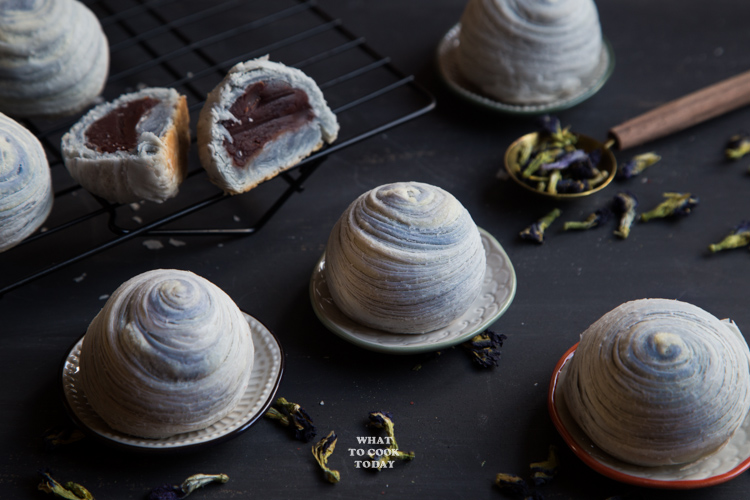
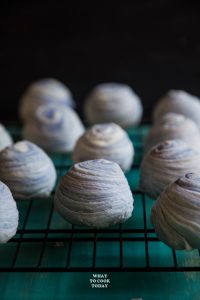
Teochew Red Bean Spiral Thousand Layer Mooncake- Pastry-style mooncakes are filled with sweetened red bean paste and made with coconut oil instead of lard and colored with natural juice from blue pea flowers. Ultra flaky crust you will absolutely love!
Mooncake festival is next monday and I’m a little late with posting this Teochew style red bean paste thousand layer mooncake. But, better late than never they say! I actually made these out of a whim! I had all the ingredients on hand and decided to spend the time I didn’t really have to make these! LOL! BUT, the family loves them so I guess that’s worth it!
TRADITIONAL TEOCHEW MOONCAKE
I grew up with traditional Teochew mooncake. Basically, it’s a pastry-style mooncake made with lard for the outer flaky crust and inside the pastry is sweetened lotus filling. There are also version with savory filling. The mooncake is usually “stamped” with red stamp on top of the cake (the Chinese likes red remember? LOL). Unlike these thousand layer mooncake that shape like a ball, traditional Teochew mooncake is shaped like a disc.
TEOCHEW SPIRAL THOUSAND LAYER MOONCAKE
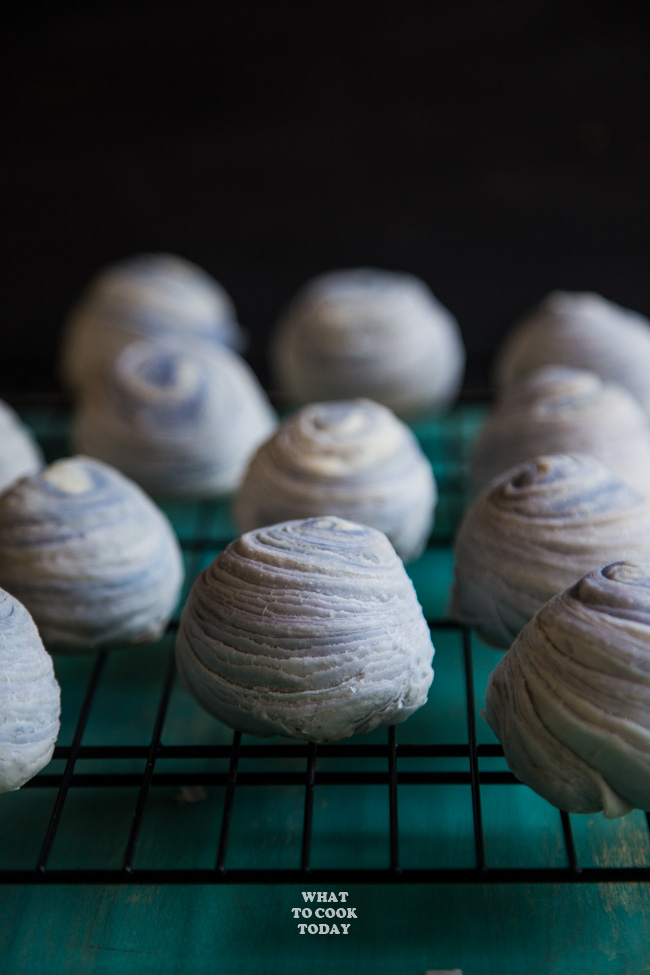
The spiral thousand layer mooncake is not something I’ve known as a kid, but sure has gained popularity in the past decade probably! Nobody really knows for sure how it came about but the inspiration is definitely from the traditional disc-shaped Teochew mooncake. It reminds me of the spiral curry puff that is very popular in Singapore.
Most people like to fill this spiral thousand layer mooncake with sweetened yam paste. I don’t feel like making any filling from scratch (I shouldn’t even be spending time making these mooncakes to begin with LOL!). I still have ready-made sweetened red bean paste and that’s what I use. They still turn out very delicious. The kids love them.
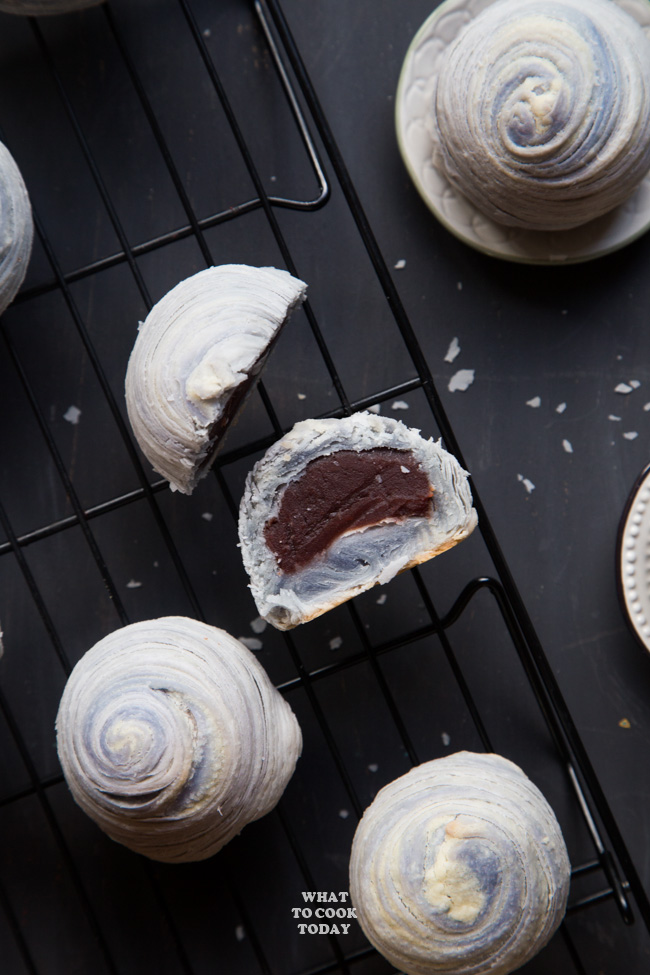
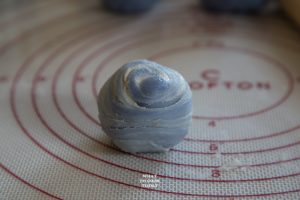
As I’m trying to minimize the use of artificial coloring, I use dried blue pea flower juice to color the mooncake.
HOW TO EXTRACT BLUE PEA FLOWER JUICE:
1. Start with warm water (in this case 80 gr of warm water)
2. Add 1/4 cup of dried blue pea flower (add more if you want a more intense color)
3. Let them steep for at least 15 minutes
4. Squeeze out any extra liquid from the flower, discard them and you have yourself some blue pea flower juice


HOW TO STORE TEOCHEW THOUSAND LAYER MOONCAKES
How to store flaky pastry like this
1. Let them cool down completely on a cooling rack
2. If you plan to eat them the next day or two, keep them in paper bag. Push all the air out and fold over. The paper bag can help to retain the crisp and flakiness at least for a day or two
3. For longer storage, put the whole paper bag inside a freezer bag. Push all the air out and seal the bag. They can be kept for up to 3 months in the freezer
4. Thaw them at room temperature and then reheat briefly in the oven or an air-fryer at 350 F for 8-10 minutes or until crisp again

HOW TO REHEAT TEOCHEW THOUSAND LAYER MOONCAKES
They tend to lose that flakiness after refrigeration, but you can “recrisp” them with:
1. Air fryer
Set the temperature to 350 F and reheat for about 5 minutes and they are as good as new
2. Oven
Set the temperature to 350 F and bake for about 5 – 8 minutes

Did you make this Teochew red bean spiral mooncake recipe?
I love it when you guys snap a photo and tag to show me what you’ve made 🙂 Simply tag me @WhatToCookToday #WhatToCookToday on Instagram and I’ll be sure to stop by and take a peek for real!
You may also like this Teochew Rainbow Spiral Yam Mooncake

Recipe is adapted from Bake For Happy Kids’. The mooncakes do not taste so heavy (a.k.a sinful) but love that it’s still flaky and the family still enjoyed them.
Teochew Red Bean Spiral Thousand Layer Mooncake
Ingredients
Water dough (Blue layer):
- ¼ cup dried blue pea flower (packed) see notes 1
- 80 gr hot water
- ¼ tsp vinegar
- 60 gr shortening see notes 2
- 2 Tbsp sugar
- 180 gr all-purpose flour
Oil dough:
- 180 gr all-purpose flour
- 100 gr shortening see notes 2
Filling:
- 600 gr red bean paste filling less amount if you use salted egg yolks in the filling
- 12 salted egg yolks optional, I didn't use in this recipe
Instructions
Prepare blue pea flower juice
- Add the blue pea flower and vinegar to 80 gr of warm water. Let them sit for 15 minutes. Use the back of the spoon to lightly mash the flower. Squeeze out any liquid from the flowers and you have the blue color liquid now
Prepare the filling (without salted yolk):
- I use a store-bought red bean paste and roll the paste into about 50 gr balls. Set aside
Prepare the filling (with salted yolk):
- If you plan to use egg yolk, you need a smaller ball, about 30-35 gr. Roll into balls. Flatten with your palm to about 4-inch circle. Place one salted egg yolk in the middle and wrap the bean paste around it. Continue with the rest
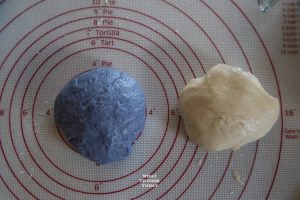
Prepare the water dough:
- Add sugar to the warm blue liquid. In a large mixing bowl, rub the shortening into the flour. It will feel crumbly. Gradually add the blue liquid and continue to mix and knead until you form a non-sticky dough. Cover and let it rest for 30 minutes
Prepare the oil dough:
- Rub the shortening into the flour until it forms a smooth dough. Cover and let the dough rest for 30 minutes

Shaping:
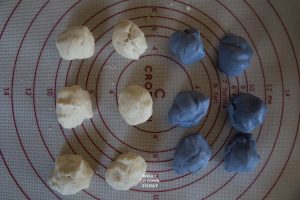
- Give both dough a few kneads and they should be smooth now. Divide the water dough and oil dough each into 6 equal portions
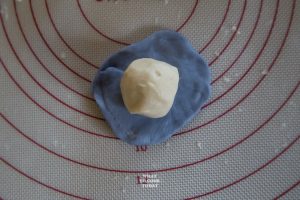
- Keeping the rest covered, take one oil dough and one water dough. Flatten the water dough and place one oil dough in the middle
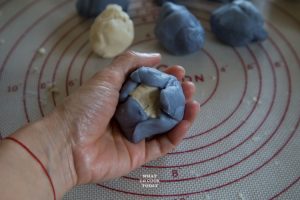
- Wrap the water dough around the oil dough. So the oil dough is nested inside the water dough now. Repeat with the rest of the doughs
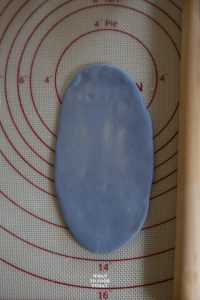
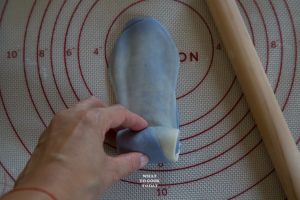
- Use a rolling pin to roll this dough into a flat oval shape
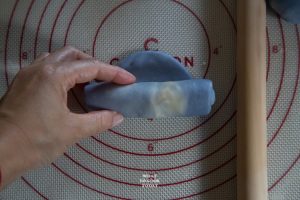
- Roll it up tightly starting from the bottom like a Swiss roll
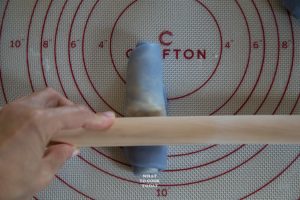
- Turn the dough vertical and roll it out again
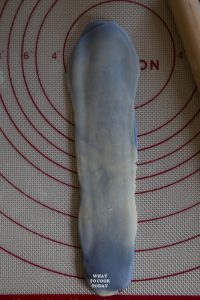
- Now you have a long flat strip of dough. Roll it as thin as you can as it will give you more spiral in the finished products later
- Roll it up tightly again starting from the bottom into a Swiss roll
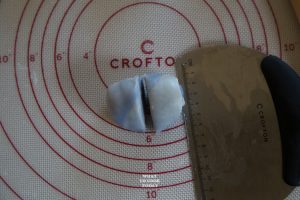
- Cut this into half
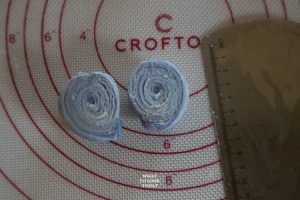
- Here is how the cut-side looks like (all those beautiful spirals are right here after baking!). Keep them covered tightly and rest for another 30 minutes before rolling them out
- Work with one at a time, flip the cut side down and use a rolling pin to roll it out into a circle, about 7-inch in width
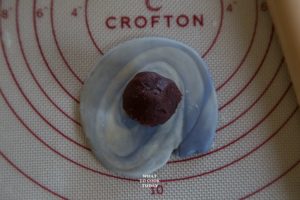
- Place the filling in the middle
- Gather the sides to wrap the filling. Pinch to seal at the bottom. When you flip it over, this is how it looks like. Place them on a baking sheet lined with parchment paper
- Repeat with the rest of the doughs. Preheat your oven to 350 degrees while you are halfway through working with the dough


Baking:
- Place the baking sheet, 3rd rack from the top into the oven and bake for about 20-25 minutes or until the bottom is golden brown. Remove from the oven and let them cool on the baking sheets for 5 minutes and then remove to cooling rack to let them cool down completely
Serving and storing:
- They can be served on the same day after baking, but I feel like they taste better the next day as the flavor has time to develop. They can be kept at room temperature for 2-3 days in an air-tight container or if you want to preserve the flaky crust, store them in a paper bag, fold it over. The crust will soften in the next few days, which is normal. Simply reheat in the oven at 350 F (180 C) for 5 minutes or so and they are as good as new
- They also freeze very well. I wrap each in a cling wrap and then put in a freezer bag, push all the air out and seal the bag. Keep them in the freezer for one month max. When ready to serve, simply thaw at room temperature and you can recrisp it in the oven at 350 F (180 C) for 5 minutes or so
Marv's Recipe Notes
- If you decide to use food coloring: you can use 80 gr water with food coloring if you want
- If you use coconut oil, make sure it's not in liquid. If it's really warm where you are, I recommend using shortening or lard because it's a bit hard to work with coconut oil as they get melty so quickly. You can refrigerate the coconut oil briefly until they turn solid, but once you touch the dough a lot, they get melty in warm weather

21 comments
Hi there,
I have 3 questions:
1. for step 11. Do I need to rolling pin it gently or it doesn’t matter. Will it affect the spiral?
2. (Still on step 11) the middle portion needs to be thin or slightly thicker before i put in the filling?
3. Im using Ghee (replacement for lard). I also noticed much spiral is not obvious. Not too sure why.
Hello,
To answer your questions:
1. I just roll it normally, not necessarily extra gentle or anything. Try not to rip out the dough as much as you can. You can dust with a bit of flour (not too much) if the dough gets a bit sticky
2. The middle don’t have to be thicker. It’s just the same thickness all around
3. I’ve never tried it with Ghee, but I think it should be an okay replacement and your product should be much more flavorful compared to shortening. As for the spiral pattern, It could be because of the Ghee too, it may not be as obvious compared to using shortening
Hi, may I know what is coconut oil in solid state?
It’s like the consistency of shortening or softened butter, not melty. I hope it makes sense. You may need to refrigerate it a bit to firm it up, but if it’s really warm where you are, it may be a bit hard to work with coconut oil as they melt so quickly compared to using shortening
Thanks for replying Marv 🙂
Hi..May I know how to keep it fresh and flaky after bake? So that when consume do not need to heat it again.
Hi, with a pastry like this especially the one that has filling, they may not stay flaky for more than 24-36 hours without reheating to crisp it up. You can try storing them in a paper bag and roll the bag to close. I usually just crisp it up in the toaster oven or air fryer when they are no longer flaky.
Hi! Thanks for the recipe. Your mooncakes look beautiful. My pastry doesn’t have obvious flaky layers like yours. Any idea why? Thanks!
Hi Fye, may I know what type of fat you use? and did you see the spiral pattern on the dough after finished wrapping the filling inside the dough?
Hi, just wondering, is it possible to make the dough in advance and either freeze or keep it refrigerated after step 8? So that we can just defrost them and have them freshly baked whenever we want them!
Hi Alicia, yes, you can do that too and when you are ready to bake, you can defrost them in the fridge. YOu can also finish filling and shaping them and then place them on a baking tray lined with a parchment paper, not touching each other, and freeze them for about an hour and then transfer to a freezer bag and they won’t stick to each other anymore. You can bake these whenever you want. You don’t need to thaw them and bake at the same temperature but may need a slightly longer time, maybe add 5-8 minutes, or until they are cooked through.