This post may contain affiliate links. Please read our disclosure policy.
Learn how to make this twice-baked Jewish chocolate almond Mandel bread drizzled with chocolate. This chocolate almond Mandel bread is a must-try!

What is Mandel bread?
Mandel bread is a traditional Jewish Ashkenazi holiday cookie. Mandel means almond and brot means bread in German and Yiddish. You may think that mandel bread is a biscotti at a glance. Well, they look like biscotti. They can be baked until crispy and crunchy like biscotti OR bake them not as long and you get a softer more bread-like texture with that crisp texture on the edge. I honestly like them either way. Mandel bread tastes richer to me compared to Italian biscotti.
Why you’ll like this recipe
1. Easy
This recipe is very easy to put together. You do need a hand mixer to briefly mix the wet ingredients
2. No need for overnight chilling
The dough can be baked straight away and does not require overnight chilling as most recipes do
3. Intense chocolate flavor
Not only do you get the intense chocolate flavor from the cocoa powder and instant coffee, there are also chunks of chocolate pieces and chunks of almonds in the cookies. So good!

Jewish Chocolate Almond Mandel Bread (Mandelbrot)
Ingredients
- 1 ½ tsp instant epresso powder
- 2 tsp hot water
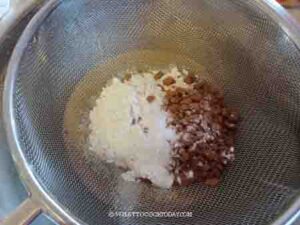
Dry ingredients:
- 160 g all-purpose flour plus more for dusting
- 32 g cocoa powder
- ½ tsp salt
- ½ tsp baking powder
- ¼ tsp baking soda
Wet ingredients:
- 1 tsp vanilla extract
- 113 g dark brown sugar
- 50 g sugar
- 57 g oil
- 50 g egg from one large-size egg
- 18 g egg yolk one egg yolk from large-size egg
Add ons:
- 60 gr almond chopped
- 43 gr bittersweet chocolate (60% cacao) chopped
For decorating:
- 57 gr bittersweet chocolate (60% cacao) chopped
Instructions
Prepare the dough:
- Preheat the oven to 350 F (180 C) for a conventional oven. If you have a convection oven, lower the temperature by 20 F or 15 C. Position one of the oven rack 3rd from the top and the other one 3rd from the bottom if you are going to bake two trays at the same time. Otherwise, just position one rack in the middle of the oven if you only bake one tray
- Line two large baking sheets with parchment paper.
- Dissolve instant espresso powder in hot water. Set aside to let it cool down a bit

- Whisk all the dry ingredients together to combine
- Combine dark brown sugar, sugar, oil, vanilla extract, whole egg, egg yolk, and espresso in a bowl using a hand mixer on high speed until light, about 5 minutes. You can whisk this manually by hand too. Add the instant espresso and whisk to combine.
- Sift in the dry ingredient and fold all ingredients together using a sturdy spatula until they are well-combined and you don't see any pockets or dry bits of flour. Fold in the chopped almond and chocolate
- The dough is actually going to be wet and sticky.
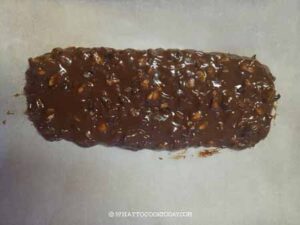
- Use a spatula and scoop half of the dough onto a baking sheet you have lined up with parchment paper.
- Spray the spatula and your palms with non-stick spray and use them to help you shape the sticky dough to about 12-14 inches in length and about 2-2 1/2 inches wide. It's not going to be a perfect rectangular, but no worries there
- Repeat the same with the other half of the dough. Scoop it to another prepared baking sheet


First baking:
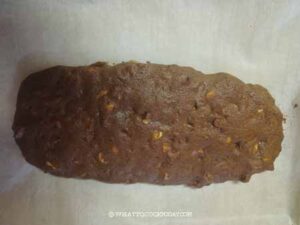
- Place the baking sheets at the position racks and bake for 25-30 minutes and rotate the pan halfway through baking, top to bottom, front to back if you bake two trays. The bread should be dry to touch at the end of baking
- Remove from the oven and let them cool down for 20 minutes. Lower the temperature to 250 F (120 C) for a conventional oven. For a convection oven, lower the temperature by 20 F or 15 C
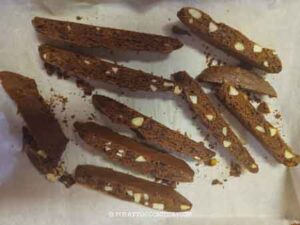
- Use a serrated knife to slice the bread at a diagonal into 3/4-inch thick slices. You may roughly get about 9-10 whole pieces and 2 smaller end pieces (which you can snack on as your treat)
- If you prefer a "soft-baked" texture, you can skip the second baking and go straight to "cooling" step
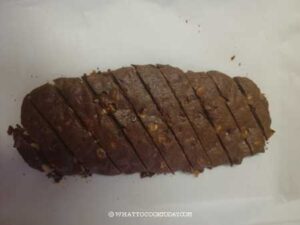
Second baking:
- Turn the cut-side on their sides and bake for another 20 minutes. Don't judge doneness straight from the oven. They may appear still soft but please note that they do crisp up further as they cool down. So you don't want to bake them too long either
Cooling:
- Let the bread cool down completely on a cooling rack and they will crisp up further
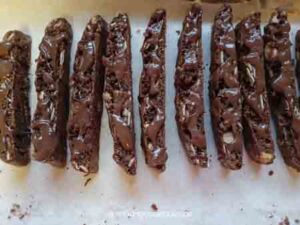
Decorate (optional):
- Put chocolate chips in a microwave-safe bowl and microwave at a 30 seconds interval until you see there are still few chips that almost melted but not quite. Continue stirring the the chocolate will melt
- Drizzle the bread with melted chocolate. Let the chocolate set and then store them in an air-tight container for 2 weeks. They were gone in one day at our house LOL!
*Nutrition facts are just estimates and calculated using online tools*
Important Tips
1. Use the Right Fat
Traditional recipes often use oil for a parve (non-dairy) version.
2. Don’t Skimp on Eggs
This recipe needs whole egg and egg yolk. This gives the cookie its slightly cakier texture compared to Italian biscotti.
3. Shape into Logs Evenly
Oil your hands or use lightly oiled parchment to shape the logs—this prevents sticking and flatten the logs slightly for more even baking.
4. Cool down after the first bake
This is to prevent the bread from crumbling if you slice it too early
5. Slice with a Serrated Knife
Use a sharp serrated knife and a gentle sawing motion to cut clean slices. You can cut diagonally for classic bakery-style appearance.
6. Let Cool Completely
Mandelbrot crisps up as it cools. Don’t judge doneness straight from the oven.
How to store mandel bread
1. Let them cool down completely on a cooling rack and keep them in an air-tight container for about a week
2. They can be kept frozen too. Simply wrap them up, about 4-5 pieces per batch, in cling wrap and then put them inside a freezer bag, push all the air out and seal the bag. Keep for about one month for the best result

Whether you enjoy it with your morning coffee, as an afternoon snack, or tucked into holiday gift boxes, its crunchy edges, tender center, and bursts of chocolate and almonds make it irresistibly satisfying. Once you master the basic technique, it’s easy to experiment with your own flavor twists. Make a batch (or two)—you’ll be surprised how fast they disappear!

