This post may contain affiliate links. Please read our disclosure policy.
Whether you’re a fan of traditional donuts or looking to explore new and exciting culinary delights, baked pon de ring donuts offer a unique and enjoyable experience. Their eye-catching appearance, chewy texture, and delicious flavors make them a must-try treat for donut lovers seeking something out of the ordinary.

I’m seriously floored by the number of shops that have popped up in just one mall that sells mochi donuts! When we were in Seattle, we went to this mall and there were at least five different shops that sell mochi donuts and probably close to eight shops that sell boba tea!!! They sure have taken America by storm LOL!
What is pon de ring
Pon de Ring is a popular and distinctive style of donut that originated in Japan and has gained international recognition. It is a creation of the famous Japanese donut chain, Mister Donut. The name “pon de ring” is derived from the Japanese phrase “pon deh ringo,” which means “a bunch of apples” due to its apple-like appearance. Mochi donut doesn’t use yeast. Instead, it depends on baking powder to leaven the dough.
The unique shape
Pon de Ring donuts are known for their unique shape and texture. Unlike traditional donuts, which are typically round with a hole in the center, Pon de Ring donuts are formed into a series of small, interconnected spheres. The donut dough is shaped into small balls and arranged in a circular pattern, creating a visually appealing ring shape.
The texture makes it unique
What sets the baked mochi donut apart is its distinctive texture. The mochi adds a pleasant chewiness to the traditionally light and fluffy donut, resulting in a delightful contrast. Biting into a baked mochi donut offers a unique sensation, with the perfect balance of softness and elasticity.
The rise of the mochi donut
Initially, mochi donuts were predominantly found in Japan. However, their popularity quickly spread beyond Japan’s borders, captivating the international food scene. Mochi donuts have gained immense popularity due to their chewy texture, which sets them apart from traditional donuts. The combination of mochi’s distinctively soft and sticky consistency with the sweet and fluffy qualities of a donut has captured the attention of dessert enthusiasts worldwide. No kidding!

My version of baked pon de ring
Traditional pon de ring is cooked by deep-frying, like traditional American donuts. I decided to do the baked version. I love donuts, the deep-fried version, but I hate deep-frying 🙂 The other day when I made Korean Sesame Mochi Bread, it dawned on me that I could use the same dough to make baked pon de ring. The result is quite satisfying. Soft and chewy!
Endless flavor combinations
One of the reasons for the widespread appeal of mochi donuts is the vast array of flavors available. While traditional flavors like vanilla, chocolate, and matcha remain popular, creative and unique variations have emerged. From fruity flavors such as strawberry, mango, and passion fruit to indulgent options like caramel, cookies and cream, and even savory options like cheese or bacon, cheetos, takis, etc. There is a mochi donut flavor to suit every taste preference.

Baked Japanese Mochi Donut (Pon De Ring)
Ingredients
For the donuts:
- 25 g unsalted butter
- 35 g sugar
- 2 g salt
- 125 g whole milk
- 25 g all-purpose flour
- 110 g tapioca flour
- 50 g egg from one medium egg, you may need more
- 1 tsp vanilla extract or another flavor you want
For the glaze:
- 200 g Melting wafers or high-quality white chocolate
- 50 g heavy cream
- oil-based gel food color to avoid white chocolate from seizing
For topping:
Instructions
- The recipe doesn't use yeast, baking powder, or other chemical leavening agents. It depends on the egg and the high moisture of the batter to puff up in the hot oven. So it is important to get the right consistency for the batter
- Preheat oven to 375 F (190 C) for conventional oven, 350 F (180 C) for convection oven
- Get all the ingredients ready as once you start cooking the batter, you want to have them within your reach
- Beat 2 eggs in a bowl with a fork. You will not need all 2 eggs, but you will need at least 1 egg and a few teaspoons extra, depending on the consistency of the batter
Prepare the batter:
- Put butter, sugar, salt, and milk in a saucepan over low-medium heat. Just let it cook until the butter just melts but the milk is not boiling. This is important because if the milk is too hot and when you add the flour, the mixture turns very lumpy. Immediately add the flour and keep whisking with a whisk until it turns into a paste. Turn off the heat. Add the tapioca starch and switch to a spatula to combine. The mixture seems very dry and impossible to mix at first but just keep mixing. It should turn into a smooth and very thick paste, like a dough
- I put a trivet on the scale and the saucepan on top of it, tare the scale to make sure it's zero and add 50 grams of beaten egg. Use a spatula and keep stirring until they are combined. It seems difficult to combine at first and the batter and eggs separate but just keep stirring and it will turn into smooth shiny paste
Test the consistency of the batter:
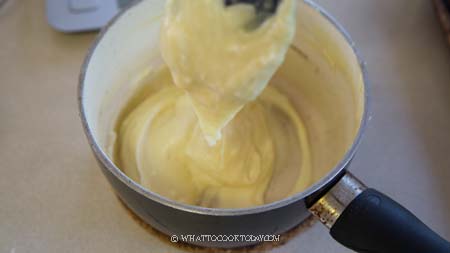
- Do a "V" test. When you pull the batter up with a spatula, it flows off smoothly and some batter would hang down from the spatula forming a "V" shape. The batter would look smooth and shiny too. If the batter doesn't fall off and just hang on the spatula and looks very thick and choppy, add about 1 teaspoon of beaten egg and mix again. Test the consistency again and add more eggs as needed until you reach the consistency described. I ended up using a total of 52 grams of egg and sometimes up to 54 grams of eggs. It all depends on how much liquid has evaporated when you cook the paste and how much liquid the flour absorbs
- If the batter is not the right consistency, the donut will turn out dense and won't puff up properly. It depends on the moist batter to expand and grow in size during baking
Pipe the batter:
- You can draw 6 or 8 of 1-inch circles in a circular pattern to create a ring shape on parchment paper to be used as a "template" for you to pipe. I didn't use any. If you do use a template, place another parchment paper on top of the template. You don't want to pipe on the template.
- Transfer the batter to the bag and pipe following the template if you use one. If not, pipe about 1 inch-size batter, 6 or 8 of them, in a circular pattern to create a ring shape on parchment paper. Make sure you have about 1-inch gap in between each ring as the batter will expand a bit as it bakes.
- Dip your finger in water and smooth out the top of the batter so the top won't burn during baking
Baking:
- Pop this inside the oven (middle rack) and bake for the next 20-25 minutes. DO NOT open the oven door during this baking time. If the donuts deflate when you take them out from the oven, that means they are not cooked enough. Pop them right back into the oven and bake for another 3-5 minutes and check again
- Transfer the donut to a cooling rack to let them cool off completely before glazing them
Prepare the glaze:
- Put the melting wafers in a heat-proof bowl or microwave-safe bowl. Microwave for about 1 minute to soften. The chocolate won't melt completely yet
- Bring the heavy cream just to a simmer. DO NOT boil it. Pour this over the melting wafers and stir until all melts
- Divide the white chocolate up and put the color you like for each. When the chocolate is about 90 F (32 C). It is ready to be used
- Pick up the donut and dip into the colored chocolate and place on it a baking sheet lined with parchment paper. Repeat with the rest
- Add sprinkles, non-pareil, or any topping of your choice on top while the chocolate is not set yet. Allow the glaze to set
How to store:
- I do not recommend making this in a big batch. They are the best eaten on the same day. Because it is made mainly with tapioca starch, the donut can go stale pretty quickly
*Nutrition facts are just estimates and calculated using online tools*
How to bake mochi donut
1. The recipe doesn’t use yeast, baking powder, or other chemical leavening agents. It depends on the egg and the high moisture of the batter to puff up in the hot oven. So it is important to get the right consistency for the batter
2. Preheat oven to 375 F (190 C) for conventional oven, 350 F (180 C) for convection oven
3. Beat 2 eggs in a bowl with a fork. You will not need all 2 eggs, but you will need at least 1 egg and a few teaspoons extra, depending on the consistency of the batter
4. Put butter, sugar, salt, and milk in a saucepan over low-medium heat. Just let it cook until the butter just melts but the milk is not boiling. This is important because if the milk is too hot and when you add the flour, the mixture turns very lumpy. 
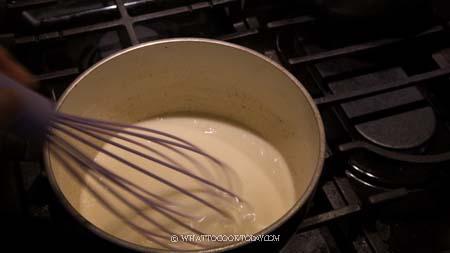
5. Immediately add the flour and keep whisking with a whisk until it turns into a paste. Turn off the heat. 
6. Add the tapioca starch and switch to a spatula to combine. The mixture seems very dry and impossible to mix at first but just keep mixing. It should turn into a smooth and very thick paste, like a dough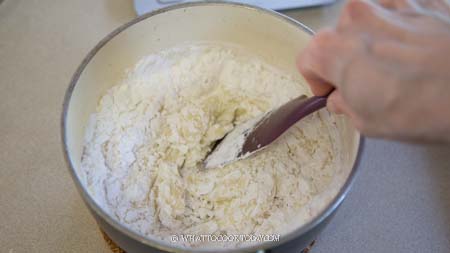

7. I put a trivet on the scale and the saucepan on top of it, tare the scale to make sure it’s zero and add 50 grams of beaten egg. Use a spatula and keep stirring until they are combined. It seems difficult to combine at first and the batter and eggs separate but just keep stirring and it will turn into smooth shiny paste
8. Do a “V” test. When you pull the batter up with a spatula, it flows off smoothly and some batter would hang down from the spatula forming a “V” shape. The batter would look smooth and shiny too. If the batter doesn’t fall off and just hang on the spatula and looks very thick and choppy, add about 1 teaspoon of beaten egg and mix again. Test the consistency again and add more eggs as needed until you reach the consistency described. I ended up using a total of 52 grams of egg and sometimes up to 54 grams of eggs. It all depends on how much liquid has evaporated when you cook the paste and how much liquid the flour absorbs
9. You can draw 6 or 8 of 1-inch circles in a circular pattern to create a ring shape on parchment paper to be used as a “template” for you to pipe. I didn’t use any. If you do use a template, place another parchment paper on top of the template. You don’t want to pipe on the template.
10. Transfer the batter to the bag and pipe following the template if you use one. If not, pipe about 1 inch-size batter, 6 or 8 of them, in a circular pattern to create a ring shape on parchment paper. Make sure you have about 1-inch gap in between each ring as the batter will expand a bit as it bakes. Dip your finger in water and smooth out the top of the batter so the top won’t burn during baking
11. Pop this inside the oven (middle rack) and bake for the next 20-25 minutes. DO NOT open the oven door during this baking time. If the donuts deflate when you take them out from the oven, that means they are not cooked enough. Pop them right back into the oven and bake for another 3-5 minutes and check again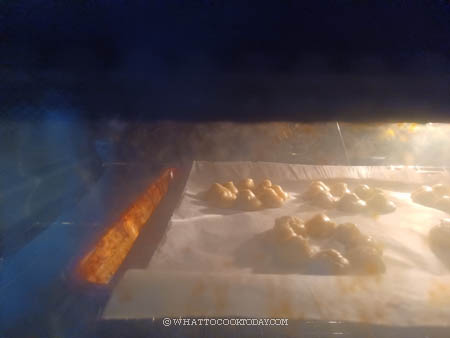
12. Transfer the donut to a cooling rack to let them cool off completely before glazing them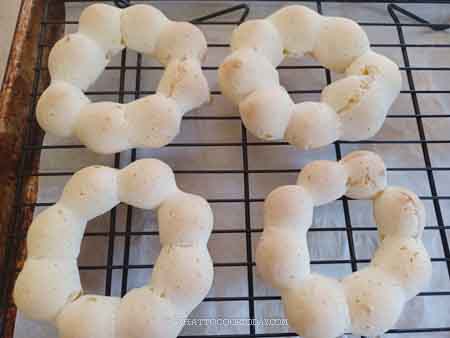
13. Put the melting wafers/white chocolate in a heat-proof bowl or microwave-safe bowl. Microwave for about 1 minute to soften. The chocolate won’t melt completely yet. Bring the heavy cream just to a simmer. DO NOT boil it. Pour this over the chocolate and stir until all chocolate melts. Pick up the donut and dip into the white chocolate and place on it a baking sheet lined with parchment paper. Repeat with the rest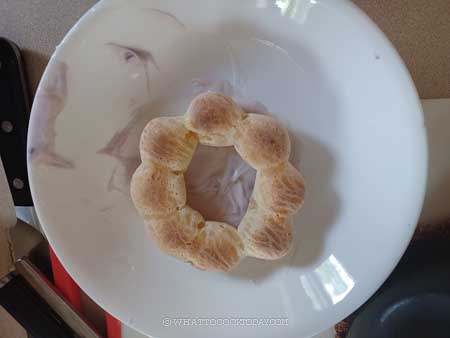
14. Add sprinkles, non-pareil, or any topping of your choice on top while the chocolate is not set yet. Allow the glaze to set
Did you make this baked mochi donut (pon de ring) recipe?
I love it when you guys snap a photo and tag it to show me what you’ve made. Simply tag me @WhatToCookToday #WhatToCookToday on Instagram and I’ll be sure to stop by and take a peek for real!

Fried mochi donuts
If you want to try out the original fried mochi donuts, here is the recipe

