This post may contain affiliate links. Please read our disclosure policy.
A delightful combination of soft fluffy milk bread with a buttery cookie crust shaped and scored to create a turtle shell pattern on the surface. This creative design adds a touch of whimsy to the traditional Melon Pan, elevating its visual appeal. The recipe for sourdough version is also available.

What is melon pan and turtle melon pan?
Melon Pan, also known as Melonpan or Melonpannā, first emerged in Japan during the early 20th century. Its exact origins remain unclear, but it is believed to have been influenced by European-style bread and pastries. The term “pan” is widely used to denote various types of bread, including Western-style bread, pastries, and baked goods. It has become an integral part of the Japanese culinary vocabulary. The name “Melon Pan” is derived from its appearance, as the round shape and characteristic grid pattern on the surface resemble the rind of a melon. Despite its name, Melon Pan does not contain melon flavoring. Turtle Melon Pan derives its name from its charming resemblance to a turtle. The pastry is shaped and scored to create a turtle shell pattern on the surface, complete with eyes, a head, and even legs.
What’s so special about melon pan and turtle melon pan?
Melon Pan has gained immense popularity in Japan and beyond. Its irresistible combination of a crispy outer layer and a soft, fluffy crumbs creates a delightful contrast of textures with each bite. Melon Pan consists of two key components: the sweet bread dough and the cookie crust. The bread dough is typically made using flour, yeast, sugar, butter, milk, and sometimes eggs. The dough is kneaded until it becomes soft and elastic before being left to rise. This process gives the bread its light and fluffy texture. The cookie crust, which gives Melon Pan its distinct appearance, is made from a mixture of flour, sugar, butter, and perhaps a hint of matcha or cocoa powder for added flavor and color. For turtle melon pan, the crust is scored to resembles the shell of a turtle.

Turtle-Shaped Melon Pan
Ingredients
If using commercial yeast:
- 135 g whole milk plus more as needed
- 250 g bread flour
- 50 g all-purpose flour
- 10 g milk powder
- 4 g fine sea salt
- 50 g sugar plus more for the topping
- 4 g instant yeast
- 30 g egg save the rest for cookie crust
- 30 g butter softened unsalted
For sourdough version: prepare sweet stiff starter
- 55 g active starter (100% hydration)
- 165 g bread flour (12.7% protein content)
- 65 g whole milk
- 30 g sugar
For the main dough:
- 58 g bread flour 12.7% protein content
- 50 g all-purpose flour
- 20 g milk powder
- 4 g fine sea salt
- 50 g sugar plus more for topping
- 30 g whole milk more as needed
- 30 g egg save the rest for cookie crust
- 30 g unsalted butter unsalted
For cookie crust:
- 120 g bread flour (12.7% protein content)
- 45 g icing sugar
- Pinch of salt
- 60 g unsalted butter softened
- 25 g egg
To color the cookie crust: (use any of the following)
- Food coloring of your choice
- 2 g matcha powder
- 2 g cocoa powder
Filling: (optional) – just an idea
Instructions
If using sourdough starter:
- This recipe will give you sourdough bread that doesn't taste sour. Why? Because we use a Sweet Stiff Levain, which is built from regular 100% hydration sourdough starter. I don't maintain stiff starter. I build it whenever I need it. I love baking enriched bread/buns and steamed buns using sweet stiff starter.
- I recommend using a starter that is at least two months old and consistently doubles or triples in 4-6 hours when you feed it at 1:1:1 ratio. Young starter will not give the best result
- Mix all ingredients for sweet stiff starter. Cover loosely with a plastic wrap or a lid. It takes about 10-12 hours to double. Since we are using milk instead of water, the stiff starter may not triple and only double, that's normal
Prepare the dough:
- Add all ingredients for the dough except for the butter. Tear the sweet stiff starter into pieces and add into the dough for sourdough version. Use the dough hook to stir the mixture a bit so the flour won't fly around when you start the mixer. Knead on the lowest speed for 2-3 minutes and then increase to speed 2 and knead for 3 minutes and then speed 4 for another 3 minutes or until it forms a dough that clears the side of the bowl, but not smooth yet
- Add the softened butter and knead on speed 2 for about 2-3 minutes and then increase speed to 4 and knead for 5 minutes or until the dough is soft, smooth, elastic, and slightly sticky to the touch. If you stretch a small portion of the dough thinly and gently, it shouldn't break. This is a windowpane stage
- It is important that the dough is soft, meaning, enough hydration. This will ensure you get a soft fluffy bread texture for more than 24 hours. If the dough feels firm, don't be afraid to add a bit more milk, one teaspoon at a time and knead until you get a soft smooth dough.
First proofing:
- Lightly oil the bowl, cover with a kitchen towel or loosely with plastic wrap, and let rise in a warm place for about 45 minutes to 1 hour, or until double in volume. if it's colder, it may take longer to proof the dough
- For sourdough version, proof for 2 hours at 82 F (28 C). The dough will not double and that's okay
Prepare the cookie crust:
- Combine the flour, salt, and icing sugar. Add butter and egg and combine into a soft dough
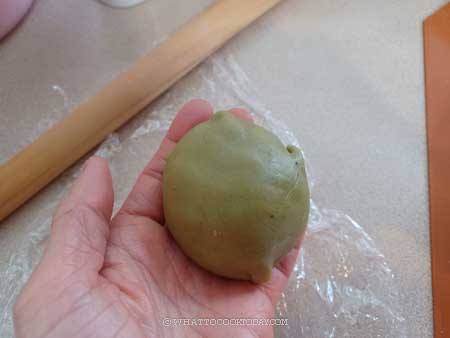
- If you choose to color the cookie dough into different colors, divide the dough accordingly. I use 3 different colors: cocoa powder, ube extract, red/pink gel food coloring. I divided the dough into 3. Add the color/extract/powder to the dough. Knead the color so it distributes evenly
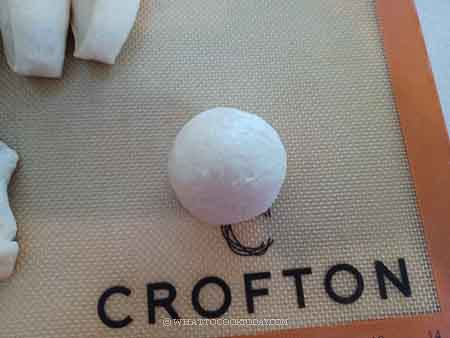
- Divide each color into 4 portions, so you get a total of 12. Roll each one into round balls. Keep them covered tightly in an air-tight container to prevent them from drying out. If it's really warm where you are, keep them in the fridge. Otherwise, you can keep them at room temperature
- We want the cookie dough to be soft and easy to roll out, but not too soft that it's sticky and hard to work with. If it's too sticky or the butter starts to melt, put them in the fridge for a bit to firm it up slightly. We also don't want the cookie dough to be too stiff or cold from the fridge because it's also hard to work with.
- If the cookie dough has been in the fridge, take it out to let it soften a bit for 15 minutes before the end of proofing
Shaping:
- Line two baking sheets with parchment paper
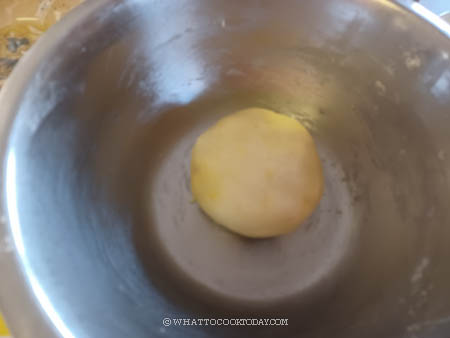
- Knock out all the gas by giving it some kneading. Divide the dough into 12 equal portions. Pinch off about 10 grams from each portion to make the head and 4 feet. Round them up into balls. Cover and let them rest for 5 minutes to relax the gluten
- Take one piece of dough and keep the rest covered. If you choose to use a filling, flatten slightly with your palm and roll it out into a 5-inch round circle, put the filling and wrap the dough around the cheese and pinch to seal tightly.
- If you don't want to use any filling, flatten the dough slightly with your palm and then stretch the edge towards the center and round it up into a taut dough ball. Repeat with the rest
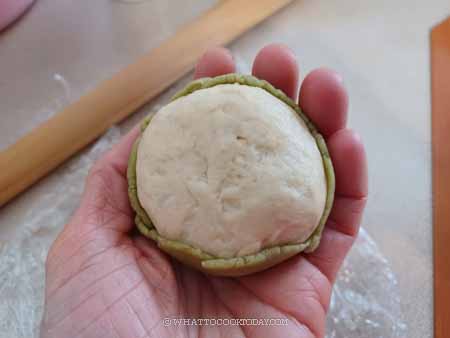
- Work with one cookie dough at a time. Take one dough and roll it out into larger than the main dough (the body of the turtle). Cover the dough with the cookie dough. Use a bench scraper to score the cookie dough to create that pattern. Dip the cookie dough part in a sugar. Place it on a prepared baking sheet, about 2 inches apart and repeat with the rest of the dough and cookie dough
- Next, round up the little doughs for the head and feet. Dab with a bit of water and attach them to each main dough. Each dough has 1 head and four feet. Dab the head with a bit of water and attach black sesame seeds on the head for the eyes
Final proofing:
- Cover and let them proof at a warm place until they are really puffy. This may take about 45 minutes to 1 hour. If it is colder where you are, it may take longer
- For sourdough version, this may take 3-4 hours, depending on the temperature and the strength of your starter
Test the dough:
- When you gently push on the dough, it should bounce back very slowly and leave some indentation. The dough is done proofing and start preheating your oven to 375 F (190 C) for a conventional oven. For a convection oven, lower the temperature by 20 F or 15 C
Baking:
- Place the pan in the middle of the oven and bake for 12-15 minutes or until the buns are lightly golden brown on top and a thermometer should register around 190 F (88 C) at the center of the bread
- Let the bread cool down on a cooling rack
Storing:
- Let the bread cool down completely. They can be kept in an air-tight container at room temperature for 2-3 days. The bread stays soft for 3 days in my case when stored properly
- For longer storage, transfer them to a freezer bag, push all the air out and seal the bag. Keep them in the freezer for no more than one month for the best result. Simply thaw at room temperature until soft again. You can reheat in the oven at 350 F (180 C) for 5 minutes or until they are warm.
RECOMMEDED TOOLS


*Nutrition facts are just estimates and calculated using online tools*

How to bake turtle-shaped melon pan
1. If using sourdough stater, prepare the sweet stiff starter. Mix all ingredients for sweet stiff starter. Cover loosely with a plastic wrap or a lid. It takes about 10-12 hours to double. Since we are using milk instead of water, the stiff starter may not triple and only double, that’s normal
2. Add all ingredients for the dough except for the butter. Tear the sweet stiff starter into pieces and add into the dough and add pandan essence for sourdough version. Use the dough hook to stir the mixture a bit so the flour won’t fly around when you start the mixer. Knead on the lowest speed for 2-3 minutes and then increase to speed 2 and knead for 3 minutes and then speed 4 for another 3 minutes or until it forms a dough that clears the side of the bowl, but not smooth yet
3. Add the softened butter and knead on speed 2 for about 2-3 minutes and then increase speed to 4 and knead for 5 minutes or until the dough is soft, smooth, elastic, and slightly sticky to the touch. If you stretch a small portion of the dough thinly and gently, it shouldn’t break. This is a windowpane stage
4. Lightly oil the bowl, cover with a kitchen towel or loosely with plastic wrap, and let rise in a warm place for about 45 minutes to 1 hour, or until double in volume. if it’s colder, it may take longer to proof the dough. For sourdough version, proof for 2 hours at 82 F (28 C). The dough will not double and that’s okay
5. Prepare the cookie crust. Combine the flour, salt, and icing sugar. Add butter and egg and combine into a soft dough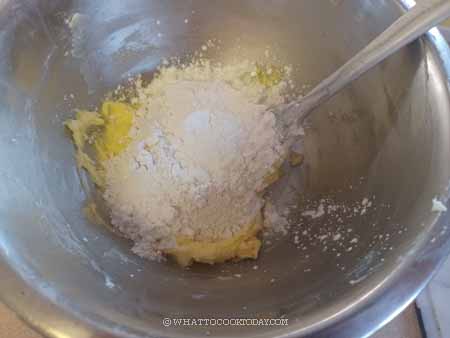
6. If you choose to color the cookie dough into different colors, divide the dough accordingly. I use 3 different colors: cocoa powder, ube extract, red/pink gel food coloring. I divided the dough into 3. Add the color/extract/powder to the dough. Knead the color so it distributes evenly
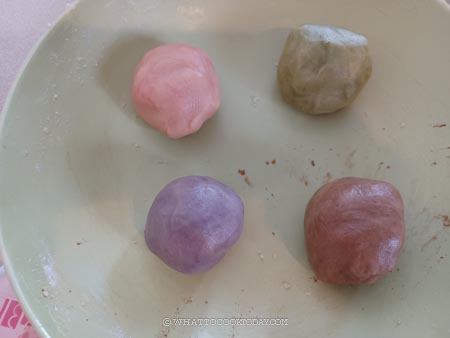
7. Divide each color into 4 portions, so you get a total of 12. Roll each one into round balls. Keep them covered tightly in an air-tight container to prevent them from drying out. If it’s really warm where you are, keep them in the fridge. Otherwise, you can keep them at room temperature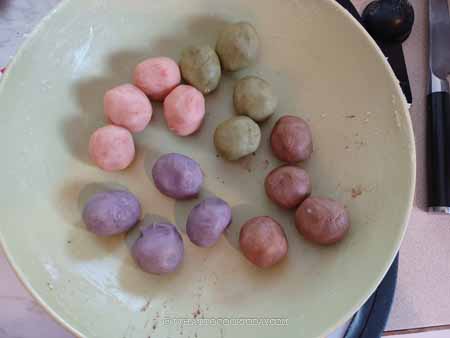
8. Line two baking sheets with parchment paper.Knock out all the gas by giving it some kneading. 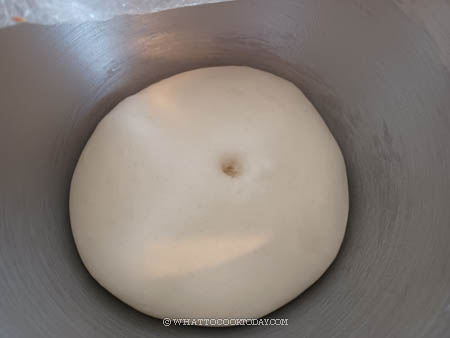

9. Divide the dough into 12 equal portions. Pinch off about 10 grams from each portion to make the head and 4 feet. Round them up into balls. Cover and let them rest for 5 minutes to relax the gluten
9. Take one piece of dough and keep the rest covered. If you choose to use a filling, flatten slightly with your palm and roll it out into a 5-inch round circle, put the filling and wrap the dough around the cheese and pinch to seal tightly.


10. Work with one cookie dough at a time. Take one dough and roll it out into larger than the main dough (the body of the turtle) in between two cling wraps. 
11. Gently drape the cookie dough on top of the main dough (the body of the turtle) and mould it around the dough
12. Use a bench scraper to score the cookie dough to create that pattern. 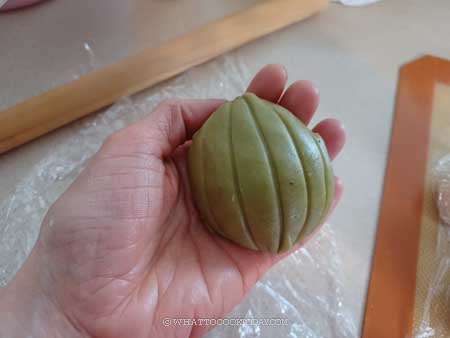

13. Dip the cookie dough part in a sugar. Place it on a prepared baking sheet, about 2 inches apart and repeat with the rest of the dough and cookie dough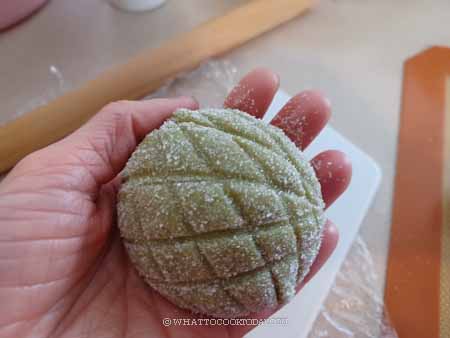
11. Next, round up the little doughs for the head and feet. Dab with a bit of water and attach them to each main dough. Each dough has 1 head and four feet.
12. Dab the head with a bit of water and attach black sesame seeds on the head for the eyes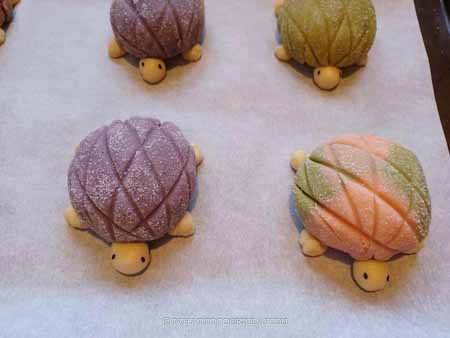
13. Cover and let them proof at a warm place until they are really puffy. This may take about 45 minutes to 1 hour. If it is colder where you are, it may take longer. For sourdough version, this may take 3-4 hours, depending on the temperature and the strength of your starter
14. Place the pan in the middle of the oven and bake for 12-15 minutes or until the buns are lightly golden brown on top and a thermometer should register around 190 F (88 C) at the center of the bread
15. Let the bread cool down on a cooling rack
Did you make this turtle-shaped melon pan recipe?
I love it when you guys snap a photo and tag it to show me what you’ve made. Simply tag me @WhatToCookToday #WhatToCookToday on Instagram and I’ll be sure to stop by and take a peek for real!


1 comment
Cool recipe, will definitely try it