This post may contain affiliate links. Please read our disclosure policy.
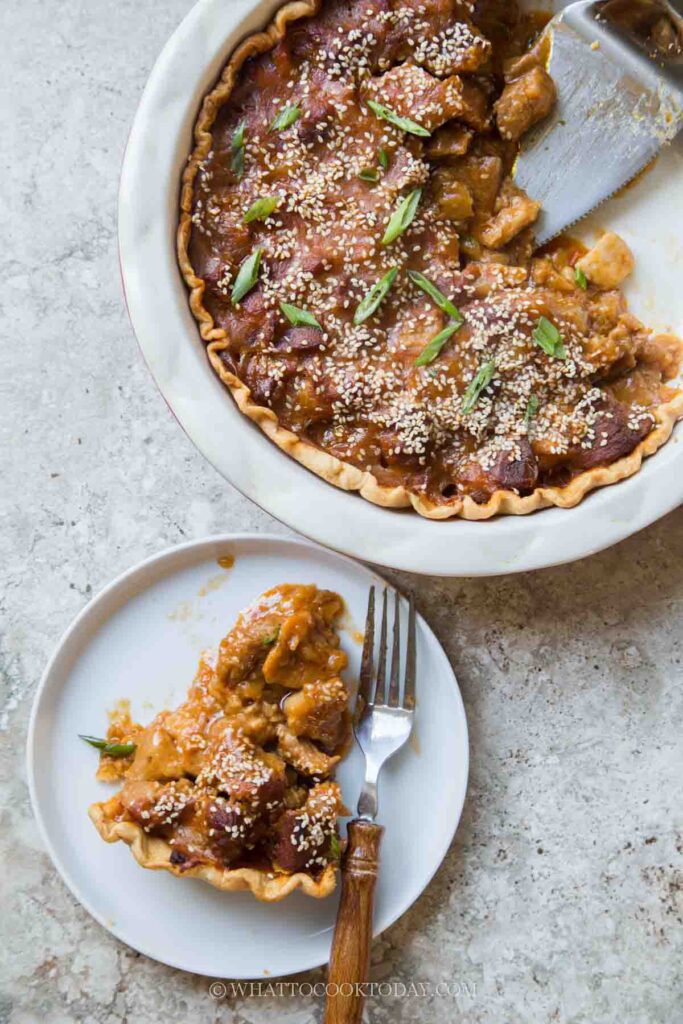
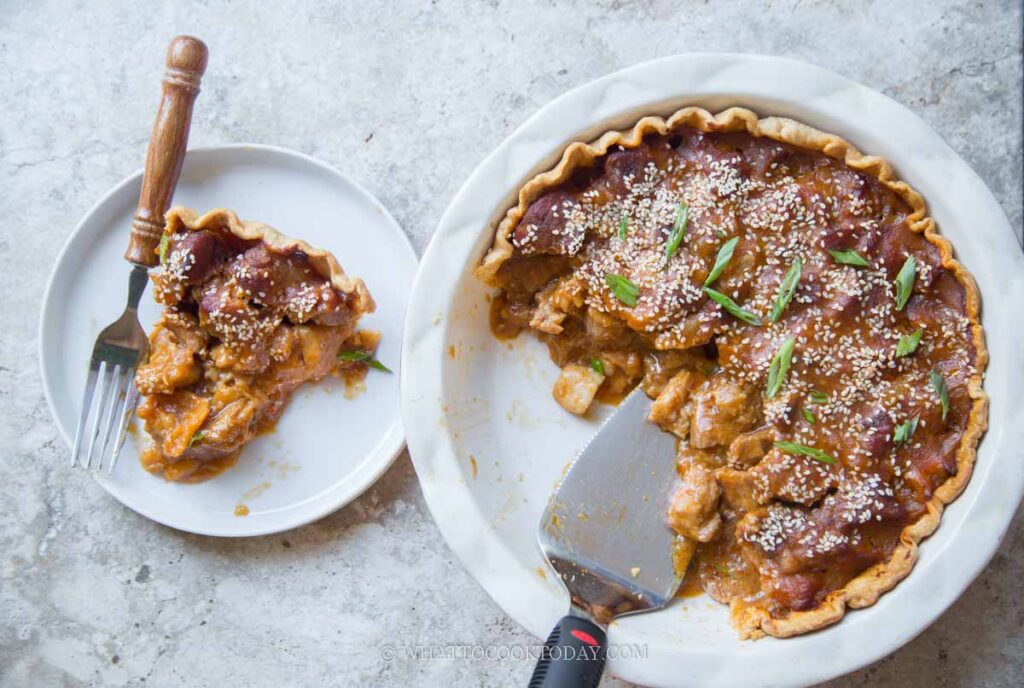
A savory gochujang pork baked in a flaky buttery pie crust, a comforting East-meets-West dish with bold, spicy, and umami flavors.
You know that moment when you realize you have an ingredient sitting in the fridge that’s just about to expire, and suddenly you feel this rush of creative energy to make something delicious with it? That’s exactly how this Gochujang Pork Pie came to be. I had a tub of gochujang that was nearing its end date, and instead of tossing it out, I decided to put it to good use. I thought, why not make a savory pork filling with gochujang, and even better, bake it in a buttery, flaky pie crust?
Asian fusion creations like this always get me excited, and this one turned out to be such a hit with my family. The gochujang gives the pork a rich, slightly spicy and savory depth, all wrapped up in a golden, crisp pie crust. Comforting, bold, and a little unexpected, everything I love in a dish.
Why You’ll Like This Recipe
- Perfect fusion of East meets West: Classic savory pie meets Korean gochujang for a comforting and unique combo.
- Make-ahead friendly: The pork filling and pie crust can both be prepared days in advance.
- Rich, spicy, and umami-loaded: The gochujang adds a deep flavor with just a mild spiciness
- Crowd-pleasing comfort food: I mean, a savory pork pie like this just screams comfort in a cold, crisp weather
Ingredients and Substitutions
- Pie crust: Use your favorite homemade all-butter pie crust or a good-quality store-bought 9-inch deep-dish crust.
- Pork shoulder: Perfect for slow cooking because of its marbling. You can also use pork belly, but that will make it a bit too greasy IMHO. You can also use beef if that’s what you prefer. Use beef perfect for stewing
- Gochujang paste: The key flavor here — Korean chili paste that’s savory, slightly sweet, and spicy. Adjust the amount to your taste.
- Onion, garlic, and ginger: These build the aromatic foundation of the filling.
- Chicken broth: Adds depth; water works fine too.
- Soy sauce and sugar: Balance out the spice and add that savory-sweet note.
- Cornstarch: To thicken the sauce so it stays nicely inside the pie.
- White sesame seeds: Add a little nutty crunch and visual flair.
Tips for Success
- Don’t skip the cooling time: The filling needs to set up so you get clean slices.
- Control the spice: Gochujang brands vary in heat level — start with less if you’re unsure.
- Double the filling: It freezes beautifully and can be used for rice bowls or wraps later.
- Make ahead: Both crust and filling can be prepared 1–3 days in advance.
Storage and Reheating
- Fridge: Store leftover pie in an airtight container for up to 3 days.
- Reheat: Warm slices in a 350°F oven for 10–15 minutes to crisp the crust back up.
- Freeze: Wrap cooled slices individually and freeze for up to a month. Thaw in the fridge before reheating.
Frequently Asked Questions
- Can I make this less spicy?
Absolutely. Start with 2–3 tablespoons of gochujang instead of 5, and taste as you go. You can also add a teaspoon of honey or more sugar to balance the spice. - Can I make this ahead?
Yes, this recipe is very make-ahead friendly! You can prepare the pork filling and crust up to 3 days in advance. Assemble and bake the day you plan to serve. - Can I freeze this pie?
Yes. Let the baked pie cool completely, wrap tightly with a cling wrap and a layer of aluminum foil, and freeze for up to 1 month. Thaw in the fridge overnight, then reheat at 350°F for about 20 minutes. - What side dishes go well with this pie?
A simple cucumber salad, coleslaw, or even kimchi pairs beautifully with the rich and spicy filling. - Can I use chicken or beef instead of pork?
Definitely! Chicken thighs or beef chuck are both great alternatives — just adjust cooking time until the meat is tender.
This gochujang pork pie is one of those “happy accident” recipes that ended up being way too good not to share. It’s hearty, spicy, savory, and just a little unexpected — all baked into a golden crust. If you love trying new fusion flavors, this might just become your next comfort food favorite.

Gochujang Pork Pie
Ingredients
- 1 9-inch homemade all-butter pie crust or use store-bought deep-dish pie crust
- 1 Tbsp oil
- 1 large onion thinly sliced
- 3 cloves garlic minced
- 1 inch ginger finely grated or minced
- 5 Tbsp gochujang paste
- 1.1 kg boneless pork shoulder cut into 1-inch cube
- 1 cup chicken broth or use water
Seasonings:
- 1 tsp sugar
- 1 Tbsp soy sauce
- Freshly ground black pepper
To thicken the sauce:
- 5 Tbsp broth from cooking the pork
- 3 Tbsp cornstarch
Topping:
- 2 Tbsp White sesame seeds
Instructions
Prepare the pork filling: (recommended to prepare the day or few days before)
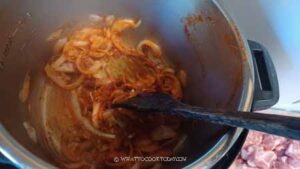
- If you are cooking on the stove, preheat 1 Tbsp of oil in a heavy-bottom pot. Add the onion, ginger, and garlic and saute for 3 minutes until the onion is soft and fragrant
- Add the gochujang paste and pork pieces and stir to mix everything evenly
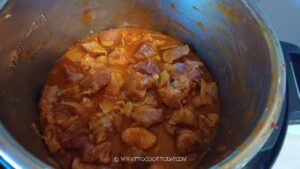
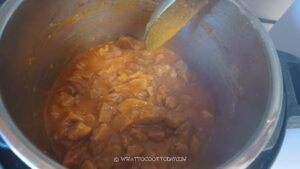
- Add the broth (or water), sugar, soy sauce, and freshly ground black pepper. Scrape the bottom of the pork as you stir everything to make sure nothing catches at the bottom of the pot and get burnt. Make sure all is well-combined
- Bring it to a simmer and then lower the heat and cover to let it cook until the pork is tender but doesn't fall apart, about 30 minutes. Test it with a pork. You can easily pierce it but still feel a bit of resistance. We will still bake this later so it will finish cooking in the oven. Proceed to thicken the sauce step below
- If using a pressure cooker like Instant Pot, press saute mode and when it says "hot" add 1 Tbsp of oil. Add the onion, ginger, and garlic and saute for 3 minutes until the onion is soft and fragrant. Add the gochujang paste and stir fry another minute

- Add pork pieces and stir to mix everything evenly. Add the broth (or water), sugar, soy sauce, and freshly ground black pepper. Scrape the bottom of the pork as you stir everything to make sure nothing catches at the bottom of the pot and get burnt. Make sure all is well-combined
- Turn off the saute mode. Close the lid and press "pressure cooker" and make sure it's on "high pressure". Set the timer to 10 minutes. Turn the pressure release valve to "sealing". When it's done cooking, let the pressure release naturally, which may take about 10 minutes or so. Then proceed to thicken the sauce

Thicken the sauce:
- There should be some juices released during the cooking process. Scoop out about 5 Tbsp of the liquid from the pot and let it cool down for about 5 minute. Whisk in 3 Tbsp of cornstarch. Carefully pour this into the pork and continue cooking over medium-low heat and keep stirring until the sauce thickens
- Remove the pot from the heat and let the pork cool down completely before cooking. Once it has cooled down completely, store it in a container and keep it in the fridge for up to 3 days
For the pie crust: (can be parbaked the day or few days before too)
- If you plan to make all-butter pie crust from scratch, you can use this my favorite all-butter pie crust recipe.
- Follow the instructions in the recipe to partially bake the pie crust and let it cool down completely before using. You can do this the day before. Once the pie crust have cooled down completely, cover with a cling wrap and it can be kept at room temperature until the next day
- If you plan to use store-bought, get the one for deep-dish 9-inch pie crust. Follow the instruction for full-baked pie crust and let it cool down completely before using
Assembling:
- Preheat the oven to 375 F (190 C) and positioned the oven rack at the lower 3rd of your oven
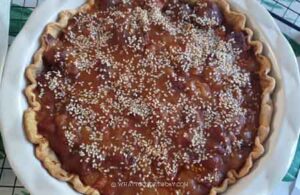
- Transfer the pork filling mixture onto the parbaked crust. It will be thick at this point because it's cold from the fridge if you prepared it the day or few days before. Sprinkle with sesame seeds.
- Place the pie plate on a baking sheet lined with parchment paper (to catch dripping if any). Place it on a positioned baking rack and bake for 40-45 minutes or until the sauce is bubbly at the edges

Cool down before cutting:
- I did a mistake and cut into the pie too soon, like 10 minutes after it's done cooking and the filling is still a bit "too runny"
- I recommend to wait for at least 30 minutes before you cut into the pie. The pie would still be "saucy" and you won't get a clean cut and that's okay. The meat on the top layer has some crisp edges from baking, while the inside of the pie is still tender and juicy
