This post may contain affiliate links. Please read our disclosure policy.
Soft, buttery, and rich brioche made using a sponge method. The rich, buttery flavor and light, fluffy texture make brioche a versatile bread that can be enjoyed on its own or used in a variety of sweet or savory dishes.

Nowadays when I go to a grocery store, I see brioche bread and its varieties pretty much everywhere. There are brioche burger buns, brioche hot dog buns, brioche dinner rolls, brioche sandwich loaf, brioche donuts, etc. Pretty much anything is “brioched” now 🙂
Why brioche is so popular?
In case you didn’t know already, brioche is a popular enriched bread from France. It is super buttery and rich thanks to the amount of butter and eggs used in the dough. I mean think of croissants but without the layers of lamination. Brioche is heavenly whether you eat it on its own, make a sandwich with it, make a dessert with it, and all kinds of stuff. The dough can be used to make savory or sweet bread. It is an indulgence bread if you ask me!
Use a standmixer to make a brioche
I do not recommend kneading by hand or using a breadmaker to make this recipe. The dough is too delicate and soft for hand kneading and for a breadmaker
Why I like this recipe
Some people ask me what is the secret to soft and buttery brioche? Really…it’s the butter and eggs and the slow rise! and in this case, the sponge method also helps with prolonging the shelf life and adding complexity to the flavor. I’ve tried several different brioche recipes and I find this one is really good and the recipe is less intimidating if you ask me.

Ingredients and substitutions
1. All-purpose flour
I usually used unbleached all-purpose flour with a protein content of about 10%. This produces a soft and fluffy texture. If you use bread flour, which has higher gluten, the texture will be chewier
2. Instant yeast
It is highly recommended that you use SAF Gold instant yeast. This yeast is designed specifically to be used for enriched dough like brioche or panettone. You can of course use regular instant yeast or active dry yeast, but they may work slower and you need to be patient
3. Sugar
I usually used granulated sugar
4. Eggs
I use large chicken eggs, which weigh about 50 grams without the shell. Make sure they are cold when you use them
5. Unsalted butter
You want to make sure the butter is really soft but not melting. This is important or your dough will be very oily when the butter melts and it won’t incorporate well into the dough
6. Salt
I use fine sea salt
Can I halve the recipe?
You can. It’s a bit harder to knead a small amount of dough in a stand mixer. You may have to readjust the dough throughout the kneading process, but it’s possible.
Important tips for successful brioche making
1. Use very soft butter BUT it shouldn’t be “melty”
2. Use a stand mixer to knead the dough on low speed. This is to avoid heating up the dough too much during the kneading process and the butter will melt as a result
3. It is very important to add the butter slowly, pat by pat, during the kneading process
4. It is important to chill the dough after the first proofing. The dough will be firm after chilling and easier to work with. It also adds complexity and amazing flavor to the finished product
5. It is important NOT to proof the dough at a very warm place like you would other yeasted bread. Brioche has high content of butter like croissants. The butter will separate and melt. So proofing time will be longer because we need to proof the dough at a cooler temperature than we normally would.
How to make brioche at home using a sponge method
1. Prepare the sponge (a least 2 hours before): Combine all ingredients for the sponge. The consistency is like a thick batter. 

2. Cover loosely and let it ferment for at least 2 hours. You can also let it ferment for 1 hour and then put it in the fridge for 24 hours until the next day when you are ready to prepare the dough. Just make sure to wrap it tightly with a cling wrap
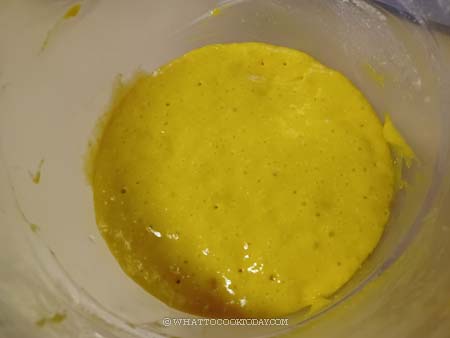
3. Prepare the dough: Combine all the ingredients in a bowl of a stand mixer fitted with a dough hook attachment. Turn the mixer to low speed (speed 2 on KA) and let it run until a rough dough is formed. Let it knead for another 10 minutes or until the dough is smooth and elastic. Do not crank up the speed. We need to make sure the dough is not overheated, which will melt the butter later.
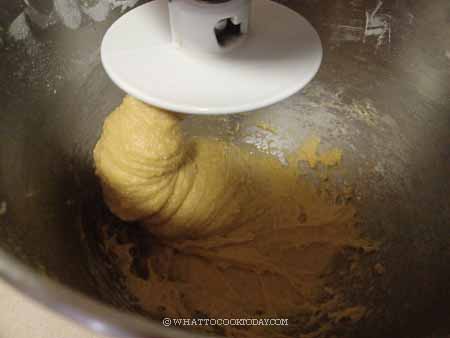
4. With the mixer still running, adding few pieces of butter at a time. Like a small pat at a time in about 20-30 seconds intervals. Once all the butter is in, let it knead again for another 15 minutes on speed 2 until the dough comes together but not entirely leaves the sides of the bowl. The dough will be very very soft, elastic, shiny, and tacky when touched but it shouldn’t stick to your fingers too bad. Please do not attempt to add more flour. This is the way it is supposed to be. It will firm up once you chill in the fridge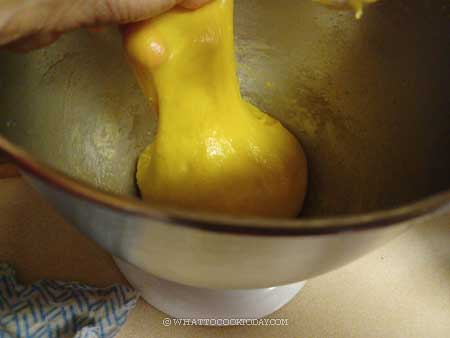
5. Oil your hands and pick up the dough. Place the dough in a large, lightly greased straight-sided bucket with a tight-fitting lid if you have one or any container with a lid. 
6. First proofing: Cover and let it ferment until double in volume at room temperature at around 75 F (24C) (not recommended at too warm of a place because we don’t want the butter to melt). This may take 1-2 hours or longer depending on the yeast 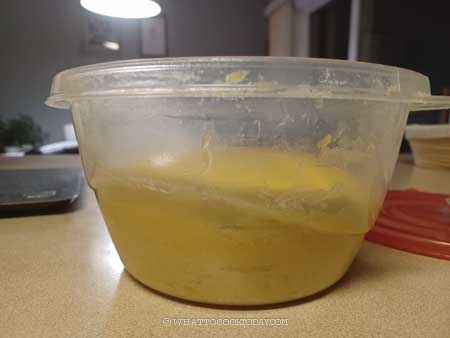
7. Chill the dough: Gently deflate the dough in the container using a lightly oiled spatula. Scoop the edge and fold it to the center to deflate the gas. Round it up into a dough ball and put it back into the container. Cover with a tight-fitting lid and put this in the refrigerator for at least 6 hours or up to 48 hours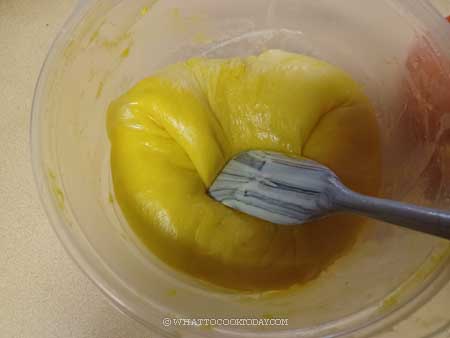
8. ShapingYou can use two 8 1/2 x 4 1/2 size loaf pans. You can also use two 9 x 5 inch loaf pan but the brioche will be shorter if you don’t mind that. Remove the dough from the fridge. Let it sit for about 30 minutes at room temperature, not warmer than 75 F (24 C). We don’t want to shape a very stiff dough. The dough is very easy to work with now because it’s cold and the butter is hardened and it won’t make a mess. To make two bread loaves, divide the dough into two portions of equal weight. Work with one dough at a time and keep the other one covered while you are working with the other one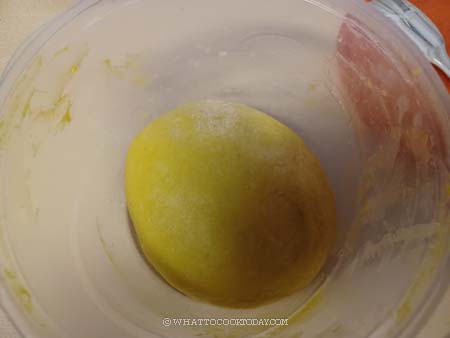
9. I didn’t do braiding with this brioche. I did the “faux” braiding. Divide each dough into 12 equal pieces. Work with one dough ball at a time, pull the edges towards the center, flip it over so the seam side is down, and roll it round with your palm into a tight dough ball. Repeat with the rest of the dough balls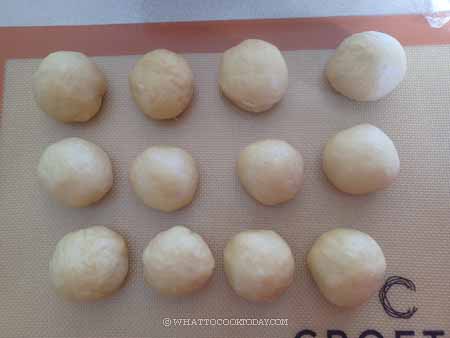
10. Arrange the dough balls into one loaf pan, 4 on one side and 4 on the other side, kinda in a zig zag pattern. Then arrange another 4 on the center. Repeat with the other dough balls in another pan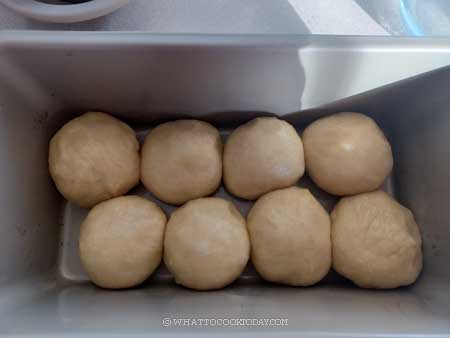
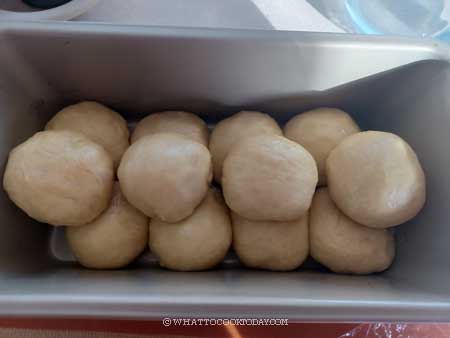
11. Final proofing: Cover the pan with plastic wrap sprayed with a bit of non-stick spray to prevent the dough from sticking to the plastic wrap as it rises. Let it ferment until doubles in size. It will almost reach the rim of the pan if you use 8 1/2 x 4 1/2 loaf pan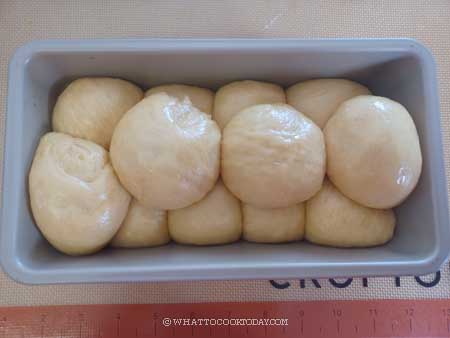
12. Baking: When you see that the dough is almost double, start preheating the oven to 350 F (180 C) for conventional oven, 330 F (165 C) for convection oven. Brush the top of the loaf with an egg wash for that shiny golden crust. Sprinkle with some Swedish pearl sugar on top or skip it if you prefer. I only have turbinado sugar and that’s what I use. I also sprinkle some white sesame seeds. These are not traditional, just my own touch LOL!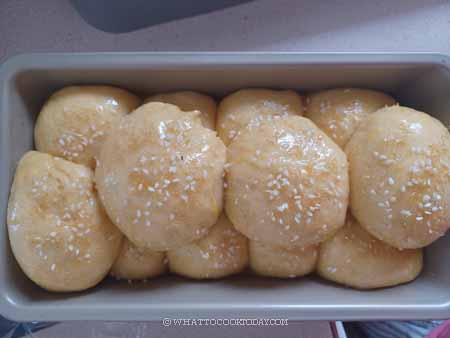
13. You can bake loaf pans or 8 x 8 or 9 x 9 pans side by side if your oven is wide enough, otherwise, I recommend baking one pan at a time. I get better results when I bake side by side or one pan at a time. For hamburger buns, bake one tray at a time. You can park the other proofed dough in the fridge to prevent them from over proofing while waiting for the oven
14. Bake in the middle rack (4th rack from the top for me) for 30-35 minutes or until an instant thermometer inserted into the middle of the loaf register 190 F (88 C). If the top browns too quickly halfway through baking, tent with an aluminum foil, shiny side up
15. Remove from the oven and let it cool down in the pan for 2-3 minutes and then remove to a cooling rack to let it cool down completely. Do not attempt to slice the bread while it’s still warm. Allow at least 2 hours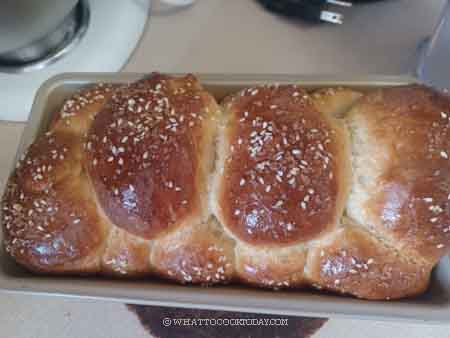

Now are you ready to enjoy your hard work ? 😉

No-Knead Brioche
If you don’t own a stand mixer, you can try to make this easy version of no-knead brioche. It’s actually a much “healthier” version of brioche but still yields a soft and fluffy bread. If you don’t like pandan flavor and just want a plain brioche, simply omit it and leave it unfilled.
Did you make this brioche using the sponge method recipe?
I love it when you guys snap a photo and tag it to show me what you’ve made. Simply tag me @WhatToCookToday #WhatToCookToday on Instagram and I’ll be sure to stop by and take a peek for real!

This recipe was last published in June 2016 and has been updated with an improved version using sponge method on March 14, 2023. The recipe is adapted from The Bread Bible’s by Rose Levy Beranbaum with some modifications in the process.
Soft and Buttery Brioche (Sponge Method)
Ingredients
Sponge:
- 60 g water
- 24 g sugar
- 100 g egg weight of 2 large eggs without the shell
- ½ tsp SAF Gold instant yeast or regular instant yeast
- 140 g all-purpose flour (about 10% protein content)
Dough:
- 320 g all-purpose flour (about 10% protein content)
- 50 g sugar
- 2 ½ tsp SAF gold instant yeast or regular instant yeast
- 1 tsp salt
- 200 g eggs (cold) 4 large eggs without the shells
- 226 g unsalted butter softened
Instructions
To take note of:
- This recipe makes 2 loaves or 16 large buns or 18 – 24 dinner rolls. You can halve the recipe but It's a bit harder to knead a small amount of dough in a stand mixer. You may have to readjust the dough throughout the kneading process, but it's possible.
- Ideal room temperature for making brioche is about 75 F (24 C). If you live in a tropical country, an air-conditioned room is definitely recommended
- I do not recommend kneading by hand or using a breadmaker to make this recipe. The dough is too delicate and soft for hand kneading and for a breadmaker
Prepare the sponge (a least 2 hours before):
- Combine all ingredients for the sponge. The consistency is like a thick batter. Cover loosely and let it ferment for at least 2 hours. You can also let it ferment for 1 hour and then put it in the fridge for 24 hours until the next day when you are ready to prepare the dough. Just make sure to wrap it tightly with a cling wrap
Prepare the dough:
- Combine all the ingredients in a bowl of a stand mixer fitted with a dough hook attachment. Turn the mixer to low speed (speed 2 on KA) and let it run until a rough dough is form. Let it knead for another 10 minutes or until the dough is smooth and elastic. Do not crank up the speed. We need to make sure the dough is not overheated, which will melt the butter later.
- With the mixer still running, adding few pieces of butter at a time. Like a small pat at a time in about 20-30 seconds interval. Once all the butter is in, let it knead again for another 15 minutes on speed 2 until the dough comes together but not entirely leaves the sides of the bowl. The dough will be very very soft, elastic, shiny, and tacky to the touch but it shouldn't stick to your fingers too bad. Please do not attempt to add more flour. This is the way it supposed to be. It will firm up once you chill in the fridge
Important tips:
- If your dough starts to get very oily, you know that the butter has melted and the temperature you are at is probably warm too. You can chill the dough in the fridge for few minutes and then continue the kneading. Which is why is important to maintain cool room temperature and to mix on a low speed
First proofing:
- Oil your hands and pick up the dough. Place the dough in a large, lightly greased straight-sided bucket with a tight-fitting lid if you have one or any container with a lid. Cover and let it ferment until double or near double in volume at a warm place, but not too warm. Try not to exceed 75 F (24 C) (we don't want the butter to melt). This may take 1-2 hours or a bit longer.
Chill the dough (at least 6 hours is mandatory):
- Gently deflate the dough in the container using a lightly oiled spatula. Scoop the edge and fold it to the center to deflate the gas. Round it up into a dough ball and put it back into the container. Cover with a tight-fitting lid and put this in the refrigerator for at least 6 hours or up to 48 hours
Shaping:
- You can use two 8 1/2 x 4 1/2 size loaf pans. You can also use two 9 x 5 inch loaf pans but the brioche will be shorter if you don't mind that
- Remove the dough from the fridge. Let it sit for about 30 minutes at room temperature, not warmer than 75 F (24 C). We don't want to shape a very stiff dough The dough is very easy to work with now because it's cold and the butter is hardened and it won't make a mess
- To make two bread loaves, divide the dough into two portions of equal weight. Work with one dough at a time and keep the other one covered while you are working with the other one
- I didn't do braiding with this brioche. I did the "faux" braiding. Divide each dough into 12 equal pieces. Work with one dough ball at a time, pull the edges towards the center, flip it over so the seam side is down and roll it round with your palm into a tight dough ball. Repeat with the rest of the dough balls
- Arrange the dough balls into one loaf pan, 4 on one side and 4 on the other side, kinda in a zig zag pattern. Then arrange another 4 on the center. Repeat with the other dough balls in another pan
Shaping varieties:
- To shape into hamburger buns, simply divide the dough into 16 equal-weight dough balls. Work with one dough ball at a time, pull the edges towards the center, flip it over so the seam side is down and roll it round with your palm into a tight dough ball. Repeat with the rest of the dough balls
- Arrange 6 doughs on each baking sheet lined with parchment paper. You will need three baking sheets and proceed to final proofing
- To shape into dinner rolls, you can use two 8 x 8 or 9 x 9 pans lined with parchment paper. simply divide into 18 or 24 (mini rolls) equal-weight dough balls. Work with one dough ball at a time, pull the edges towards the center, flip it over so the seam side is down and roll it round with your palm into a tight dough ball. Repeat with the rest of the dough balls. Arrange them in a 3 x 3 format (for 9 pieces each pan) or 3 x 4 format (for 12 pieces each pan)
Final proofing:
- Cover the pan with plastic wrap sprayed with a bit of non-stick spray to prevent the dough from sticking to the plastic wrap as it rises. Let it ferment until double in size. It will almost reach the rim of the pan if you use 8 1/2 x 4 1/2 loaf pan
How to tell if the dough is done fermenting:
- When you gently push on the dough, it springs back SLOWLY and leave some indentations. It won't fully spring back. The dough is ready to be baked. If it springs back immediately, it needs to ferment a bit longer. This may take 2-3 hours. Check it at one hour mark and see. It will be faster if you use SAF gold instant yeast
- If you gently push on the dough and it deflates the dough, it has been over-proofed. What you can do is to go ahead and deflate the dough and shape it again and start again. The result won't be optimal anymore, but it's better than baking an over-proofed dough, which will collapse later after baking and you end up with a dense gummy loaf
Baking:
- When you see that the dough is almost double, start preheating the oven to 350 F (180 C) for conventional oven, 330 F (165 C) for convection oven
- Brush the top of the loaf with an egg wash for that shiny golden crust. Sprinkle with some Swedish pearl sugar on top or skip it if you prefer. I only have turbinado sugar and that's what I use and I also sprinkle some white sesame seeds. These are not traditional, just my own touch LOL!
- You can bake loaf pans or 8 x 8 or 9 x 9 pans side by side if your oven is wide enough, otherwise, I recommend baking one pan at a time. I get better results when I bake side by side or one pan at a time. For hamburger buns, bake one tray at a time. You can park the other proofed dough in the fridge to prevent them from over proofing while waiting for the oven
- Bake in the middle rack (4th rack from the top for me) for 30-35 minutes for a bread loaf, 15-18 minutes for hamburger buns, 12-15 minutes for dinner rolls, or until an instant thermometer inserted into the middle of the bread registers 190 F (88 C)
- If the top browns too quickly halfway through baking, tent with an aluminum foil, shiny side up
Cool down:
- Remove from the oven and let them cool down in the pan for 2-3 minutes and then remove to a cooling rack to let them cool down completely. Do not attempt to slice the bread while it's still warm. Allow at least 2 hours


16 comments
Looks amazing! I love your photographs!
Thank you so much Natalie!!!!
Oops, I used the instant yeast instead of active yeast! Will they turn out brioche loaves?
Can I refrigerate more for 2 days as I’m at work tomorrow (didn’t realize it need to proof in fridge overnight)?
Thanks.
Hi Fann, you should be fine with instant yeast. No worries there! I’ve never tried it for 2 days, but I don’t think there should be a problem with that. Let me know how it turns out if you have the chance 🙂
Hi Marv,
Thanks for your quick reply. I have no guts to leave the dough in the fridge for another day. I baked it after I was back home in the evening. It’s 1am when I took it out from the oven. 😆
However, I read the article that the dough can be kept in refrigerator for up to 3 or 4 days. If at any point it grows to close to double it’s original size, go ahead and punch it down. When ready to bake, punch down the dough again (if necessary), shape, and allow to rise as if it had never taken its little nap in the refrigerator.
Thanks, Fann 😅
Hi Fann, oh my 1 am in the morning 🙂 I understand what you meant though. I have never let dough rest for that many days, but yes, I have heard that some doughs can be rested for that many days in the fridge before baking. I hope the brioche turned out for you ?
Thank Marv. The brioche bread turned out really well. However due to the amount of butter for brioche, I prefer to bake Hokkaido Milk bread of your recipe. It has now become my weekly routine to bake the bread 😅 but yet😋. No more buying from bakery since then.
Your recipes are so delicious 👍
Thanks to you, Marv (Marvelous)
Hi Fann, I know…I would rather do the Hokkaido milk bread too. I’m glad you like!!! 🙂 I haven’t eaten store-bought bread for a while too!
Hi Marv, it’s me Fann. I’m disheartened my hubby claimed that the bread I made seems ‘heavy’ unlike the bread store bought. Could it be the store has added bread improver or other stuff that makes it lighter? 😅
Please advise. With thanks, Fann
Hi Fan, oh no! you mean the brioche you made or the milk bread turned out heavy or both? 🙂 Btw, do you knead by hands or with a machine? Yes, the store-bought bread usually has bread improver and many other things that they add to prolong shelf-life and makes it lighter and airy.
Hi Marv,
Thanks for quick reply. I have been using breadmaker to knead dough. My hubby claimed both my brioche and milk bread are ‘heavy’. They are soft though straight from oven but get hardened the next day which requires microwave to soften. They are not as light and airy comparing to the store bought breads. Is it because the bread improver and preservatives that make the store bought bread lighter and airy? With great thanks, Fann 😅
Hi Fann, do you usually wrap them up in cling wrap after they’ve cooled down completely? I usually do that and then keep them in a zipper bag and they stay reasonably soft for about 3 days that way. And of course, they won’t stay soft for weeks like the store-bought one because of the preservative and additives they add to the bread and for homemade, we don’t use those.
Hi Marv, I usually place the bread in a container. I should have it cling-wrapped to keep soft 😉. My concern is my bread is not light and airy as compared to store bought. I have googled many websites, adding bread enhancer eg. liquid soy lecithin (emulsifier) or ginger powder or dry milk powder (2tbsp per loaf) can help. Will let you the the outcome. Thanks, Fann
I have added dough conditioner/bread improver before, it does somehow help to soften it. I’ve never tried liquid soy lechitin before though. Yes, please let me know what you discover. I’m sure many of us can benefit from that 🙂
I think I am making this. I cannot decide whether I should make your five spice cheese cake first or this one. Haha. Both look so good.
LOL! Brioche or chocolate cake…tough life right ?!?